Home Gym Details

Home Gym Details

Okay, we have something awesome for you today! I can hardly contain my excitement but first an update on our home gym progress.

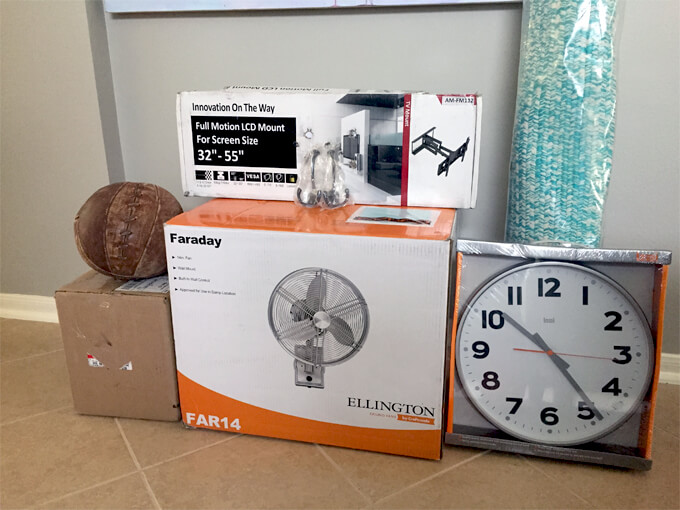
I wanted to share a few of the new items we have added to the gym over the last few weeks.
Home Gym Details

Ultimately, Brent and I decided that since we don’t have one room in our home entirely finished, it would be nice to pick out products that would round out our gym that were both functional and decorative.

That way once we are done with our last few DIY projects, the room will be complete and we will have our first room makeover done in our home.
Home Gym Details

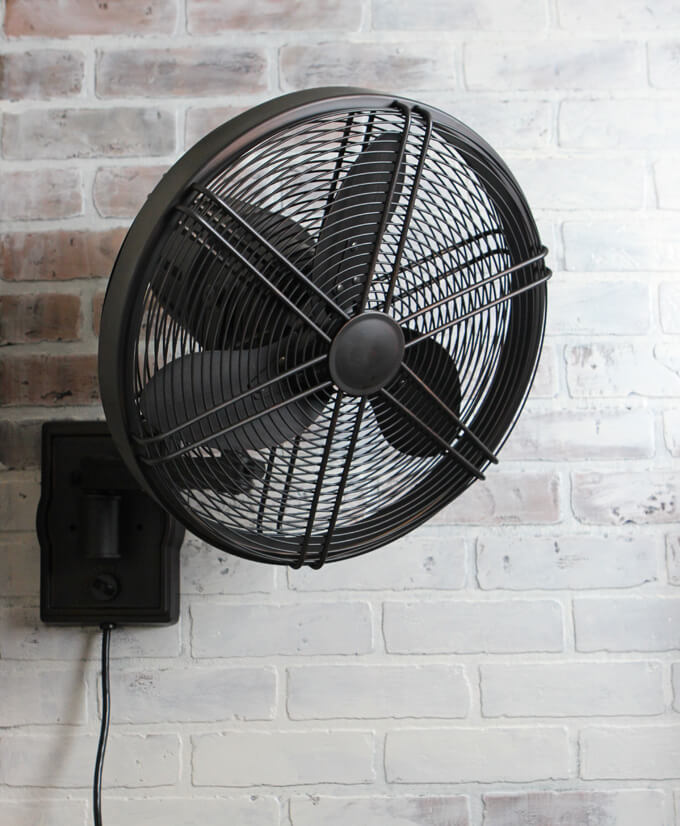
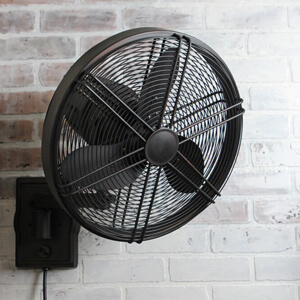
Our first pick was this wall fan. It checked all the boxes we were looking for in a fan for this room: wall fan, industrial style, oil-rubbed bronze finish and three speeds. We mounted it right above our treadmill and I have already tested it out a few times. It works like a charm. That is one perk of having your own home gym; you can literally mount a nice looking fan right across from the treadmill and blast it directly on your face full speed while you are running. It is heavenly. Plus, we think it looks pretty awesome against our faux brick wall.
Home Gym Details

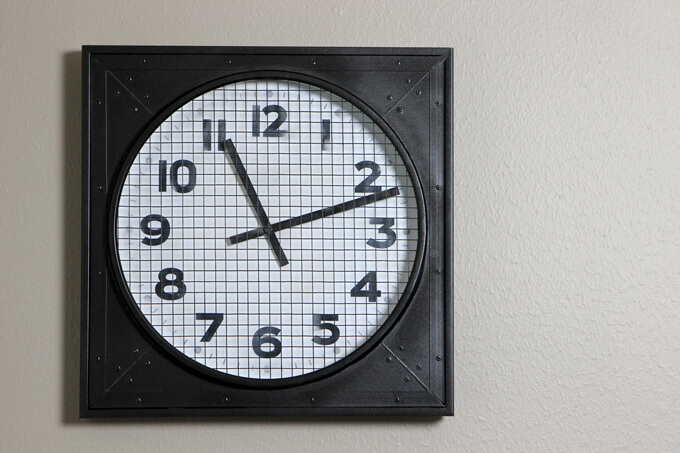
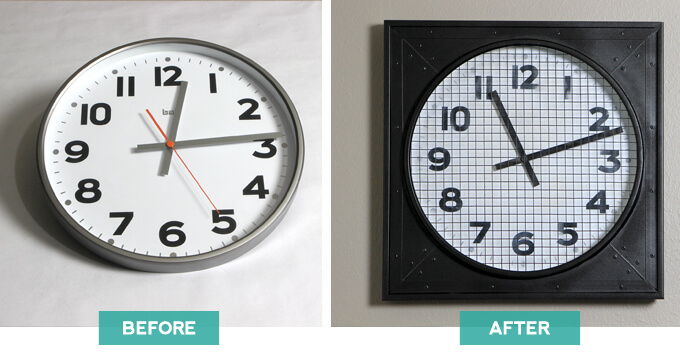
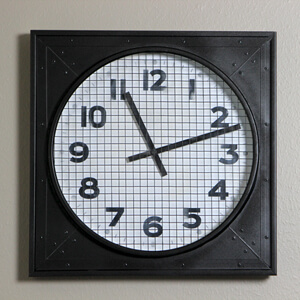
Another item we choose for the home gym was this wall clock. This particular clock didn’t match the style we were going for in our gym BUT we had big plans in store for it. What we liked about it was how simple it was, the large size, the block numbers and the beveled rim. It made for the perfect clock to use for our DIY vintage clock project.
Home Gym Details

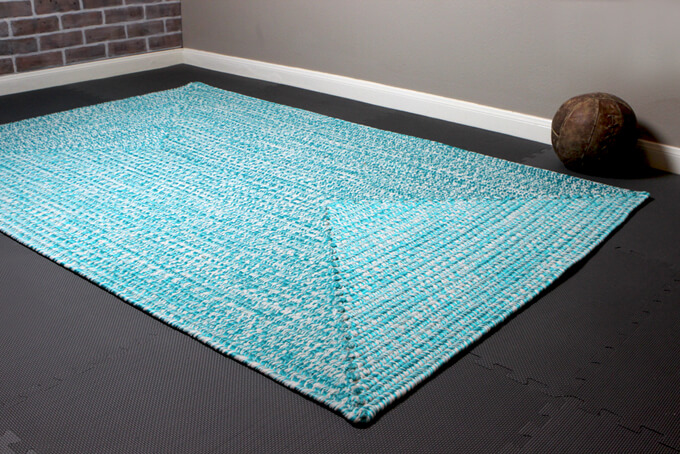
I wanted to add a rug to the gym that had some color to break up the space and to designate as the yoga area. When I found the this blue rug I knew it was the one. We liked the braided texture that gave the rug a relaxed and casual feel. It fits the space and style perfectly and once I got it in the room and looked at it up close I liked it even more. It has a cool pattern that I hadn’t noticed online.

A few other items we picked out for this room included a TV mount to hang our TV on the wall as well as some hooks that we will be using on the lockers we will be building.

Home Gym Decor

FYI: This post contains a few affiliate links to products we used to make this project. Gray House Studio does receive commissions for sales from these links but at no extra cost to you. We appreciate you supporting this site. Read our privacy and disclosure policy. You can also easily shop our recommended products here.

DIY Vintage Gymnasium Clock

DIY Vintage Gymnasium Clock

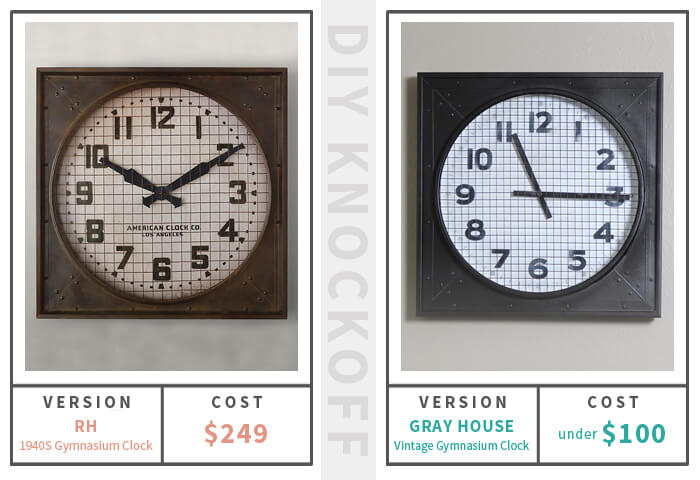
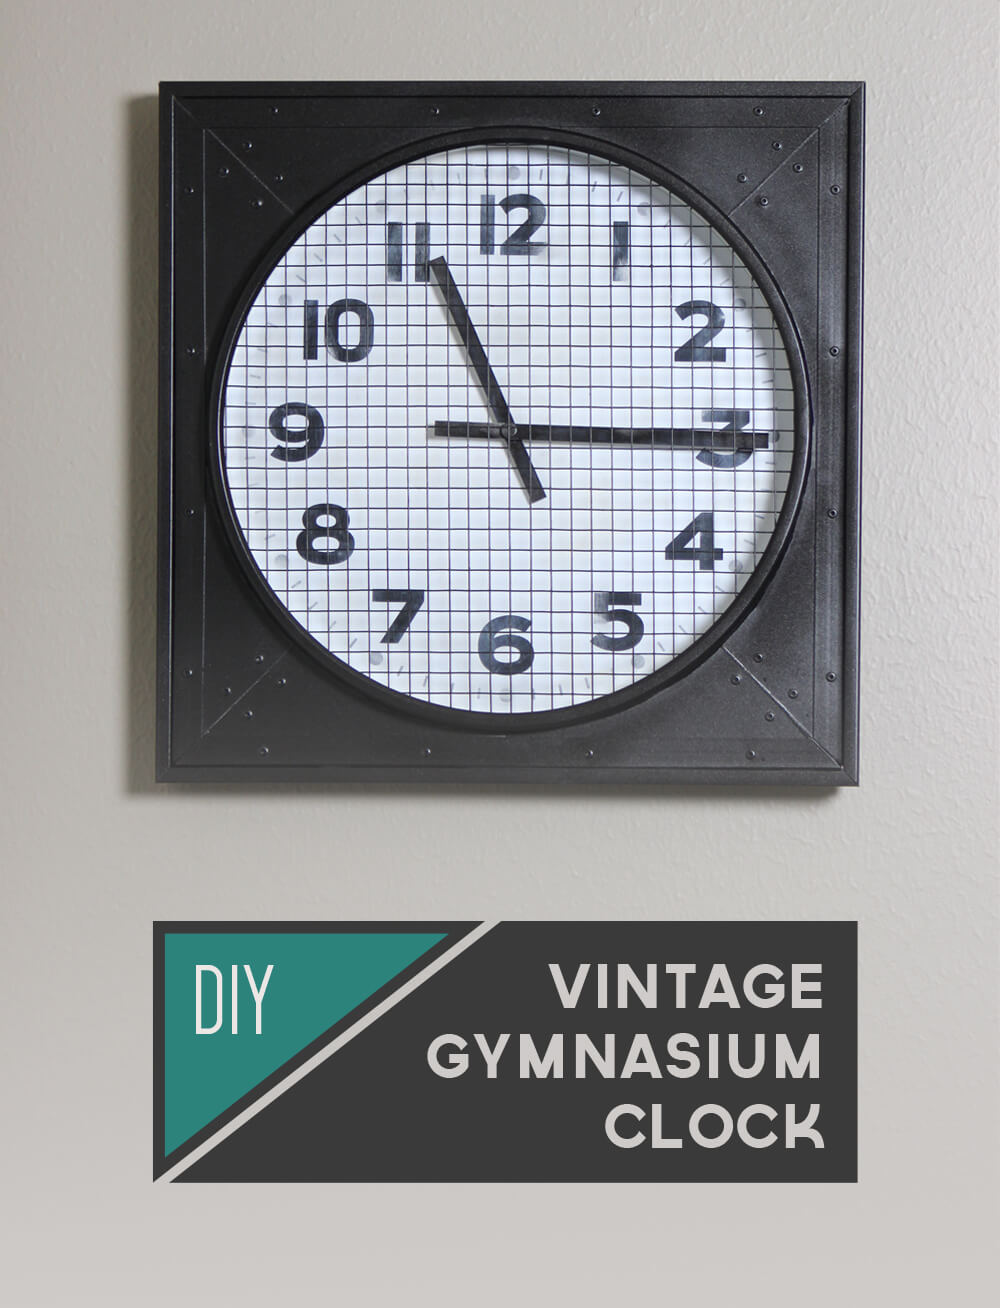
For this knockoff project we created our own DIY vintage gymnasium clock based on the Restoration Hardware 1940s Gymnasium Clock for our home gym.

DIY Vintage Gymnasium Clock

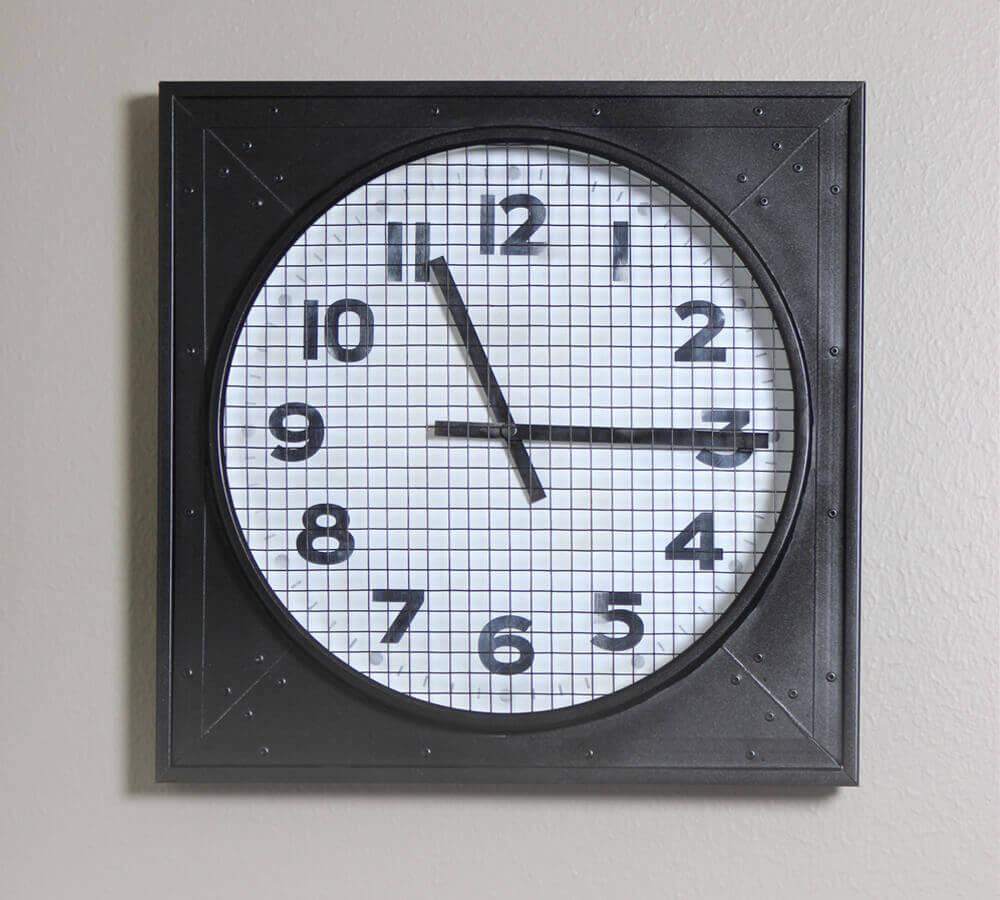
This weekend we completed another DIY project for our home gym makeover and it turned out awesome. We wanted to see if we could turn back time and if we could find a way… to make a brand new modern clock look like a vintage gymnasium clock. The style we are going for in our home gym is vintage & industrial so it just made sense to incorporate an old-fashioned gym clock with the metal grill.

DIY KNOCKOFF

DIY Vintage Gymnasium Clock
I found some great examples for inspiration but the Restoration Hardware 1940s Gymnasium Clock really hit both the vintage AND industrial look I was looking for perfectly. Brent took one look at it and was very confident we could make our own that looked just like it so I was extremely happy because we are on a budget with this room makeover and I couldn’t bare to hand over $200 for a clock, even if it is a really big, really cool clock.

So we made our own slightly smaller version of theirs using a basic clock. The whole project should have cost us around $80 but we actually got the clock with a gift card we won in a contest. Score! So our whole DIY vintage gymnasium clock project took about a day and cost us around $20. Ah, one less zero sounds so much nicer.

SUPPLIES

MATERIALS

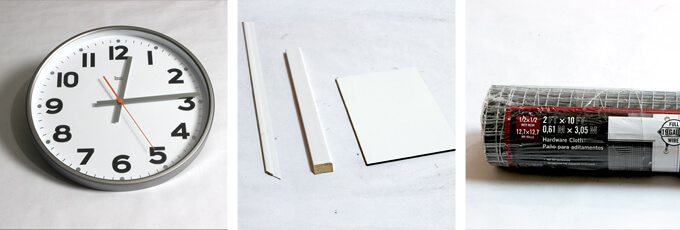
  • A Plain Wall Clock
  • Metallic Satin Oil Rubbed Bronze Spray Paint
  • 1/8 x 32-in x 48-in Markerboard Hardboard
  • 3/4-in Sequentia Wall Panel Moulding
  • 1.125-in x 7-ft Baseboard Moulding
  • Silver Galvanized Steel Hardware Cloth
  • 1/8-in Aluminum Rivets
  • White paint
TOOLS

  • Table saw
  • Router
  • Drill
  • Box cutter
  • Snips
  • 220-Grit Sandpaper
  • #0 Steel Wool Pad
  • Nail gun and finishing nails

DIY Vintage Gymnasium Clock

How We Made Our DIY Vintage Gymnasium Clock

DIY Vintage Gymnasium Clock
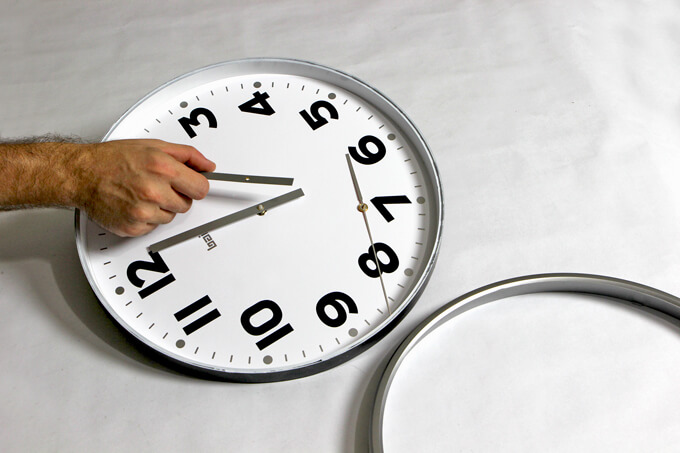
1. The first thing we did was to disassemble the clock. We pulled off the outer rim and piece of glass so we could we remove the hands off the clock by pulling them straight up from where they were connected to the center of the clock. We started with the hand on the top and then moved down one hand at a time.

DIY Vintage Gymnasium Clock
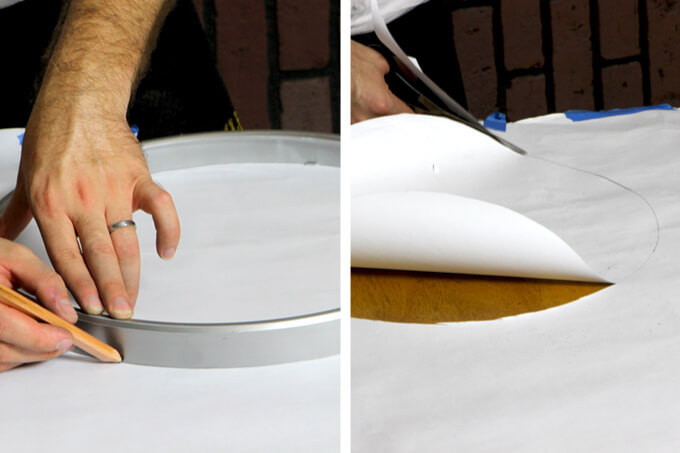
2. We traced the outer rim of the clock onto a large piece of paper and cut it out to use as a template. We set it aside for when we were ready to use it.

DIY Vintage Gymnasium Clock
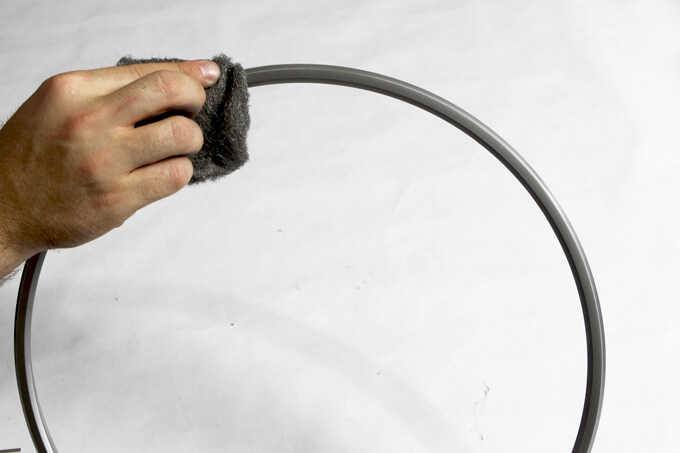
3. Next, we sanded the rim and the hands of the clock with a #0 steel wool pad to provide a rough texture for the spray paint to adhere to. We used steel wool because it leaves small enough scratches that the paint finish will still be smooth. The scratches left by sandpaper can be seen through the paint.

DIY Vintage Gymnasium Clock
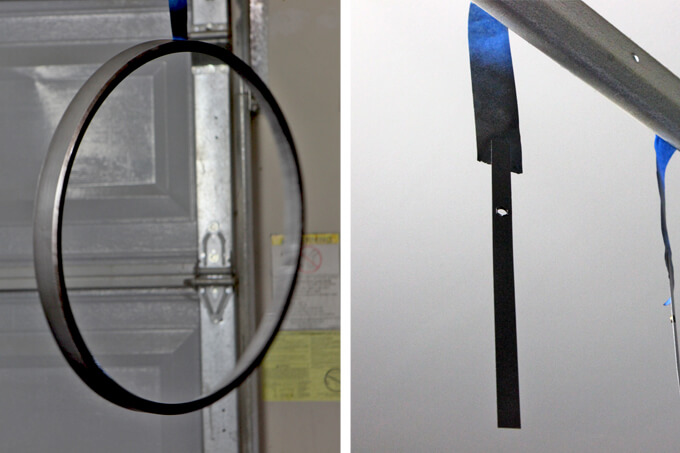
4. We spray painted the pieces we removed from the clock (the outer rim and the hands) with metallic satin oil rubbed bronze spray paint and hung them to dry so they would be out of our way.

DIY Vintage Gymnasium Clock
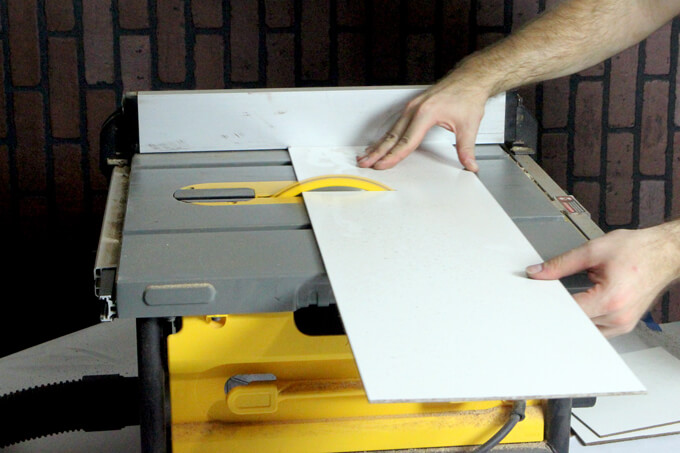
5 Then we cut the piece of hardboard down to the size of the square we needed to fit our clock. The square we cut was an inch and a half wider than the diameter of the clock. That gave us a 3/4 inch border around the clock, which is the same size as the moulding we were going to use.

DIY Vintage Gymnasium Clock
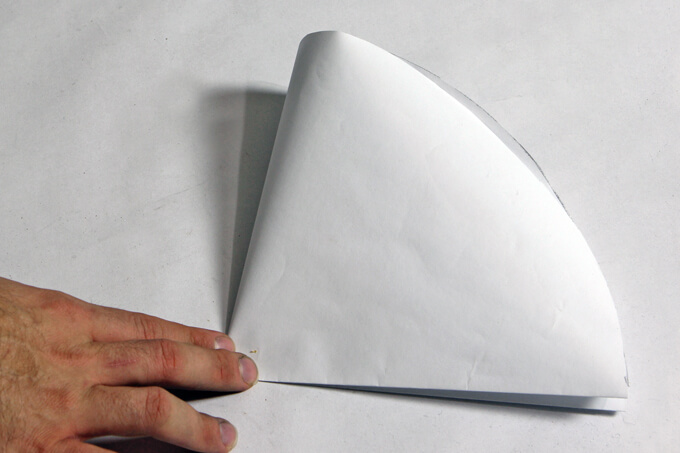
6. We took our paper template of the clock and folded it in quarters to get the radius of the circle, which was the length we needed to set up our router jig.

DIY Vintage Gymnasium Clock
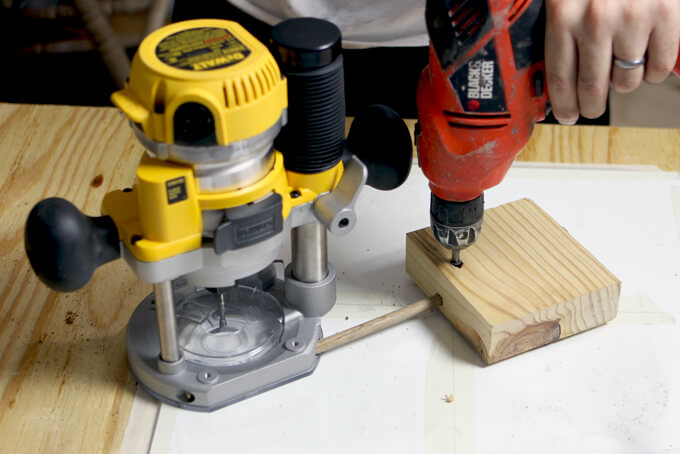
7. We cut a circle out of the square piece of hardboard with a router by attaching a scrap block of wood to the router base so it could rotate around a central point. We used the paper template to measure from the center point where we screwed into the board to the outside of the router bit.

DIY Vintage Gymnasium Clock
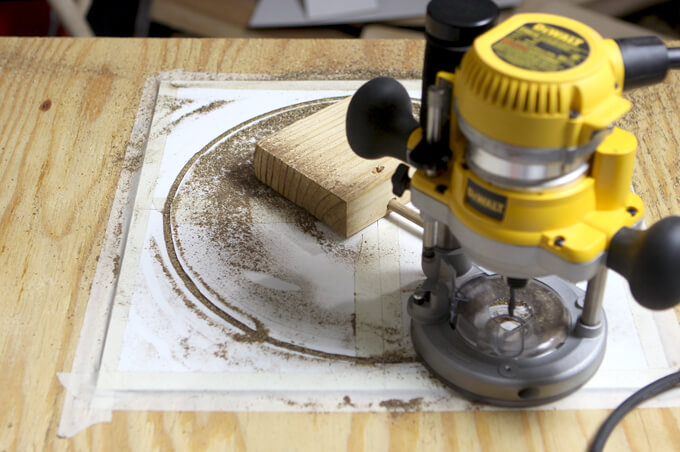
8. Once we had it set up, we turned the router on and plunged it into the board and rotated it until we completed our circle. We made sure we had a scrap board under the actual board we were cutting to protect our work surface and provide thicker material to secure the central screw.

DIY Vintage Gymnasium Clock
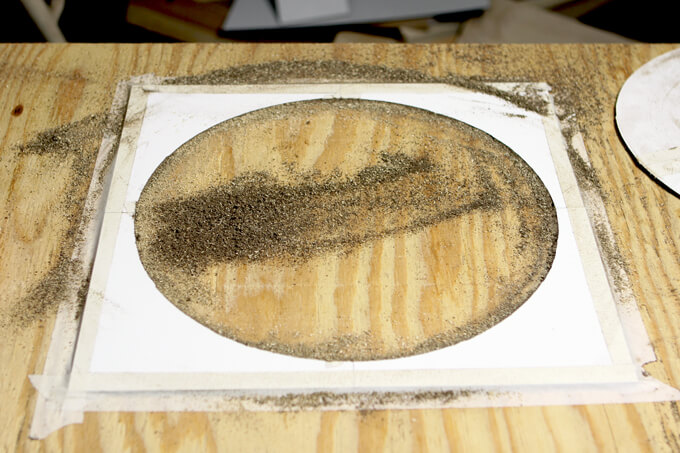
9. Once we were done with our circle we had a nice cutout where our clock would fit.

DIY Vintage Gymnasium Clock
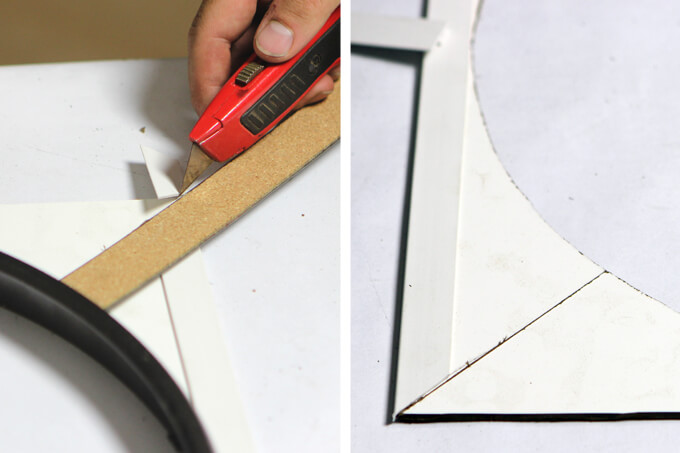
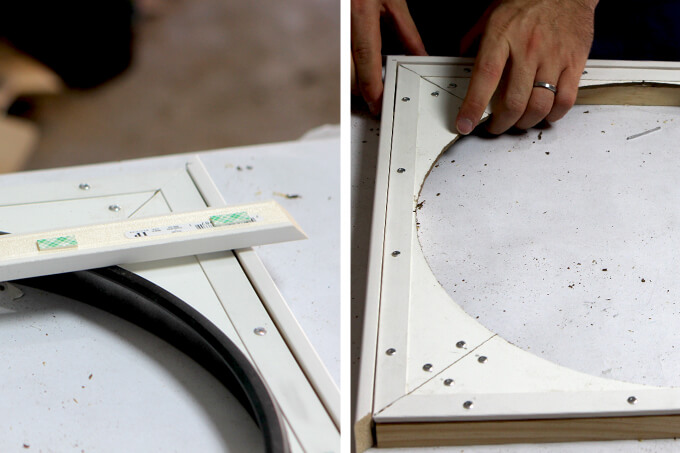
10. After attaching the 3/4 inch wall panel moulding over the rim of the hardboard, we took a straight edge and a box cutter and scored the board and the moulding at a 45-degree angle. We did this for each corner.

DIY Vintage Gymnasium Clock
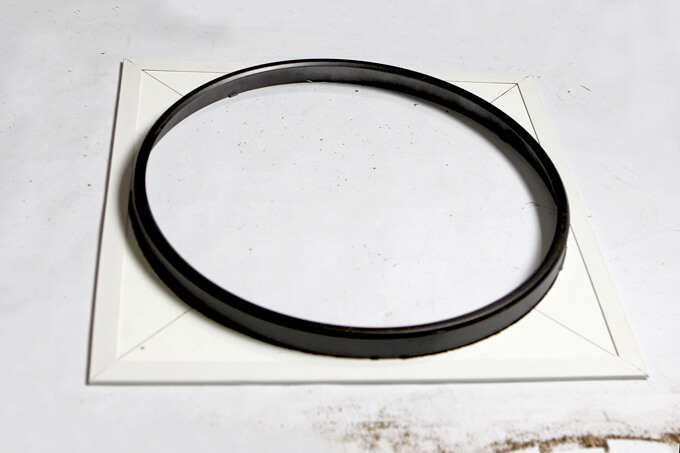
11. Once all the moulding was attached and each corner was scored, it looked like this.

DIY Vintage Gymnasium Clock
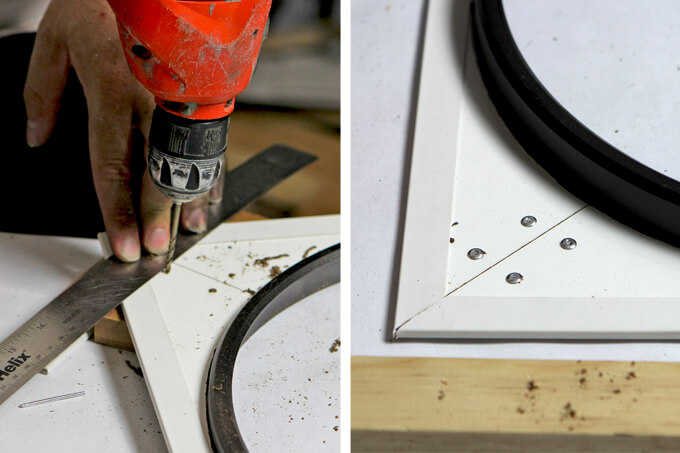
12. We drilled holes where all the rivets would go with a drill bit that matched the size of the rivets. We used 1/8th rivets so we used a 1/8-drill bit. Once we had the holes drilled, we added four rivets to each corner.

DIY Vintage Gymnasium Clock
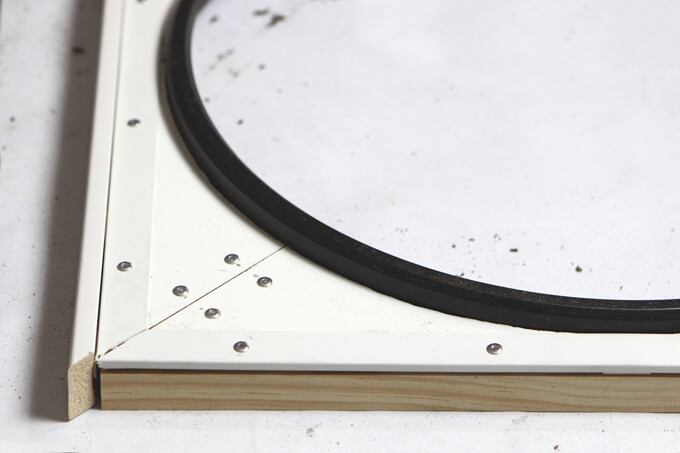
13. Then we attached four rivets on each side through our top board into a thicker board behind it to support the outer frame.

DIY Vintage Gymnasium Clock
14. We cut the baseboard moulding to frame the outside of the square at 45-degree angles using our miter saw. Then we attached it to the clock frame using mounting tape to hold it in place making it easer to secure it with finishing nails.

DIY Vintage Gymnasium Clock
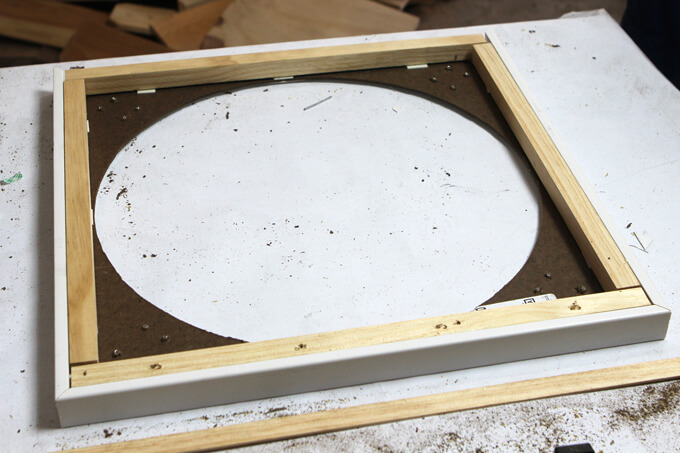
15. This is what the back of our clock frame looked like once we had all the pieces attached.

DIY Vintage Gymnasium Clock
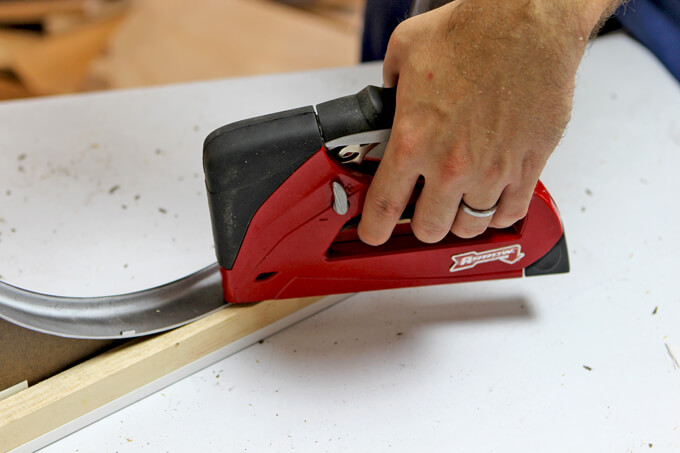
16. We secured the clock rim that we painted to the new frame we built with finishing nails.

DIY Vintage Gymnasium Clock
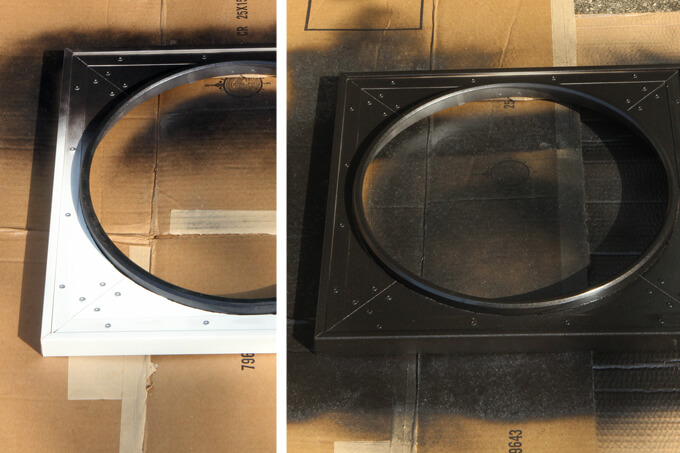
17. After our frame was complete, we spray painted the entire thing with the metallic oil rubbed bronze spray paint. We were pleasantly surprised with how convincing the spray paint made the plastic look like metal.

DIY Vintage Gymnasium Clock
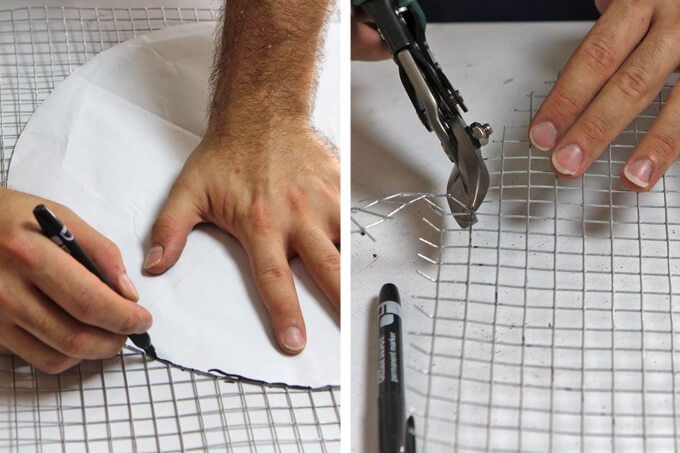
18. We took a piece of galvanized steel hardware cloth and traced an outline of our clock using our paper template and a permanent marker. We used tin snips to cut out the circle.

DIY Vintage Gymnasium Clock
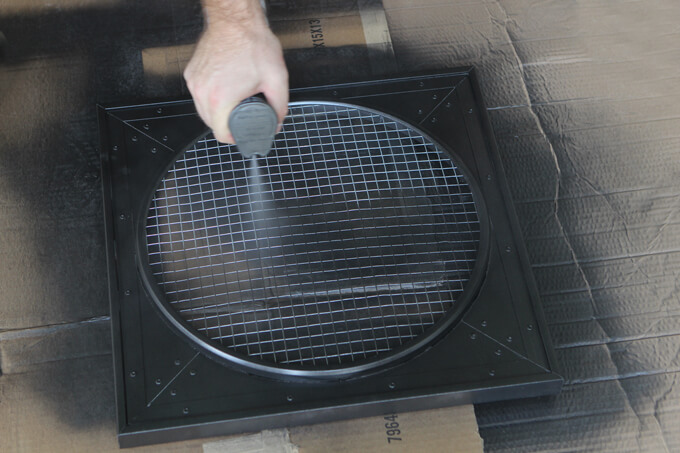
19 We inserted the metal mesh into the clock and spray painted it to match the rest of the frame.

DIY Vintage Gymnasium Clock
20. We used 220-grit sandpaper to distress areas on the face of the new clock to give it a more vintage aesthetic to match our new frame.

DIY Vintage Gymnasium Clock
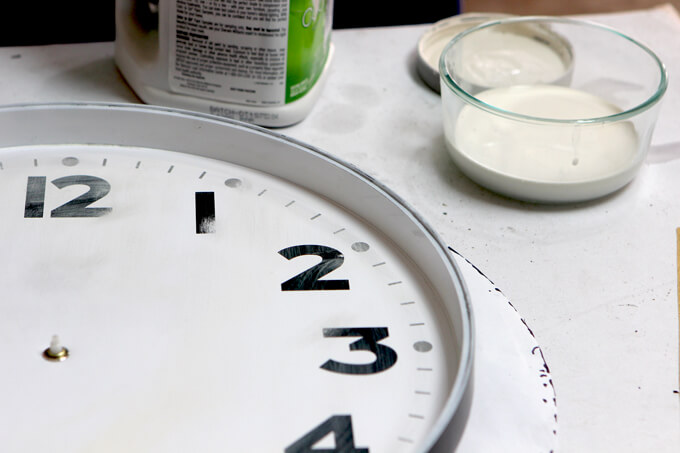
21. We also did a light wash with an off-white paint color to make it look less bright and white and more worn and aged.

DIY Vintage Gymnasium Clock
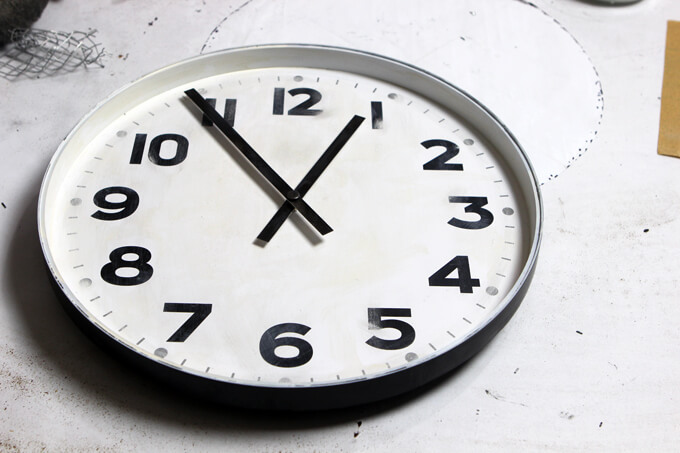
22. Then we reassembled the hands on the clock.

DIY Vintage Gymnasium Clock
23. Finally we snapped the clock back into the rim. We did not put back the glass because we replaced it with the hardware cloth. Then hung our DIY vintage gymnasium clock up in our gym!

DIY Vintage Gymnasium Clock
As I am sure you can tell we decided not to go full rust on the outer appearance of the frame of the DIY vintage gymnasium clock. We had intended on adding more colors to make it have a similar color but we ended up being happy with how the spray paint made the plastic look like metal and how it matched everything else in the room by being the darker oil rubbed bronze color.

DIY Vintage Gymnasium Clock
What a difference, right? It was so much fun to take this modern clock back in time. Pun intended.

I feel like every project we complete for this room transforms the space into an old warehouse just a little more. It is so much fun to work on this room because it is different. The DIY vintage gymnasium clock adds a special touch and has easily become one of my favorite decor projects we have done.

I know I have said it a million times but Brent really does rock at being able to figure out how to make things look exactly like I want just by looking at them AND he can figure out all the supplies we need in one trip to the hardware store just off the top of his head. We always end up with just the right amount of materials and stay on budget. He’s got skills.

PIN THIS PROJECT

DIY Vintage Gymnasium Clock

Super Easy Succulent Display

Super Easy Succulent Display

Super Easy Succulent Display

This project is actually not a new one. I did this one before we started the blog but it is sitting in my office and it caught my eye today and I realized I haven’t shared it yet and since I love it so much and it was super simple to put together I thought I would take the opportunity to show you this easy succulent display I made for our home office.

I’m sure I am in the majority when I say I am kind of obsessed with succulents. I love the colors, interesting shapes, uniqueness and simplicity. It is kind of impossible to have just one succulent. I wanted to create a display that highlighted how succulents come in a variety of shapes and sizes.

Super Easy Succulent Display

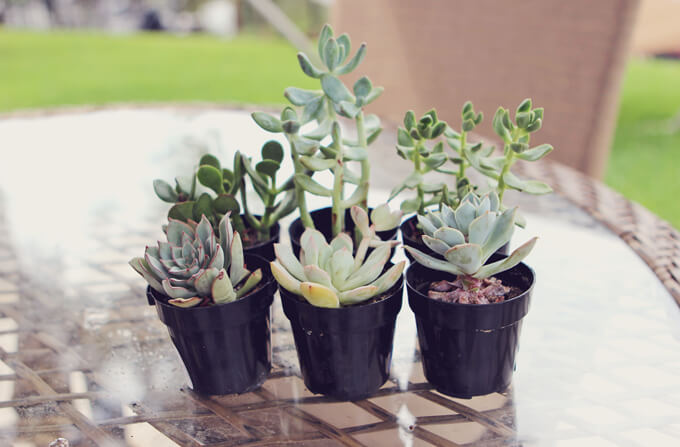
It was around this time last year I mentioned to my mom that I wanted to create a succulent display but I wasn’t sure what I wanted it to look like so we had a mother/daughter shopping day and brainstormed ideas along the way. We hit up the clearance section of Lowe’s and found they had all their cute little succulents half off. It was hard to pick my favorites but I finally narrowed it down to six that each had their own interesting appearance.

Super Easy Succulent Display

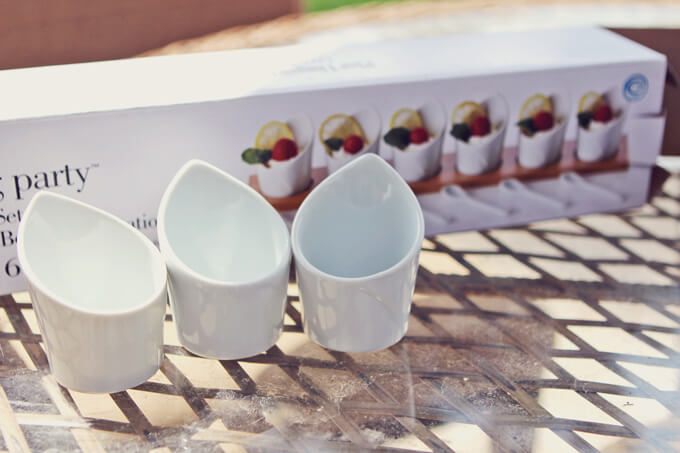
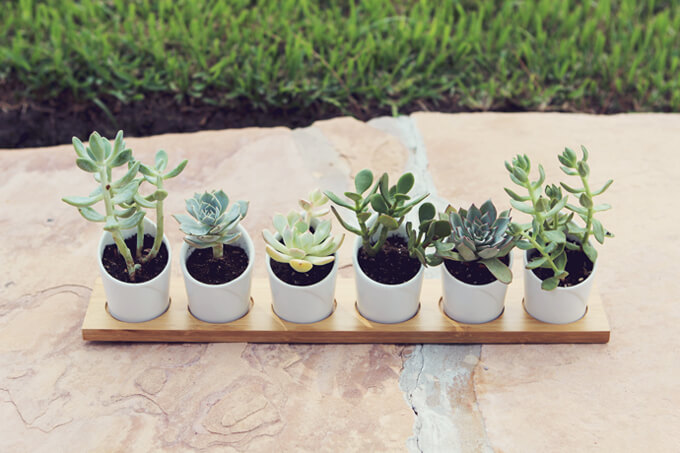
I still had no idea what I wanted to put them in or how to arrange them but our next stop was Pier 1. I figured they might have a cute bowl or mug fairly cheap that might make an interesting display. Then we found a tasting party set that had little unique shaped cups sitting on a bamboo tray that was perfect!

Super Easy Succulent Display

Even though we weren’t sure if they were going to fit, it was too good of an idea not to try and MAKE them fit. And when I went to check out, the set was on sale too! $11 for the cups, tray and as an added bonus, mini spoons! I obviously didn’t need the mini spoons for this project but I was pretty excited to have some mini spoons to eat with should the occasion arise. Who doesn’t love mini spoons?

Super Easy Succulent Display

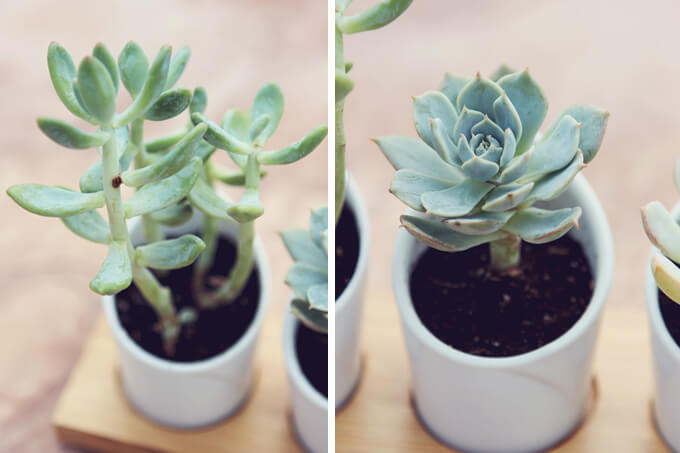
They were just the right size! I planted each succulent in a cup and arranged them on the tray based on height.

Super Easy Succulent Display

This was extremely easy to put together but I just love the results. I have been enjoying it for a year now and it makes the perfect desk decor for our office. It’s such a simple and cute way to show off my succulents collection.

Choosing the Right Home Gym Floor mats

Choosing the Right Home Gym Floor Mats

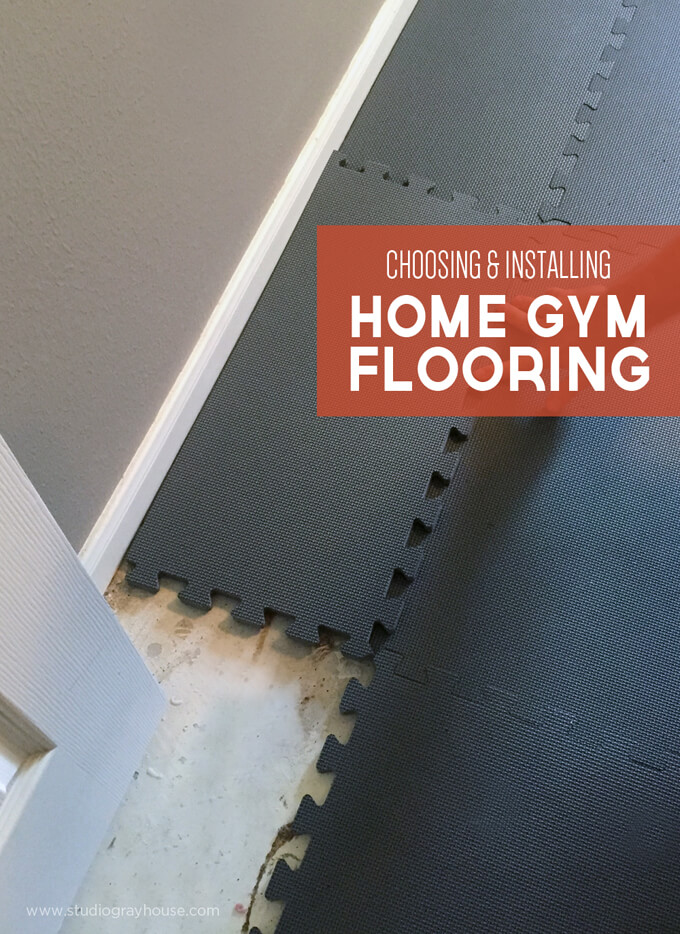
Our process for choosing the right home gym floor mats was a bit of a bumpy road but in the end we found the right fit for our gym floor.

Home Gym Floor Mats

Hey, it’s Brent here today sharing how we chose our home gym floor mats. Have you ever stumbled across the perfect pin? You know the pin that gives you a fantastic idea guaranteeing to take your project to the next level. When the supplies are easy to source and the skills needed aren’t too advanced, Pinterest can inspire you to try something new.

Sure, in the back of our heads we all know “Pinterest Fails” are a real thing but we try and be optimistic and never think it will happen to us. As we began work on our home gym room makeover, we experienced our own “Pinterest Fail”. It wasn’t the messy kind of disaster that leaves you feeling empty on the inside but rather the kind that forces you to decide if you are willing to settle for something almost right or start over.

By now hopefully you have seen the plans for our home gym. This is our first total room makeover and at first it was hard to decide where to start. But after seeing a pin with the perfect solution for a gym floor we were exited to get to work.

How To Install Home Gym Floor Mats

SUPPLIES

FYI: This post contains a few affiliate links to products we used to make this project. Gray House Studio does receive commissions for sales from these links but at no extra cost to you. We appreciate you supporting this site. Read our privacy and disclosure policy. You can also easily shop our recommended products here.
2022 Personalized Christmas Ornaments
*** Thanks so much for supporting our small shop – Moon Rock Prints – this holiday season! ***

INSTALL GYM FLOOR MATS

Home Gym Floor Mats

Home Gym Floor Mats

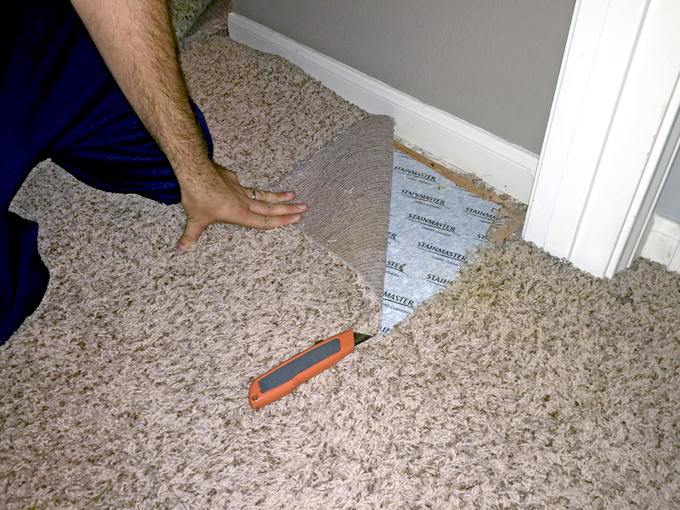
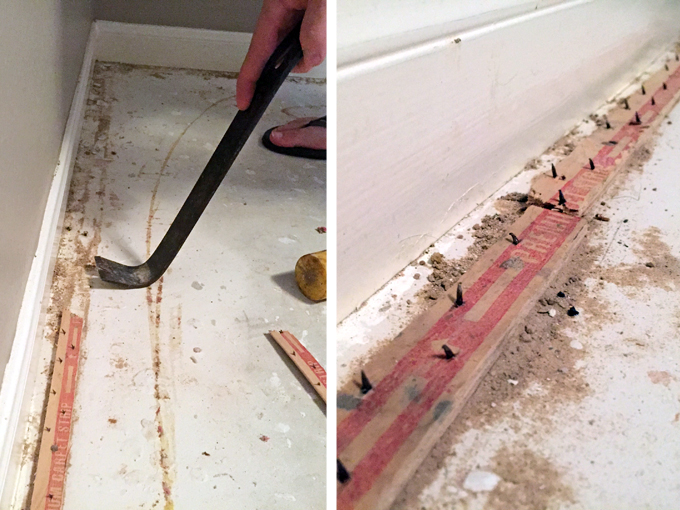
1. We woke up early to start tearing up the carpet. After the first rip of the carpet from the nail strips there was no turning back.

First Attempt at Installing Home Gym Floor Mats

Once the carpet was out, we took the advice from what we thought was a reliable source based on a pin on Pinterest and went to purchase our new flooring.

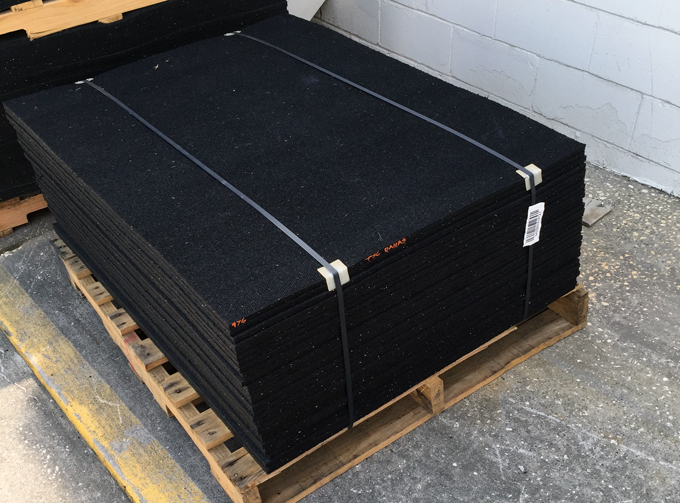
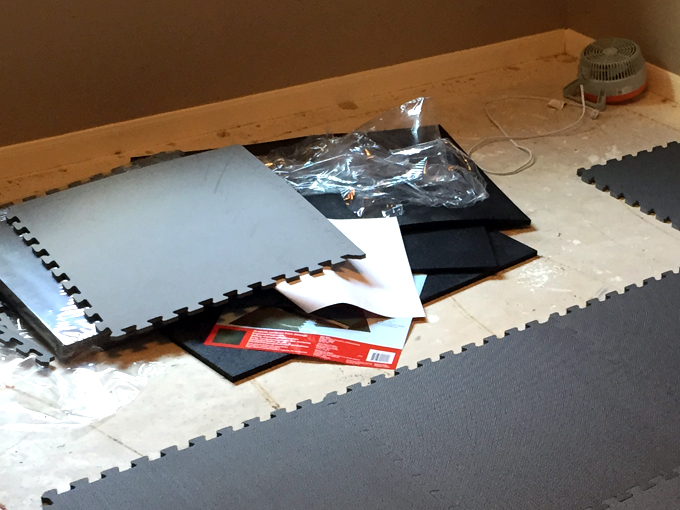
We drove thirty miles to our nearest Tractor Supply store where we purchased brand new black rubber stall mats. Maybe you’re already seeing the red flags, but we thought the idea of stall mats in a home gym was just crazy enough to work.

Plus, it was going to save quite a bit of money.

Home Gym Floor Mats

As we loaded them, a stranger in a cowboy hat asked us what we were doing with 15 stall mats but I’m sure what he actually meant was what is someone driving a Ford Focus doing trying to squeeze 15 large stall mats in the back.

We were excited to inform him of our genius idea. By the expression on his face he was not as convinced as we were.

Home Gym Floor Mats

When we arrived home I started placing the mats on the floor and cutting them to size as Courtney unloaded the mats from the car.

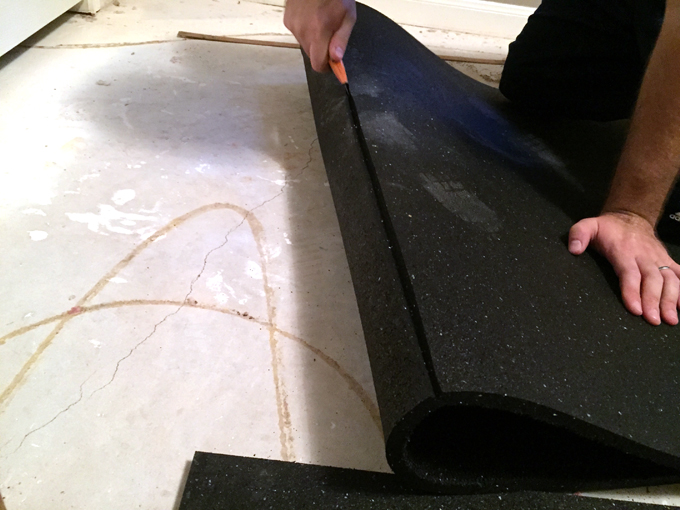
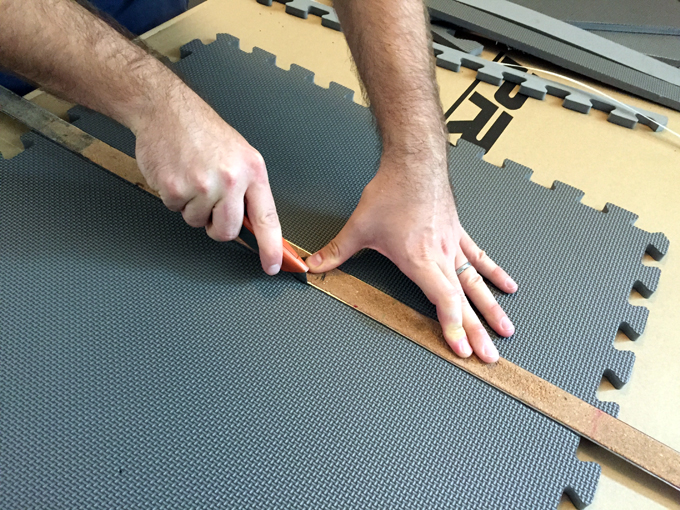
Our main concern was if we would be able to cut the mats but that part turned out to be easy.

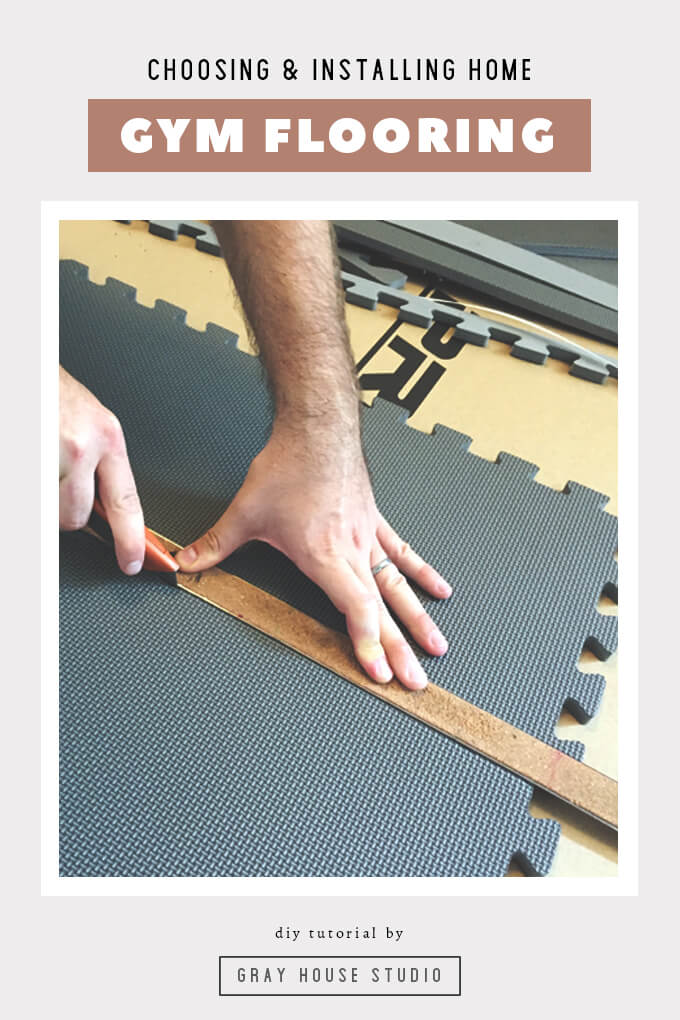
After scoring the mat with a straight edge, I simply folded the mat over and continued cutting along the previous mark with my box cutter until I cut all the way through the mat.

Home Gym Floor Mats

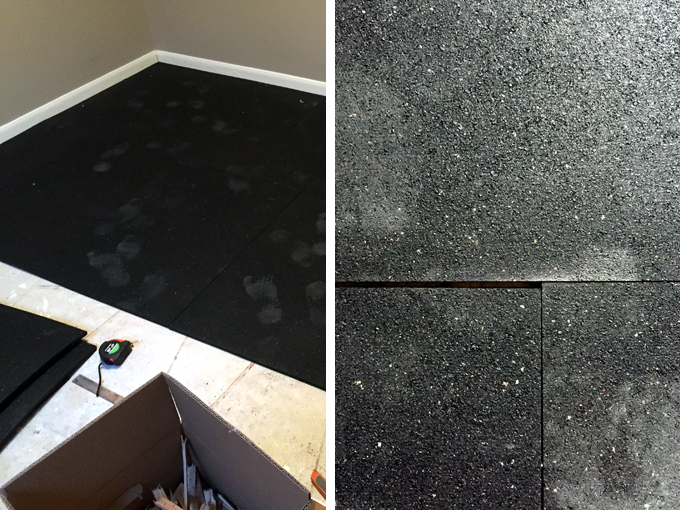
The first row went down great but once we started placing the second row we noticed a thickness and size variation from mat to mat.

This size variation resulted in gaps between the mats and ridges where a thicker mat lined up to a thinner mat.

We were really torn on what to do in this scenario. The black mats looked and felt great in the room but the small gaps just made it feel slightly off and not clean or professional.

After sleeping on it, reading the Tractor Supply return policy, and admitting we are in fact not smarter than a fifth grader we returned the uncut mats to the store.

Luckily we had only cut through three.

Second Attempt at Installing Home Gym Floor Mats

We decided to do a little more research and concluded that our original idea of gym foam tiles would look the best, be a breeze to install and actually cost a little less than the black stall mats.

Home Gym Floor Mats

One of the reasons we went with the black mats to begin with is because we thought it would be cheaper but we found we were able to get 10 packs of four of the gray foam mats on Amazon for less than we had spent on the others and these would work really well as our home gym floor mats.

Home Gym Floor Mats

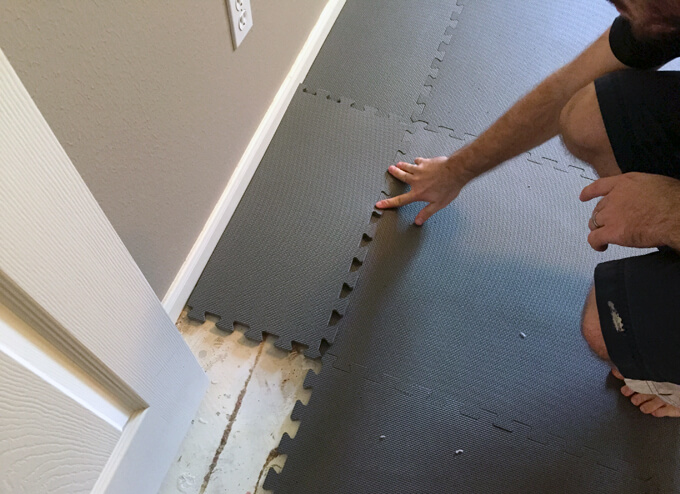
2. We installed the foam squares starting in one corner of the room and worked our way around the room cutting the last piece of each row to size with a straight edge and box cutter.

Home Gym Floor Mats

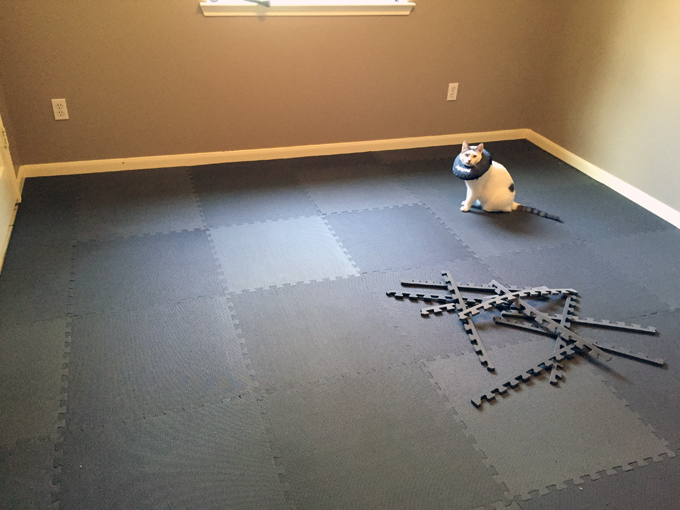
3. The tiles come in packs of four and we quickly noticed that each pack is a slightly different shade of gray.

Varying colors weren’t as noticeable or as big of a deal as varying thicknesses. We were able to mix the tiles all together to avoid large areas of the same shade of gray to make it look intentional and are happy with the results of our home gym floor mats.

Home Gym Floor Mats

It is exhausting to change gears mid-project and have to start over with a new idea and it may be a blow to your pride to admit defeat but we always try and keep the picture of what we want to the finished room to look like in mind to keep us from settling even when things get hard.

That way when you reach the intended final result, the sense of accomplishment is even more gratifying. It is said that comedy is tragedy plus time and we certainly like to laugh so I guess it is all worth it.

PIN IT FOR LATER

Our process for choosing the right home gym flooring and a tutorial for installing gym floor mats.

Planning Home Gym

Planning Our Home Gym

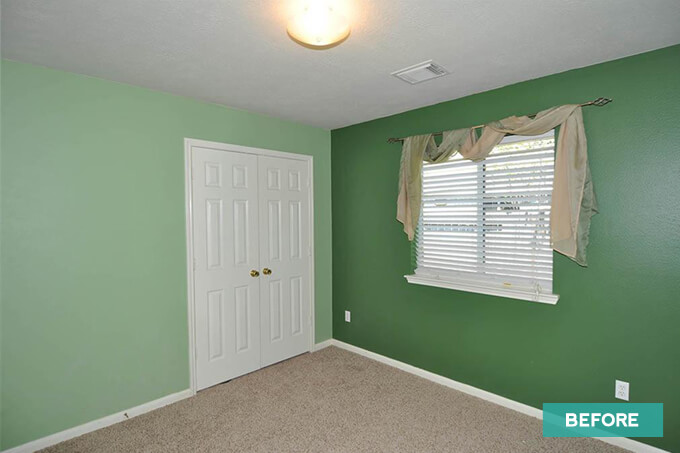
When we moved in every room in the house was painted a neutral off white color except one room. One of the bedrooms in the back of the house was the greenest room we have ever seen. We liked to imagine it was what walking into a Leprechaun’s house might feel like. Three walls were a darker green and there was an accent wall that was a pastel green. It was an interesting design choice.

Planning the Design of a Home Gym

Anyway, it was a little too bright for us so the first thing we did was paint over it with one of our favorite neutral “greige” colors, Utterly Beige. After that we pretty much ignored this room. On our floor plan page we have generously been calling it our home gym but the truth is the only thing that even remotely resembled anything work out related in that room was a few old Wii-Fit Discs (that were collecting dust) and a jump rope.

Planning the Design of a Home Gym

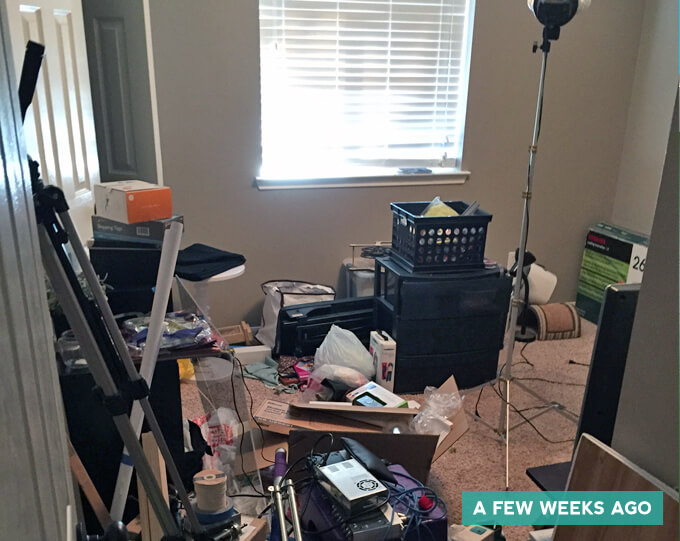
But it was inevitable, as we continued to work on other projects throughout the house, our empty back room somehow developed a gravitational pull and collected all the various left over supplies from other projects, tools we had been missing for months and an unusual amount of cardboard. Correct me if I am wrong, but I think its one of Newton’s lost laws that if a space sits empty, junk will move to fill it.

We finally had enough of the current situation and sat down two weeks ago and had our “dream big” talk about what we would like to do with this space to make it have a purpose. We both agreed a home gym would be the best use of the space for us during this time of our life.

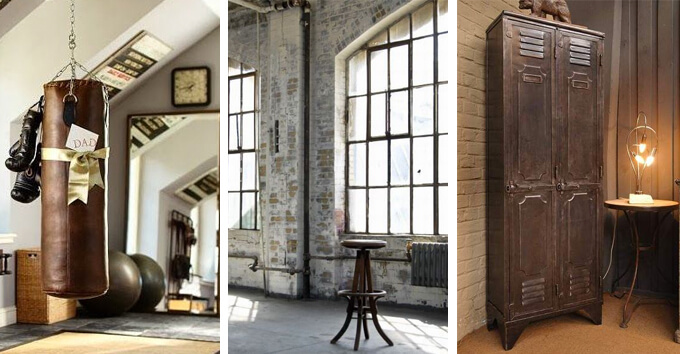
But if you have learned anything about Brent and I, we can’t just have a home gym; we have to completely transform the room so it feels like you are transported to another place entirely. If our breakfast nook takes us to a coffee shop, we want our home gym to take us, stay with me here, to an old warehouse. My inspiration is a boxing gym with worn leather equipment set in a warehouse.

Planning the Design of a Home Gym
Sources: 1 | 2 | 3

I want it to have a vintage and industrial feel but also incorporate a few modern elements. Before we begin sharing our projects for this room, we wanted to give you a look at what we are planning.

Planning the Design of a Home Gym

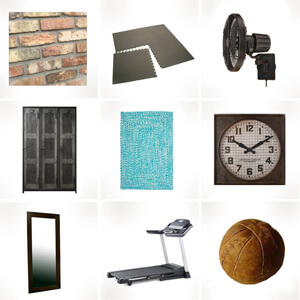
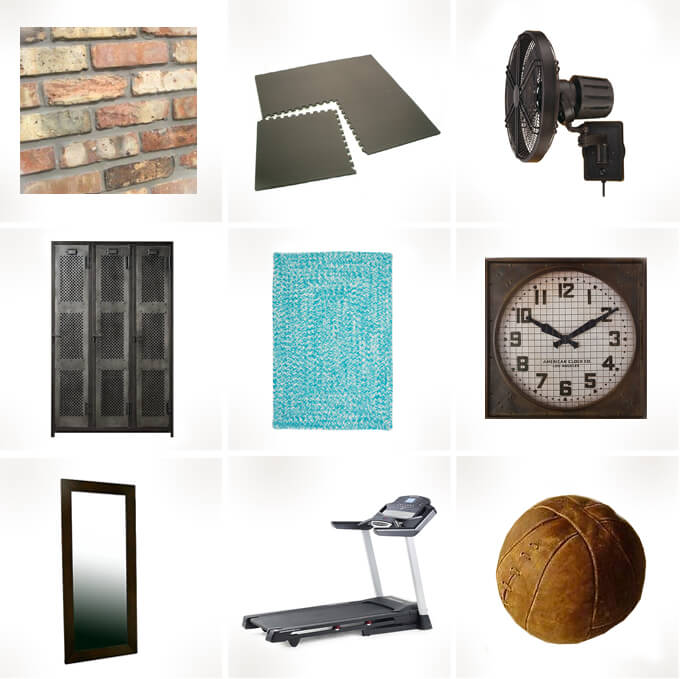
Brick Accent Wall | Brick Harboard Wall Panels from Lowe’s (which we will be painting to match the brick pictured above)
The largest project we are planning is to create a worn brick accent wall. This feature will be essential in creating the industrial loft/old warehouse look. We will be purchasing harboard wall panels that look like brick and then painting over them to create a more realistic old brick appearance. We have wanted to do a brick wall somewhere in the house and this room is perfect because it makes the most sense in terms of design.

Gym Flooring | Mats from Lowe’s
We had initially planned to use one type of mat and then changed our minds and decided to instead use these foam mats instead. We like the gray color, how easy they are to assemble, fit together nicely for a clean appearance and would be a snap to pull up in the future if we decide to go with different flooring down the road.

Wall Fan | Faraday 14-in Wall Fan from ATG Stores
How awesome is this wall fan? It fits perfectly with the style we are going for in this room. This room currently doesn’t have a ceiling fan so our first thought was to add one but the ceiling is pretty low and we didn’t want anything to hang down low enough where we could possibly hit it while working out. We will instead go with a unique lighting solution. But a work out room without a fan circulating air seems like a bad idea, so having this large wall fan is the perfect solution.

Lockers | Vintage Locker 3-Door Perforated Cabinet from Restoration Hardware
These lockers from Restoration Hardware have a great vintage vibe. I’ll be honest this is one area we won’t be splurging and will definitely be DIY-ing. We are going to be making our own lockers that fit inside the closet in the room so we can customize them. But these lockers provide great inspiration for the direction we want to go.

Rug | Catalina Area Rug from ATG Stores
The overall color palette of the room will be extremely neutral so we wanted to work in a bit of color in our designated yoga area where we plan to place this rug and have a few colorful yoga mats on a yoga mat holder we will be building. I like this blue color because it is different than what we typically use in our house and the material of the rug gives it a relaxed feel that makes it perfect for a gym.

Clock | Industrial Clock from Restoration Hardware
Another DIY project we have planned is to makeover a modern clock into one that looks like it belonged in a gymnasium in the 1940’s like this one from Restoration Hardware. I love the cage and metal that is on this clock. It screams vintage gym. We are hoping to incorporate these elements into our DIY clock project to give it a similar appearance.

Floor Mirror | Baxton Studio Daffodil Floor Mirror from Wayfair
Most gyms have mirrors hanging on the walls and while it was tempting to create a mirror wall, just kidding, we decided that having a large framed floor mirror leaning against the brick wall would be a stylish way to incorporate a mirror into the room without straying from our design concept.

Treadmill
What’s a gym without a treadmill? This will be the large piece of workout equipment in our gym.

Leather Medicine Ball | from eBay
One aspect of making over this room that I am looking forward to is decorating it with unique vintage pieces. We got this old leather medicine ball off eBay that I am excited about because it really completes my vision for this room. We will also have a few more DIY projects planned such as wall art made from old photographs that I am looking forward to working on to round out the room.

We were so excited to begin this room transformation that we actually started before we had time to post what we were planning on the blog. We are already making great progress on it. If you have been following along with us on Periscope you maybe have already seen a sneak peek or two. If you missed it you can catch it below.


Just a reminder we will be sharing our progress Thursday nights at 8PM CST on Periscope. You can find us @grayhousestudio as we share sneak peaks of the updates we are making to our room to transform it into our home gym. It is great fun to meet all of you and hear what you are up to as well so I hope you can join us!

If you miss any of our scopes, you can watch them on our Periscope playlist on our YouTube channel.

In our next post we will be sharing more about the flooring we chose for the room that will be in our home gym so be sure to come back and check that out!

Gray House Studio Update

Exciting Things Happening at Gray House Studio

DIY home renovation blog Gray House Studio

As you may have noticed it was quiet on the blog last week as we tried to catch up on everything after being gone the week before last (mostly work and mounds of laundry). I am sure everyone can relate that as wonderful as it is to take a relaxing, week long, work-free vacation, coming back can be a bit of a challenge, to put it nicely.

DIY home renovation blog Gray House Studio
^^^ But…. a week of this was definitely worth it! I would go back in a heart beat.

There are only 24 hours in a day and Brent & I need AT LEAST 10 of those to sleep in order to feel productive the next day. No matter how hard we try, we’re just not the high-energy type. Some people are morning people, some people are night owls, and as for me I find I am most productive from 11:00am to 1:00pm and that is usually because I spend the majority of time in that narrow window eating lunch.

Anyway, needless to say we weren’t able to work on or share any DIY projects last week. But that doesn’t mean it was an uneventful week for Gray House Studio. We have lots of exciting news to share!

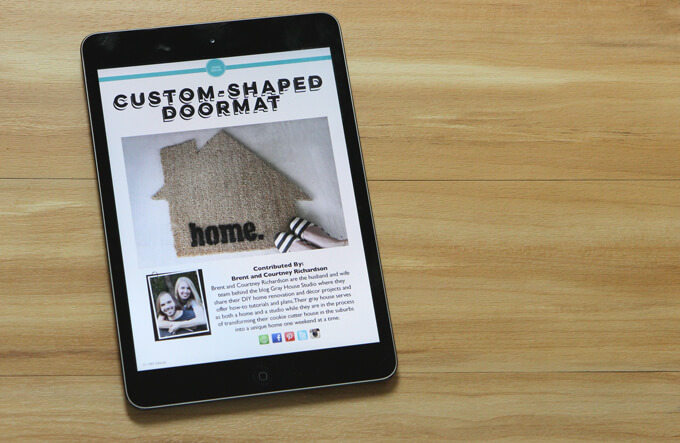
#1] Our Custom Shaped Doormat Tutorial was Featured in DIY Lifestyle Magazine.

Planning our Breakfast Nook Makeover Mood Board

DIY Lifestyle Magazine is a digital lifestyle magazine and website for DIYers by DIYers with lots of great inspiration. The August 2015 issue is live and we are super pumped that our custom shaped doormat DIY project tutorial has been featured in this month’s issue! The issue is now available in Google Play and Apple Newsstand. Because we were featured, our readers can download this issue for FREE! You can find the issue here. Then click on subscribe, then current subscribers, and enter diyaug15 to get the current issue for free.
#2] We Won the Porch & ATGStores.com Maker Mood Board Contest.

Planning our Breakfast Nook Makeover Mood Board

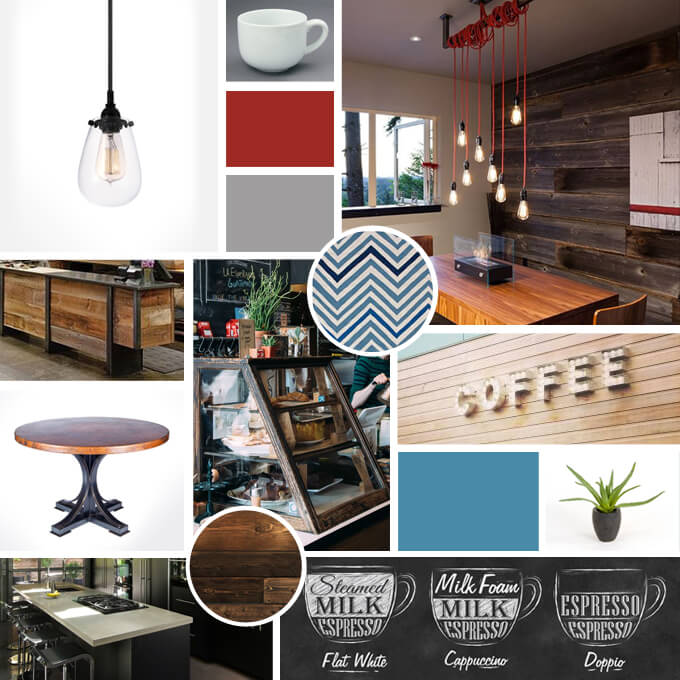
We were so incredibly excited to find out this week that we won the Porch Maker Mood Board Contest we entered back in April. You may remember we submitted our coffee shop inspired breakfast nook makeover board. Thanks a million to all the judges, Porch and ATG Stores.

We now have a $1,000 gift card to spend at ATG Stores! Ah! At first we were completely overwhelmed because we have never had that much money to spend on a project before and we had no clue what direction we should go with it. There are so many possibilities! But after some late night deliberation and “dream big” discussions, we came up with an awesome room makeover idea that we think is going to be AMAZING but in true Gray House fashion, it might be a little out there. We will be sharing our plans for this room in a post very soon.

Another fun part of winning this contest is we get to give away a gift card to one of our readers! Yay! We will be announcing more details on how to enter in the coming weeks so stay tuned. Be sure to subscribe to updates in the right side bar if you are interested in being notified with the details of the contest are posted.

And While We Have You Here…

Planning our Breakfast Nook Makeover Mood Board

We made the leap and joined Periscope. We did our first “Scope” (I guess that is what it is called) this past Thursday. Any other “Scopers” (I might just be making this stuff up, I have no idea) out there? If you joined us last Thursday, thank you! If you missed it, no worries, we plan to make this a regular thing on Thursday nights at 8PM CST.

We will broadcast live a tour of a room or project; give you a behind the scenes look at our current project we are working on, and answer any DIY or blog questions you may have. Feel free to send your questions ahead of time and they could be a topic of our next Periscope broadcast! I’ll be honest, we aren’t entirely sure what we are doing yet with this platform but we think it will be a fun way to get know each other!

After you download the app you can find us @grayhousestudio and if you can’t make it to watch live you can always catch up within 24 hours by finding the link on our Twitter account. We will be uploading our broadcasts to our YouTube channel as well. Hope to see you there!

______

Whew, I wasn’t kidding; there was a lot to share because there is a lot to be happy about here at Gray House Studio. And with even more fun things on the horizon, we just want to express how thankful we are for everyone who takes the time to stop by our blog and read a post or two or all of them. It really makes us thrilled to be able to share and connect with all those out there who are passionate about DIY and home renovation.