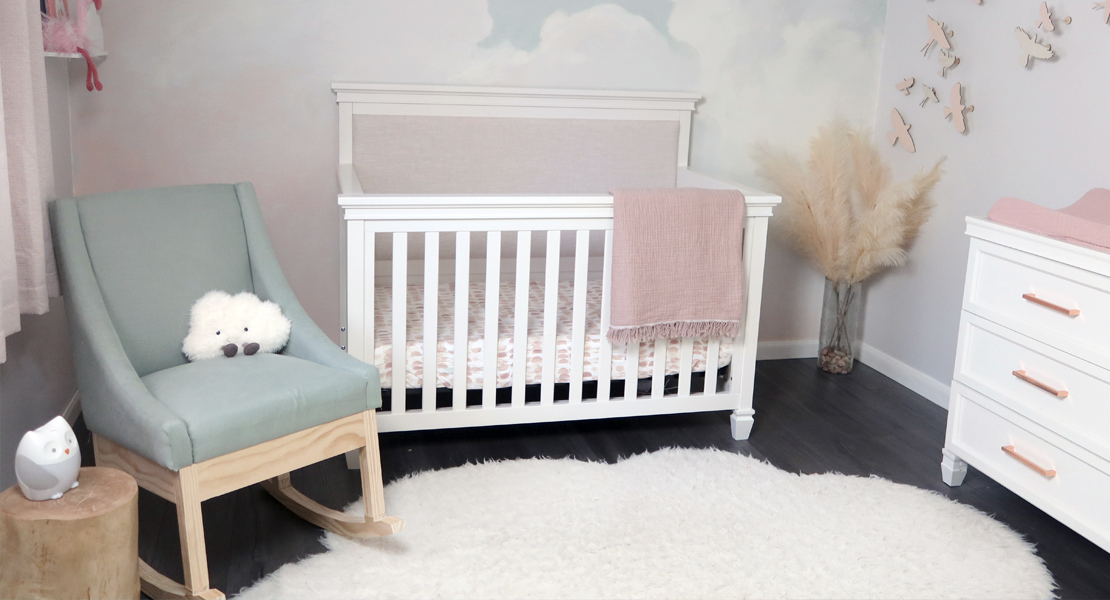
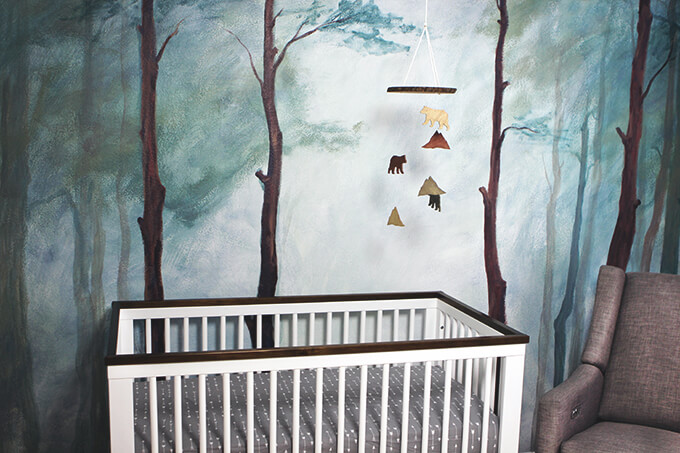
We designed this dreamy woodland themed nursery for our nephew. Complete with a floor to ceiling painted woodland mural, this room is one of our favorite designs to date and we loved making over the space in one weekend.
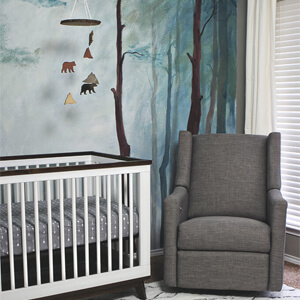
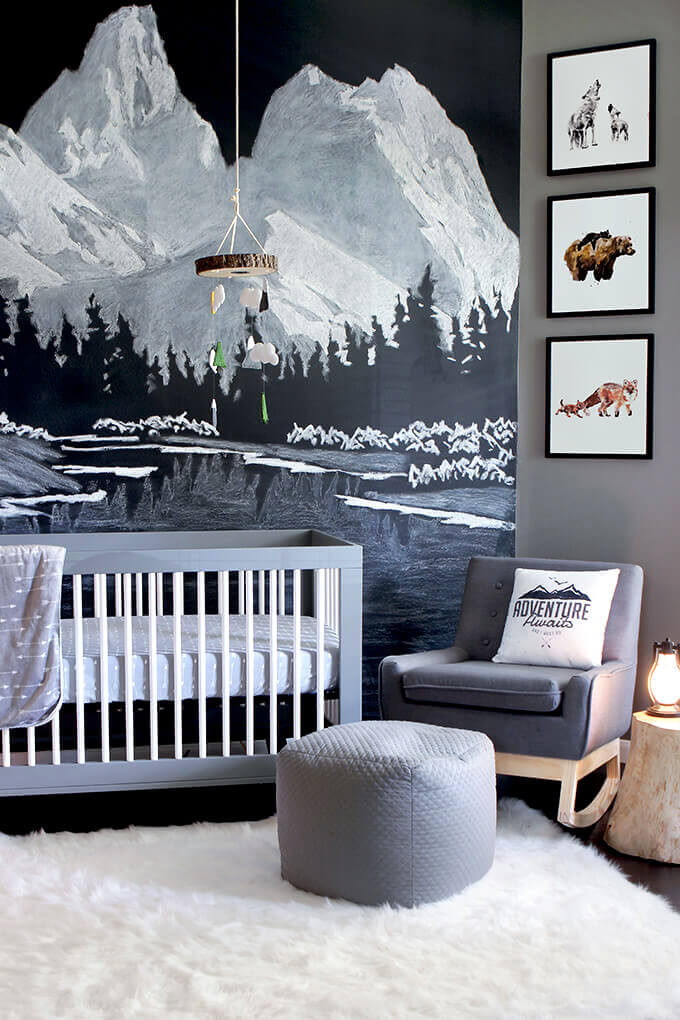
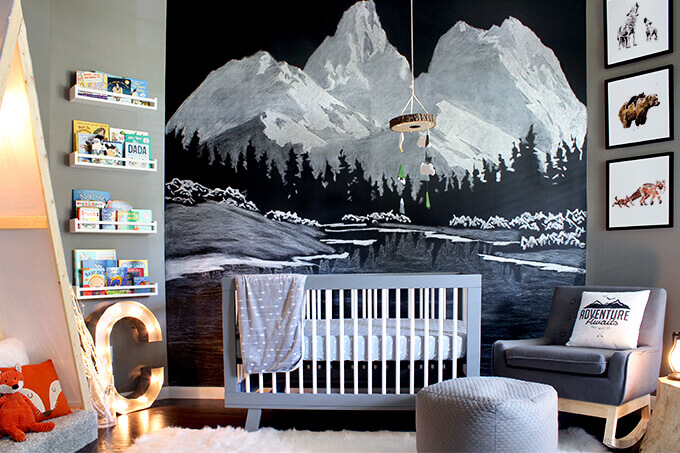
Take a tour of our son’s modern outdoor themed nursery. Complete with a hand drawn chalkboard wall and whimsical woodland watercolor prints. Our woodland nursery design features mountains and black, white, and gray nursery elements. We designed a monochromatic nursery that is a gender neutral nursery perfect for a child who loves exploring the outdoors.
We are excited to finally reveal our son’s modern outdoor themed nursery.
All of the DIY projects we had planned are finished and it came together exactly how we had imagined, maybe even better.
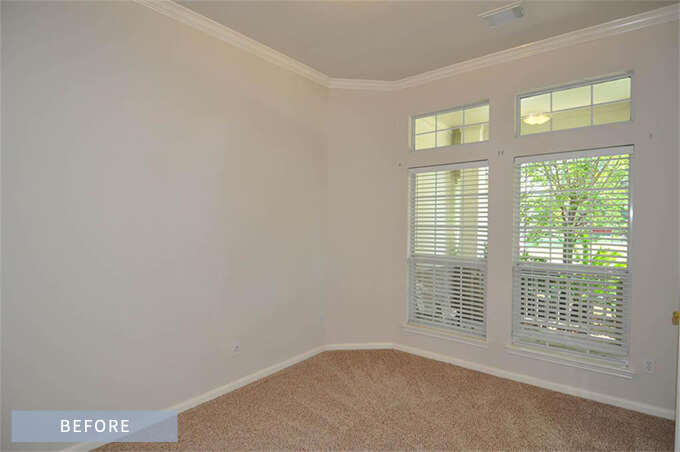
Before we began our modern outdoor themed nursery makeover, the room was a blank canvas.
We had big plans for the room but didn’t get started working on it until the end of July. Luckily, our son stayed put until a week past his due date so we were able to get everything done, just in time for his arrival.
When we found out we were having a boy, Brent and I started brainstorming what we wanted his nursery to look like.
We were on the same page wanting it to be an outdoor themed nursery that wasn’t too cutesy or too rustic. Our vision was to design a modern outdoor nurser.
We liked the idea of a neutral color scheme so this theme is gender neutral.
We incorporated woodland animals into the room as well through the wall art and pillows.
First we made some large changes to the room. We painted the walls gray and replaced the doorknobs. We also pulled up the carpet and installed laminate flooring. The flooring project took a few weeks to complete and turned out to be a labor intensive process due to the uneven concrete below the carpet. Thanks goodness I was pregnant and had a good excuse to get out of that one!
To add privacy to the room Brent put decorative window film on the glass panes in the doors.
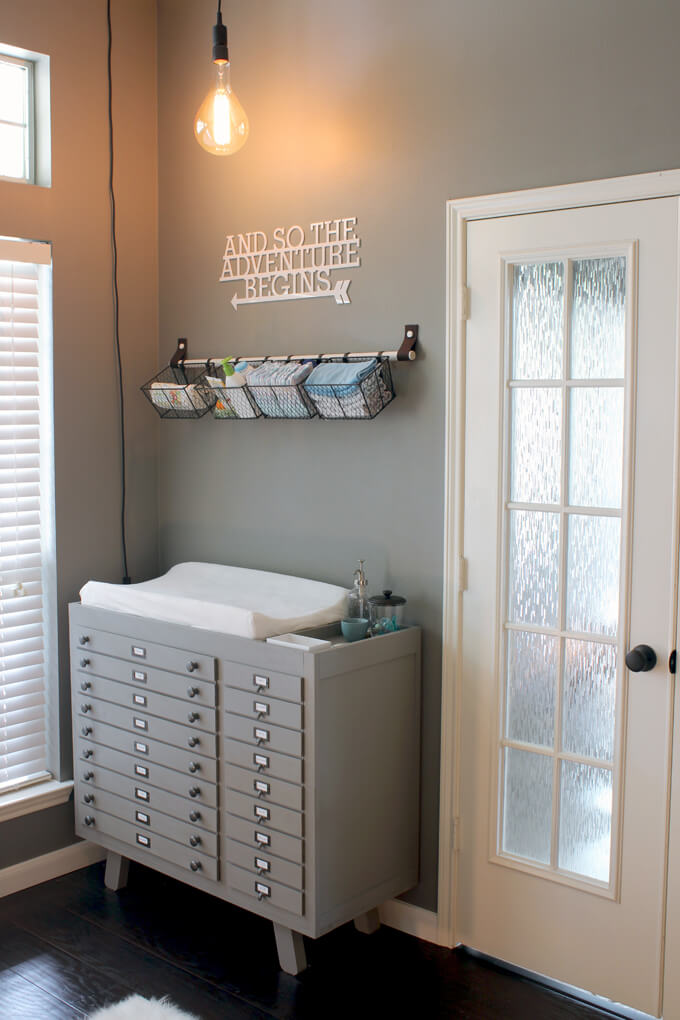
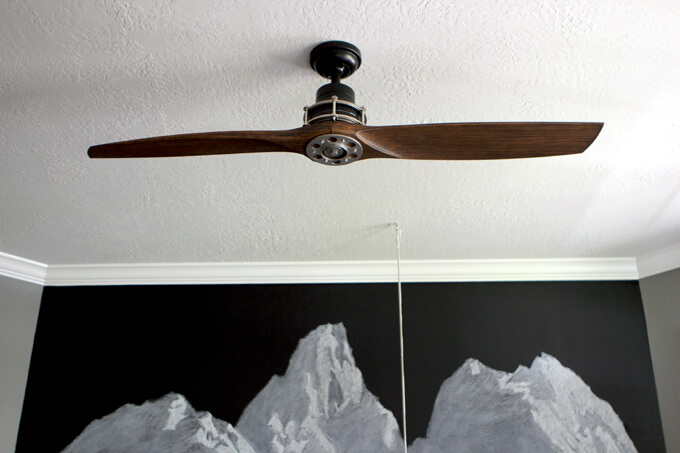
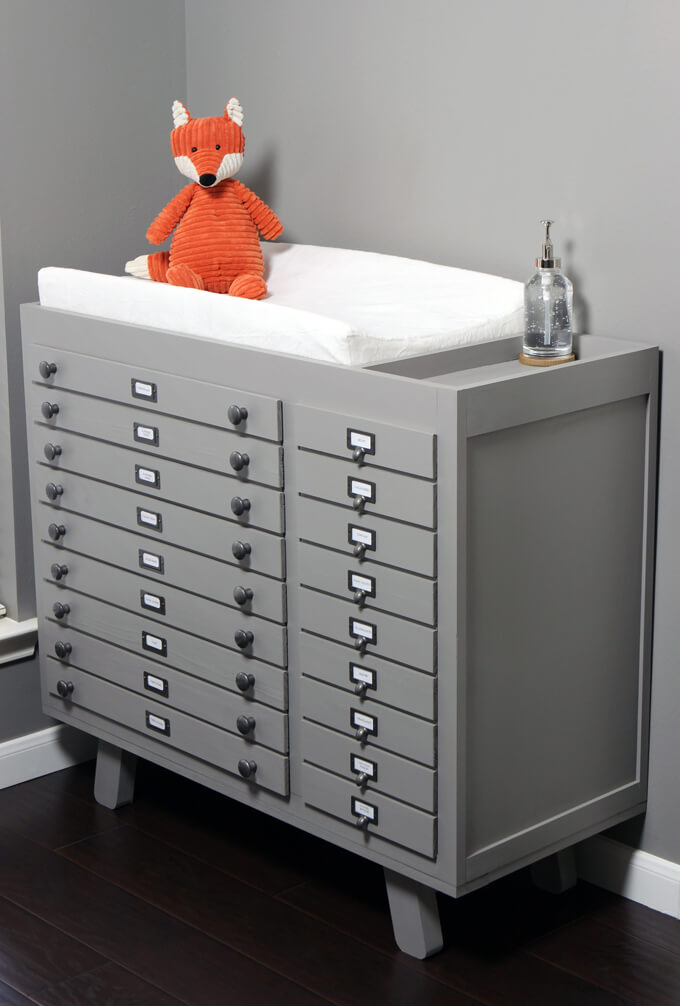
After our son was born, we quickly learned middle of the night diaper changes are a bit difficult in the dark. To solve this issue we added a huge light bulb over the changing table. It is perfect because it is just bright enough to see what you are doing without blinding you when you are half asleep at 2:00 in the morning. Plus, it is a crazy giant light bulb which makes it a fun addition to the room.
The room was dark because we replaced the old light fixture in the room with a two-blade ceiling fan. We chose this particular ceiling fan because it resembled a plane propeller.
I feel like our biggest challenge was making sure we were keeping a cohesive look throughout the whole room. With each DIY project we started and each new decorative piece we added to the outdoor themed nursery, we spent a lot of time beforehand planning and probably over analyzing.
We wanted to make sure all the elements fit the aesthetic we were going for, matched the other pieces in the room but weren’t too “matchy-matchy”. Like I said, we probably totally over analyzed our kid’s room but we love the end result. It turned out looking clean but still fun and whimsical.
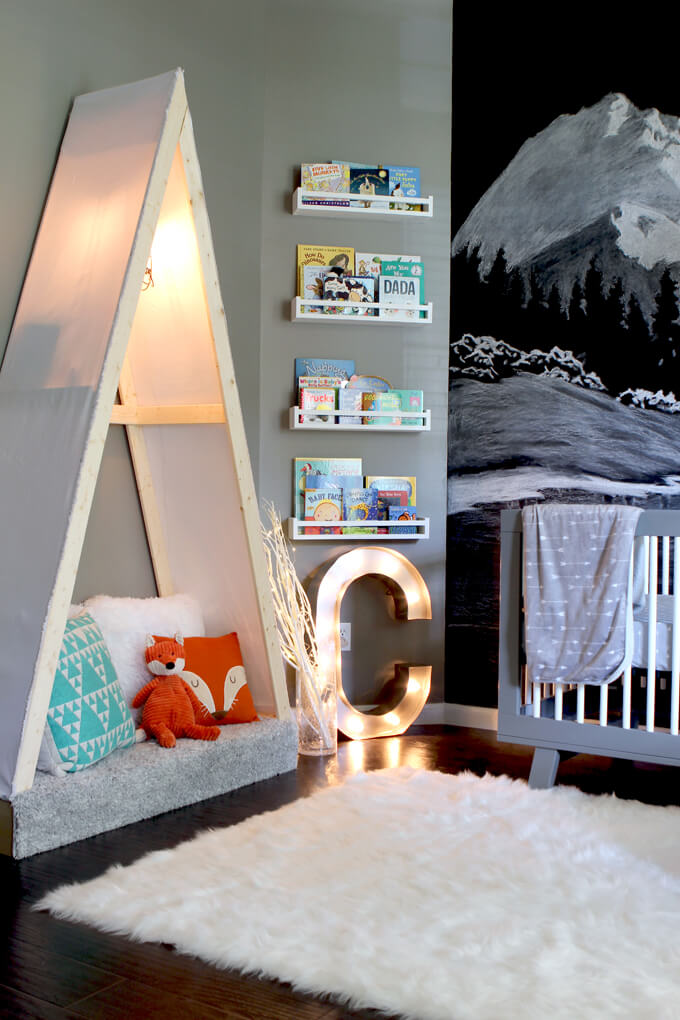
2 YEARS LATER UPDATE: I’ll go ahead and read your mind and put it at ease and let you know, yes, we removed the fragile vase and the giant marquee light and moved it up high once he was mobile.
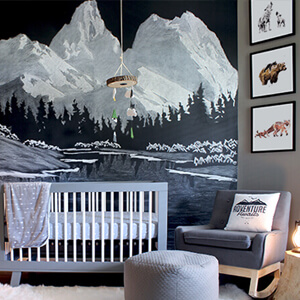
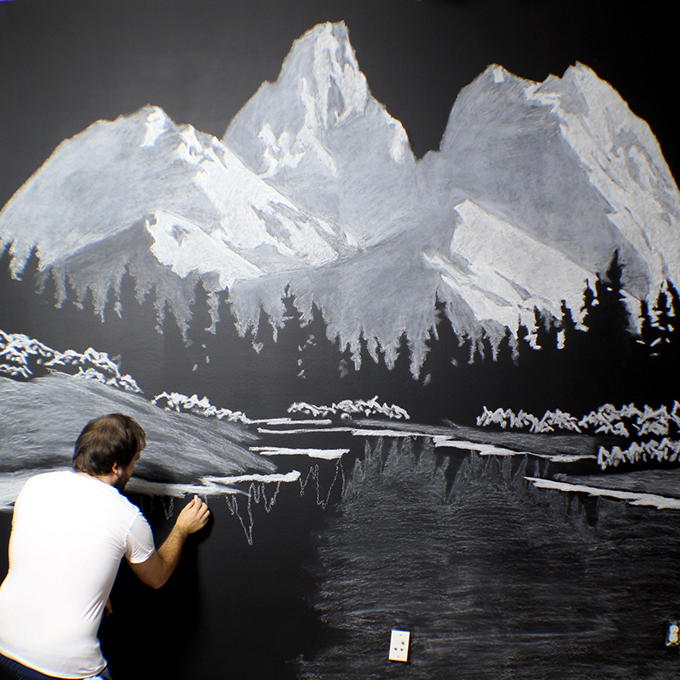
We love a good focal wall so we decided for our outdoor themed nursery we would try a chalkboard art wall. My dad was kind enough to lend his time and talent to paint the wall with chalkboard paint.
He is really good at painting lines freehand and the thought of trying to paint the lines that separated the gray wall and black wall scared me!
Then, Brent being the crazy talented artist that he is, drew the mountains and landscape scene in chalk.
Wondering if this chalkboard is still intact now that we have a toddler on our hands? Yep! It still looks as good as the day Brent finished it. I don’t know if it is because the crib is in front of it or what but our son has shown no interest in trying to wipe away his dad’s art.
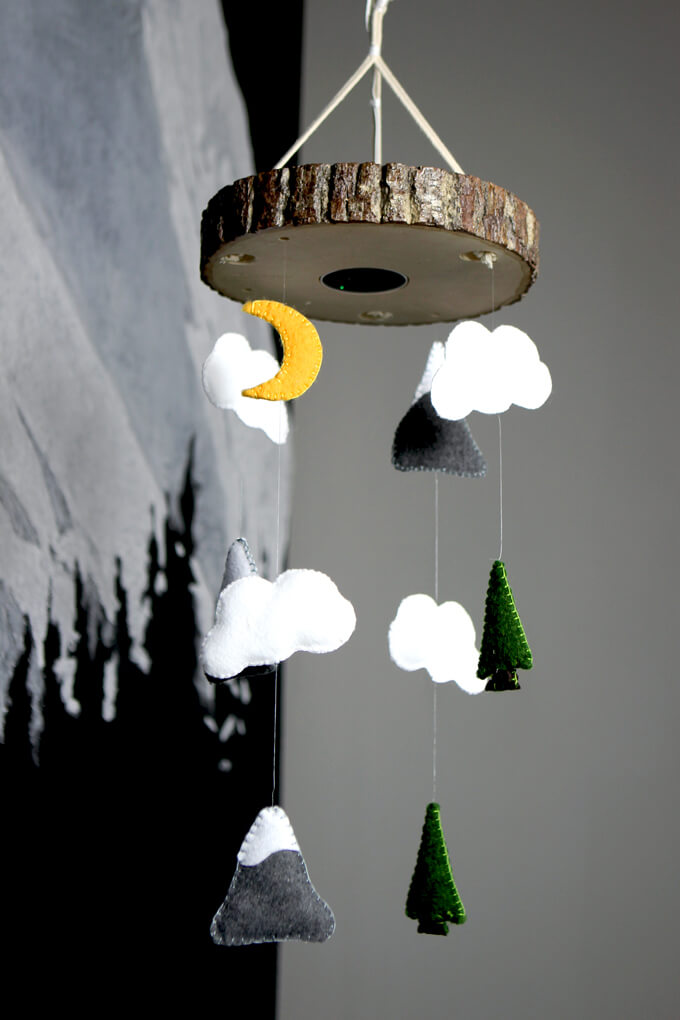
DIY Nursery Camera Mobile
For this simple DIY project, we killed two birds with one stone. We made a playful mobile using a wood slice and felt pieces and hid our nursery camera in the wood slice so we can watch our son sleeping but don’t have a bulky camera out in the open.
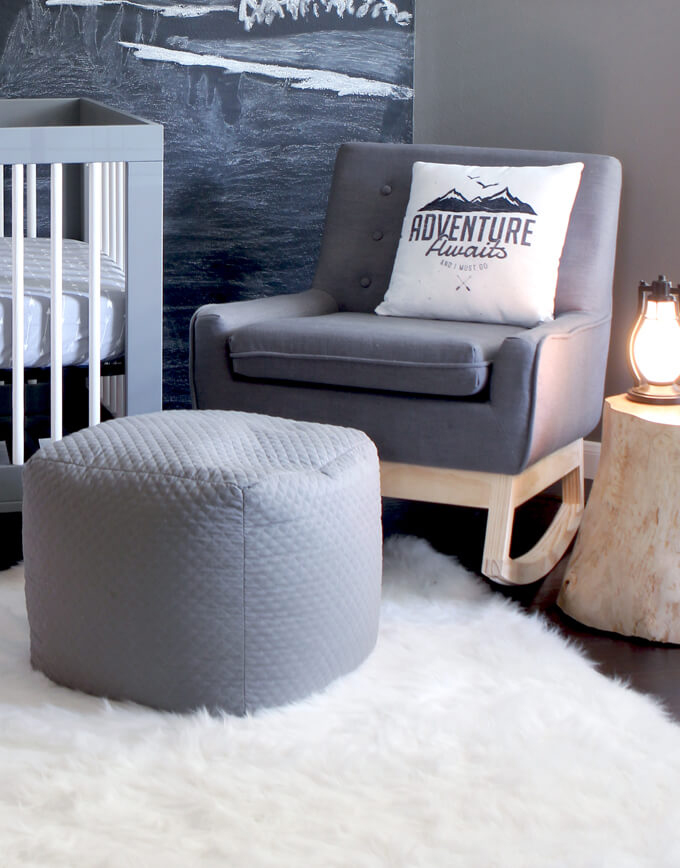
We could not find a rocking chair in the style and color we liked that was in our price range. Nursery rocking chairs are expensive. To solve this dilemma, we purchased a normal chair in the color and style we liked and Brent removed the old legs. Then he built and attached his own rocking base. It turned out awesome.
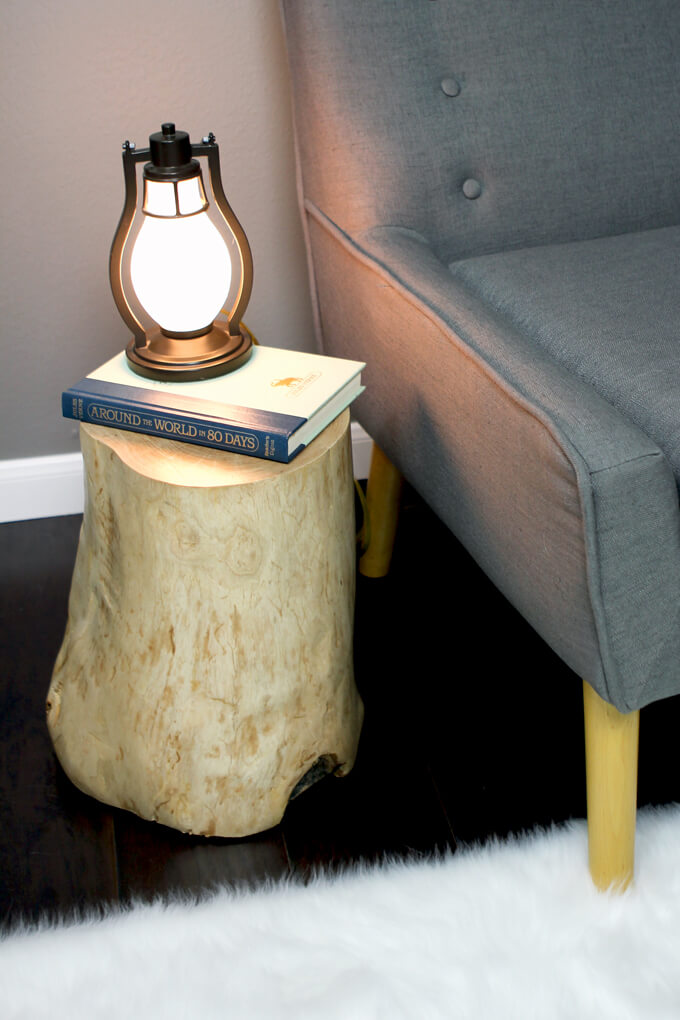
Our log side table was another “we can’t afford to buy one so we will make one ourselves” project. We found a stump for free and for only $16 and calloused hands, we were able to make our own stump side table that was just the right height to match our rocking chair.
The baby changing table was a big DIY project but it was worth it to us to have complete control over the design and functionality of this important piece of furniture.
Brent designed this beautiful piece to match our crib but have an old printmakers cabinet vibe as well.
We added labels to give the appearance that camping gear is being stored in the drawers to match with the outdoor themed nursery but the truth is those drawers are fake! They are actually doors hiding all of the diaper changing necessities including a diaper pail.
The changing table is the project in the room that is currently getting the most use for sure.
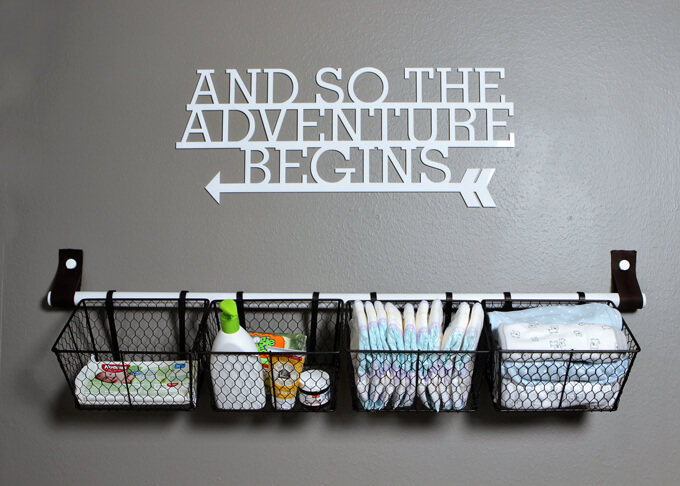
When you have a newborn it feels like you need to have at least eight arms to successfully do everything you need to do. To make things easier during diaper changing time we created this simple wall storage solution.
We attached a dowel rod to the wall using leather straps and hung baskets filled with diapers, wipes and burp cloths so there is very little effort needed to grab the essentials.
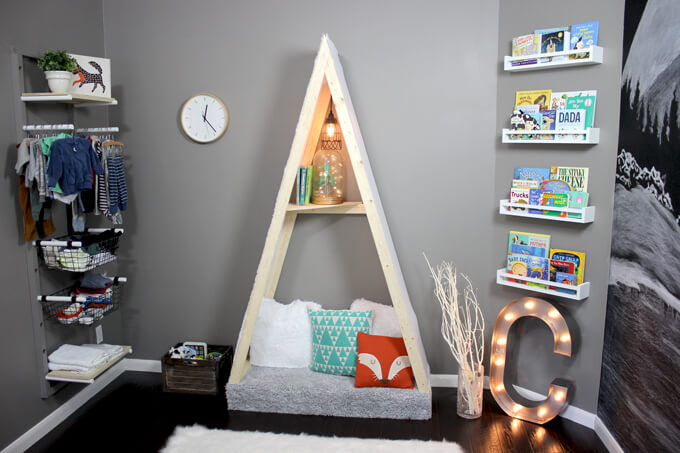
The room we are using for the nursery is actually a bonus room so it does not have a closet. We were faced with the challenge of where and how to store baby clothes.
We didn’t want a bulky piece of furniture so we opted not to use a dresser and instead made use of an empty wall by building a vertical baby clothes rack.
2 YEARS LATER UPDATE: Where there were blankets on the bottom shelf there are now toddler shoes and a basket for hats but other than that this piece is still going strong! I love how the limited space forces me to stay on top of his clothes and make sure I only have the size that currently fits folded in the baskets.
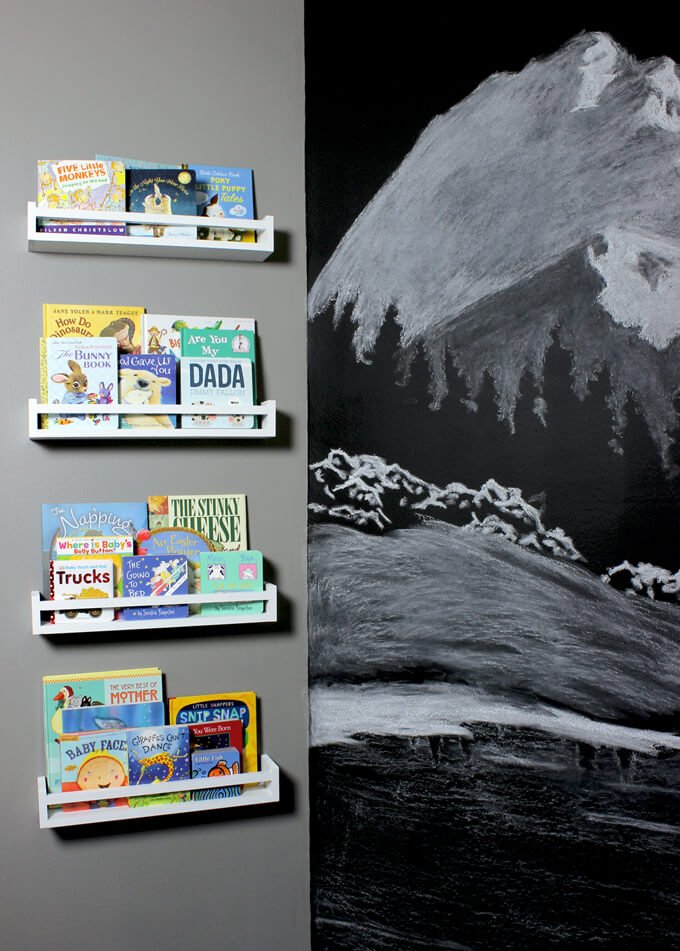
These super easy to build bookshelves were the perfect afternoon DIY project. We built them so they would be the exact length to fit on the angled wall and we could store and display all of Connor’s book next to his reading nook.
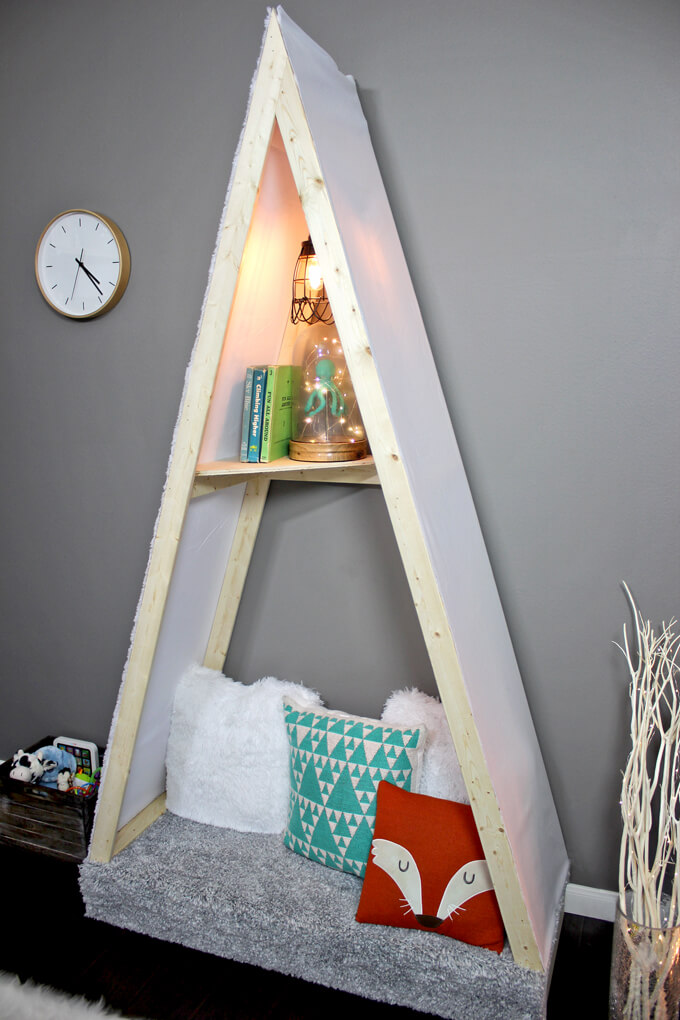
The reading nook tent was the last project we built for the room. We wanted to include a playful piece that could be a cozy place for Connor to curl up and read once he gets older. What is an outdoor themed nursery without a tent?
For now we use it as a seat to watch him while he plays on his play mat. We added a few vintage and whimsical decor pieces on the shelf to complete the look.
FYI: This post contains a few affiliate links to products we used to make this project. Gray House Studio does receive commissions for sales from these links but at no extra cost to you. We appreciate you supporting this site. Read our privacy and disclosure policy. You can also easily shop our recommended products here.
The room may look unconventional as far as nurseries go, but we love how our son’s modern outdoor themed nursery turned out. It is fun, clean and cozy and a room we think he can really grow into. We hope to spend a lot of time in this space reading and playing together.
I love turning on the twinkle lights and the little lantern at night when the house is quite and rocking him to sleep. It feels dreamy in this room, like we are transported to another land that is just our own, far out in the middle of nowhere.
Looking for More Woodland Nursery Inspiration?
Check out this whimsical woodland nursery we designed for our nephew!
For the past three months now we have been working on moving our home office out of one room and into another all the while giving it a total revamp to fit with our industrial/vintage style. You can take a look back at our plans for our home office that we posted in March.
It is not a large room but some of the DIY projects we were working on for this space turned out to be large in scale (I’m looking at you cabinets) so it took us awhile to finish all the projects and get it exactly how we wanted it.
It has been a long time coming so today I am excited to finally be able to share our completed home office makeover and take you on a little tour of our newly refreshed and organized office. Since the room is a little small, we thought a video tour might make a little more sense so be sure to check that out below.
Side Note: If you haven’t already, we would love for you to subscribe to our YouTube channel and follow along to see our latest DIY videos. We have some fun ones in the works that you won’t want to miss! You can subscribe by clicking the red button under the video in the box below. Thanks!
Home Office Makeover Tour
In this video I will take you on a tour of our newly made over home office! For our home office we continued with the rustic/industrial/vintage vibe we have going throughout the rest of the house. I also share a few tips and storage solutions for keeping a home office organized.
To see a new DIY tutorial video every Thursday, subscribe to our channel ⇾
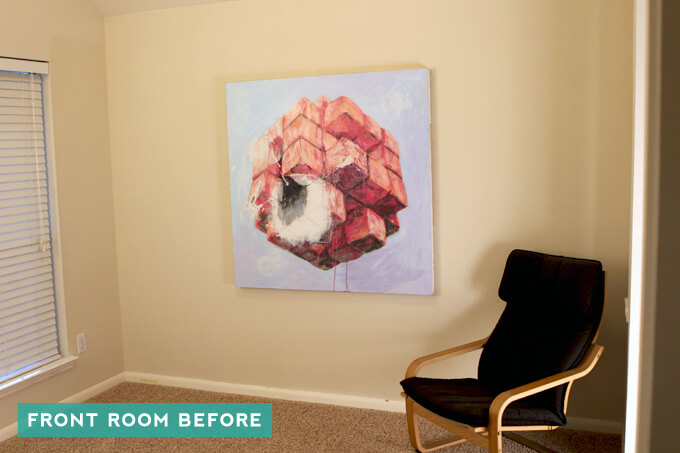
Above is what the room looked like before. Well, way before. It is the front room in our home, probably intended to be the formal living room. We have used it to store Brent’s musical equipment and more recently our work table.
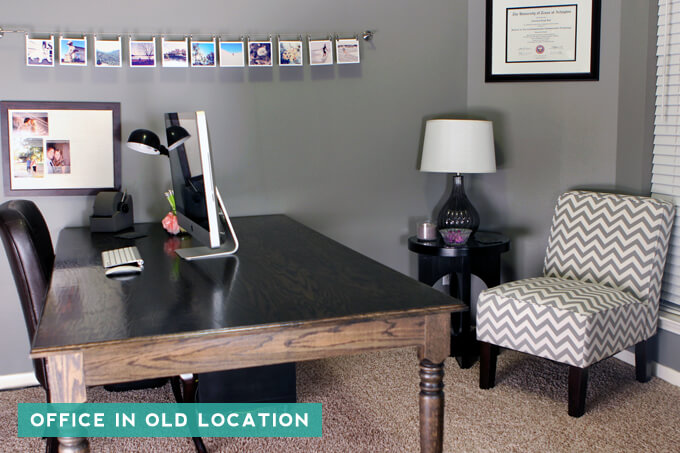
Here is what the office looked like in our spare room. We had to move it to make room for a nursery but I was excited for the opportunity to give it a refresh that matched our style and had a cohesive appearance and create more storage space.
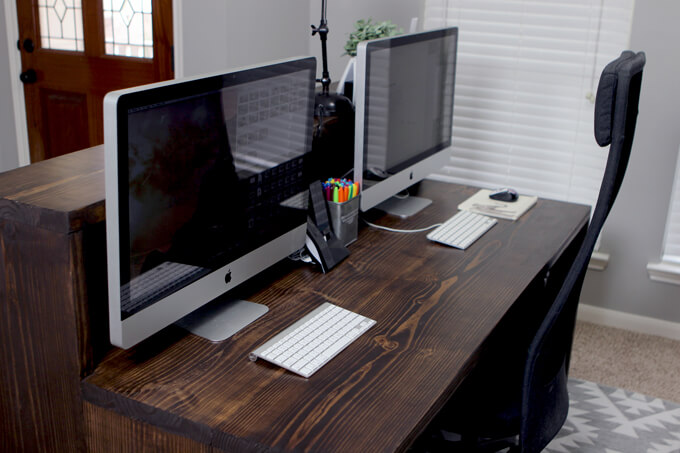
My original office desk was the first thing Brent built for me when we got married and while the sentimental side of me was super sad to see it go (thank goodness it found a wonderful new home) we wanted to build one with a new style that has a front piece that hides the cords and storage pieces that are under my desk out of sight when you walk in the door.
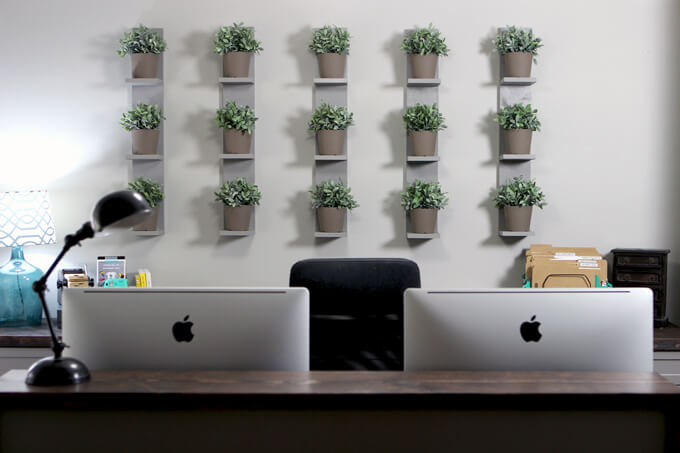
We got the inspiration for our new desk from believe it or not a display piece at Restoration Hardware and based on that Brent designed and built this awesome two-level desk that I absolutely love. There is plenty of room for both of our computers and still extra space for me to spread out my calendar and client folders. Jake (the cat) loves to lay on the top level while I work which is nice for me because it keeps him close but out of the way of my keyboard.
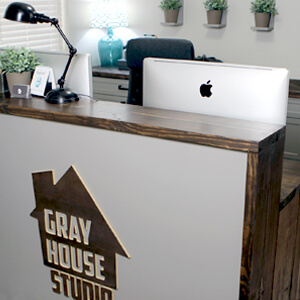
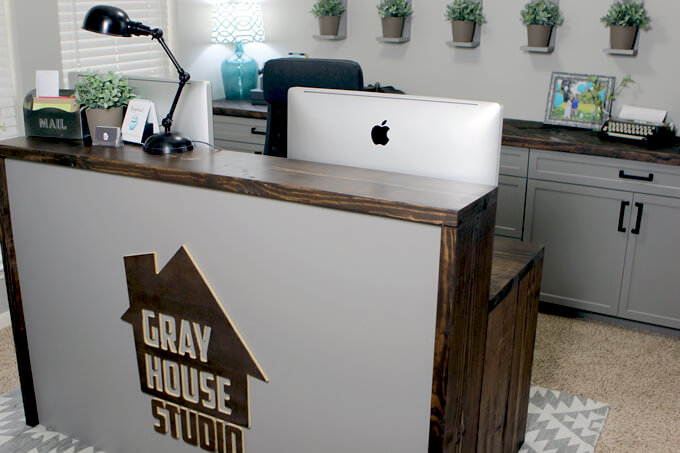
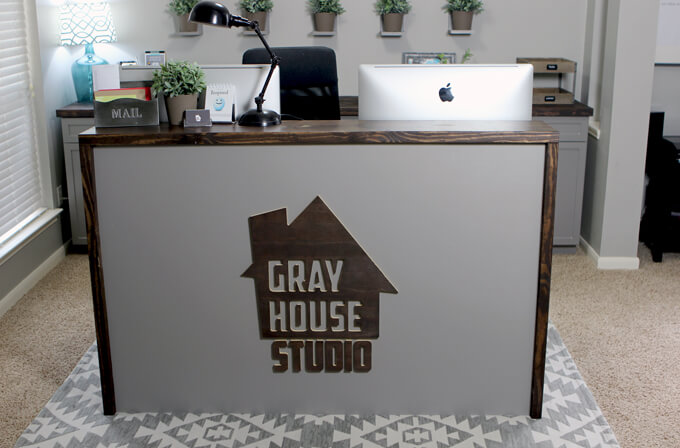
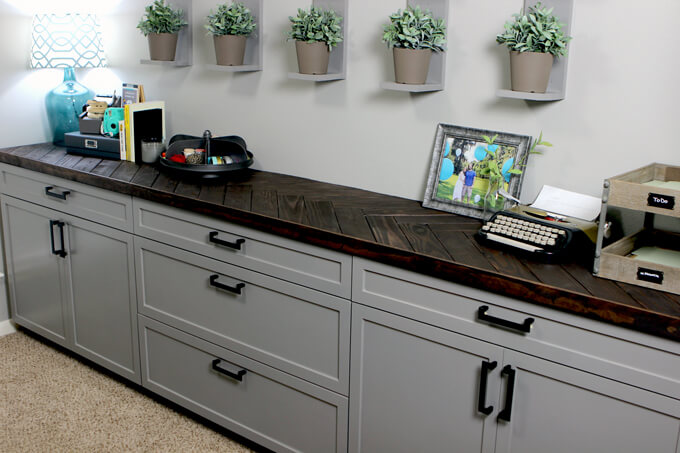
Our first project in the room was to build cabinets on the back wall. Having a home office be the first room guests see when they walk in our door can feel a little intimidating since the office seems to be the place clutter collects the fastest, especially since my office is the room I spend the most time in working on projects. I knew lots of cabinet space for storage was a MUST and Brent really knocked it out of the park building these cabinets and the herringbone countertop.
I love the pattern on the countertop so much that I didn’t want to add too much to the top of it but a few additional key storage pieces such as a two-level tray and a lazy susan hardware bin are helpful to organize the paper and supplies I use on a daily basis.
And let’s not forget about our plant wall. I am really pleased with the wall-mounted plant shelves we built to display artificial plants that bring a little greenery and color to the otherwise neutral room.
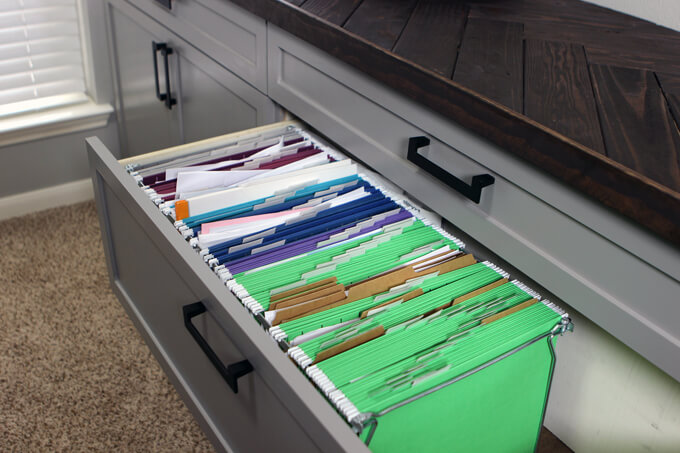
I have tons of storage space now to keep everything not only hidden away but organized and all within arm’s reach and a chair spin. I can’t tell you how much having a place to put things back helps me keep a room clean. We didn’t have room for our filing cabinet so we added two large drawers to our cabinets that work well to hold all of our paperwork and make it easy to file it away so it doesn’t stack up on the desk or counter.
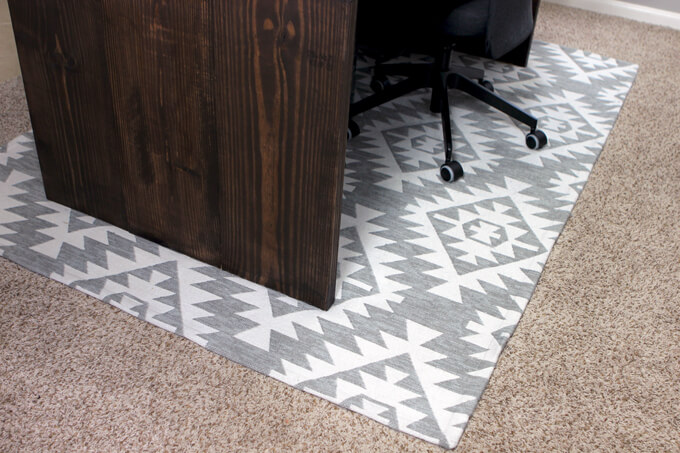
I love this rug. The gray color matches the other gray colors in our room so well. Do you know how hard it can be to match grays? I like the fun pattern. The rug also is functional because we are running a power strip cord under it to a plug, which keeps the cord out of sight and we don’t have to worry about tripping over it any cords.
It feels like such an accomplishment to get another room completed (minus the floors) and checked off our list. I thought a new office would be way down the road so when this opportunity came up, I of course jumped all over the chance to give my workspace a much needed refresh. I work in this space eight hours a day so to have it just the way I like it, feels awesome and I swear increases my productivity by at least 85% (it would be 100% but I am rocking pregnancy brain right now).
I would have never thought the office would be the adjacent room to our home library and would be out in the open with no doors to hide behind, but the two rooms flow together nicely and makes it feel like I am working in a room double the size. I hope you enjoyed the tour of our home office makeover! If you have any questions about any of the projects or items in this room, feel free to leave them in the comments section below.
Check out our back patio makeover and how we gave it a much needed refresh for spring.
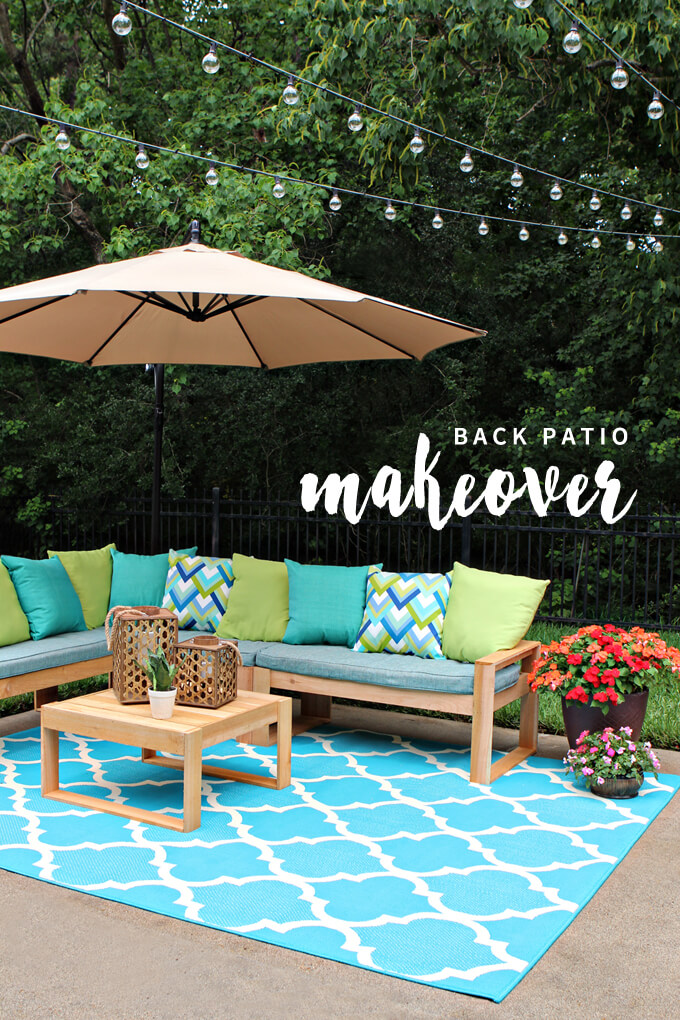
The time has come to reveal our back patio refresh! Yay! We have had all our awesome finds from At Home just sitting in the empty room that is soon to be the nursery and I have been dying to get them out where they belong for almost a month now! So we are thrilled to finally have this space finished and be able to share what we did.
We had these grand plans to have the entire backyard completed (new flower beds, a fire pit, etc.) by this point but as I am sure you may know, life sometimes gets in the way. What can you do? There is only so many hours in a day and so many weekends in a month. You can’t control the weather and let’s face it, sometimes you are so tired you just don’t feel like doing anything but sitting on the couch, eating pizza and watching a marathon of a dumb reality show.
So we are just rolling the back patio overhaul out slowly one area at a time. But we have already made a huge leap forward with our back patio makeover by creating our lounge area.
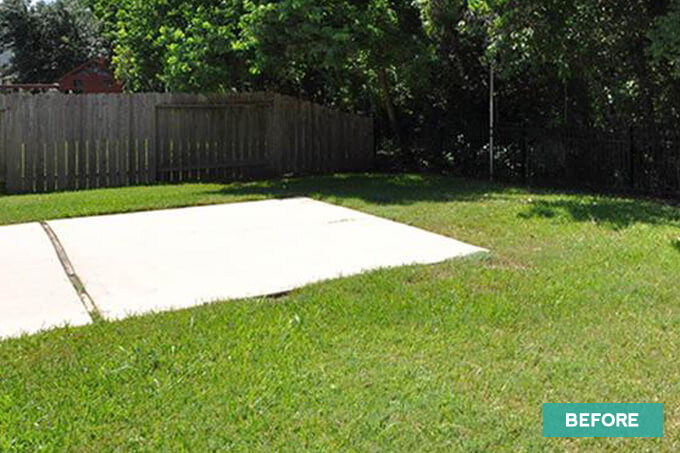
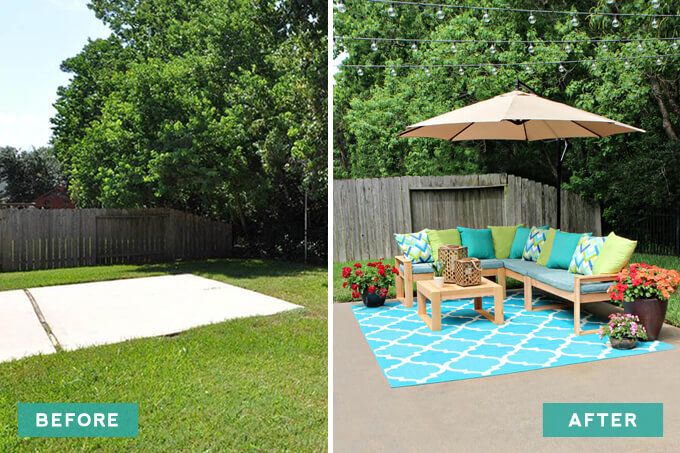
BEFORE:
In all the excitement of decorating this space I forgot to take a before picture at an angle facing back towards the greenbelt but the one from when we first moved into the house is close. Before, the patio was hardly a patio, it was just an empty and ugly slab of concrete. So much work needed to be done in this space.
AFTER:
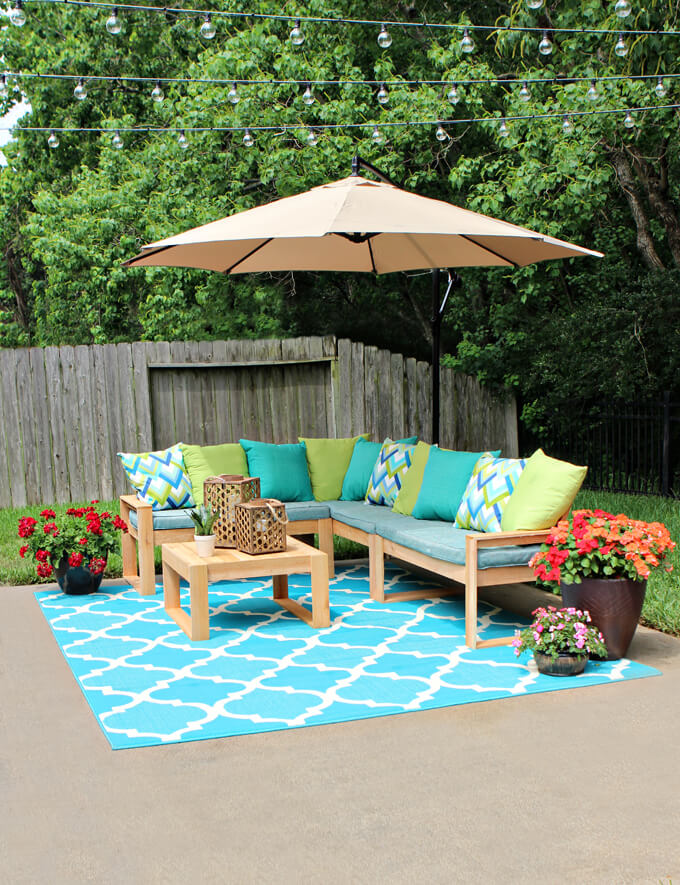
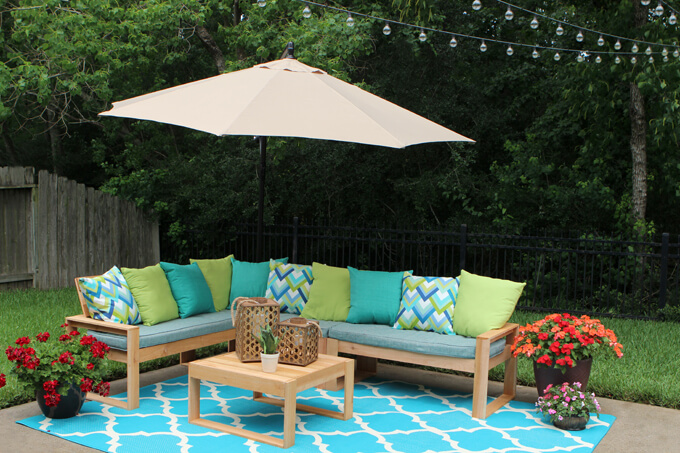
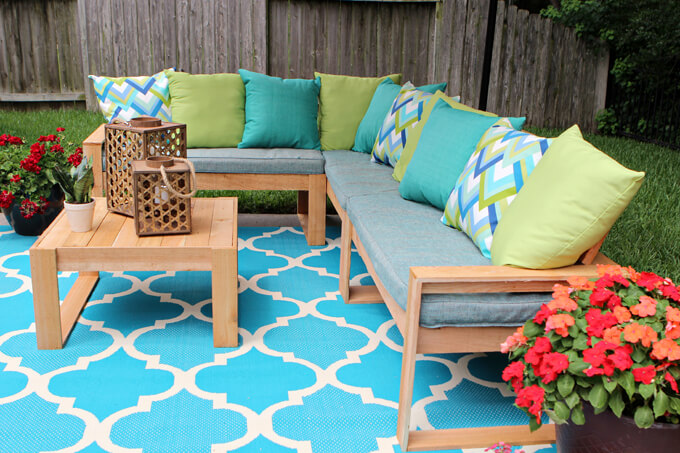
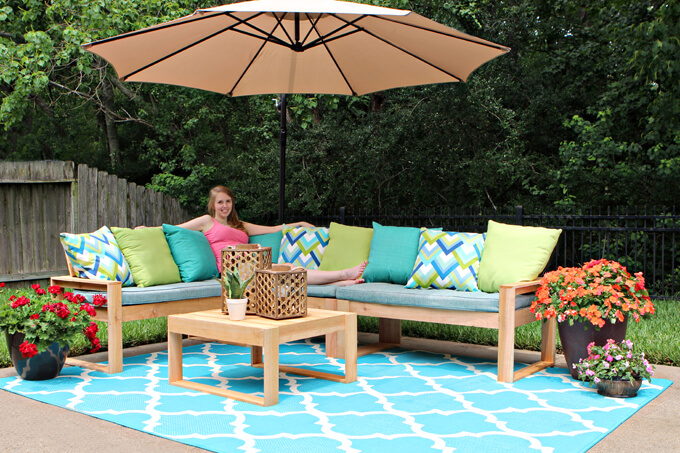
We are absolutely in love with our back patio makeover and the completed lounge area. The colors pop so nicely and every single item we picked out goes so well together and is an integral part of the space. It was well worth the time we took at the store to make sure everything coordinated and worked well together.
For so long we had to look out our back windows at just an unattractive concrete slab and now this bright cheerful area really makes us happy every time we look out the window. It is so welcoming and cozy that we can’t wait to spend spring and summer nights under the string lights lounging on our comfy cushions and host backyard BBQs now that we can seat lots of friends and family.
BACK PATIO MAKEOVER DETAILS
First things first we did some work on the concrete slab. We filled in the huge gap in between the two slabs as well as some of the really large cracks where grass and weeds would frequently grow through. The previous owners had foundation work done and it did a number on the concrete around our home including the back patio where we have huge ugly patches left behind as reminders so we needed to find ways to disguise the unattractive areas of the concrete. Next, we power washed, stained and sealed the concrete to get rid of all the gross mildew and make it easier to clean when it does come back.
After our concrete was in better shape we started decorating the space with the items we picked out from At Home. We have said it a couple of times before but At Home is really the one stop shop for outdoor decor because they have such a wide variety of items in just about every color you can imagine and you can easily stay on budget. In case you missed it, you can read more about our At Home shopping trip and all the outdoor decor we picked out in more detail.
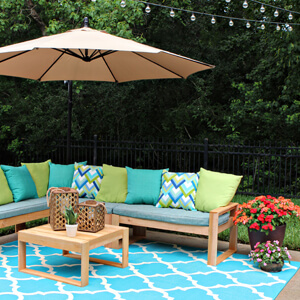
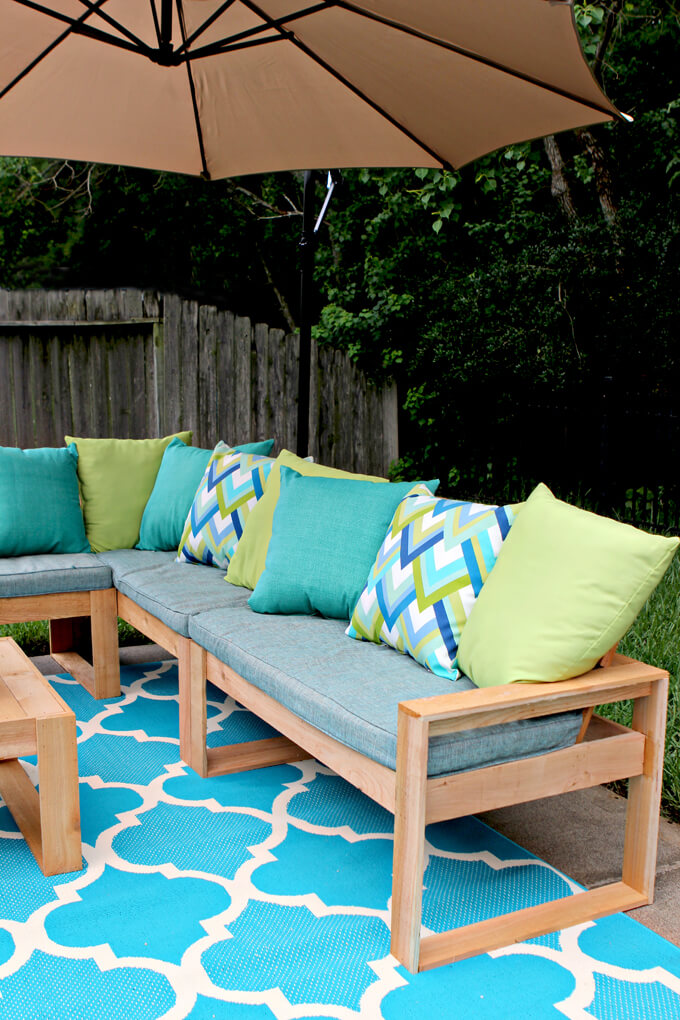
We first picked out the Azure cushions we liked from At Home and then built our outdoor sectional based on the dimensions of the cushions so we would be 100% sure they would fit. The size of the cushions also helped us determine the number of pillows we needed. We will share more details about how we built this awesome sectional for under $100 in the coming weeks. The cushions and pillows make this seating area so comfy and cozy.
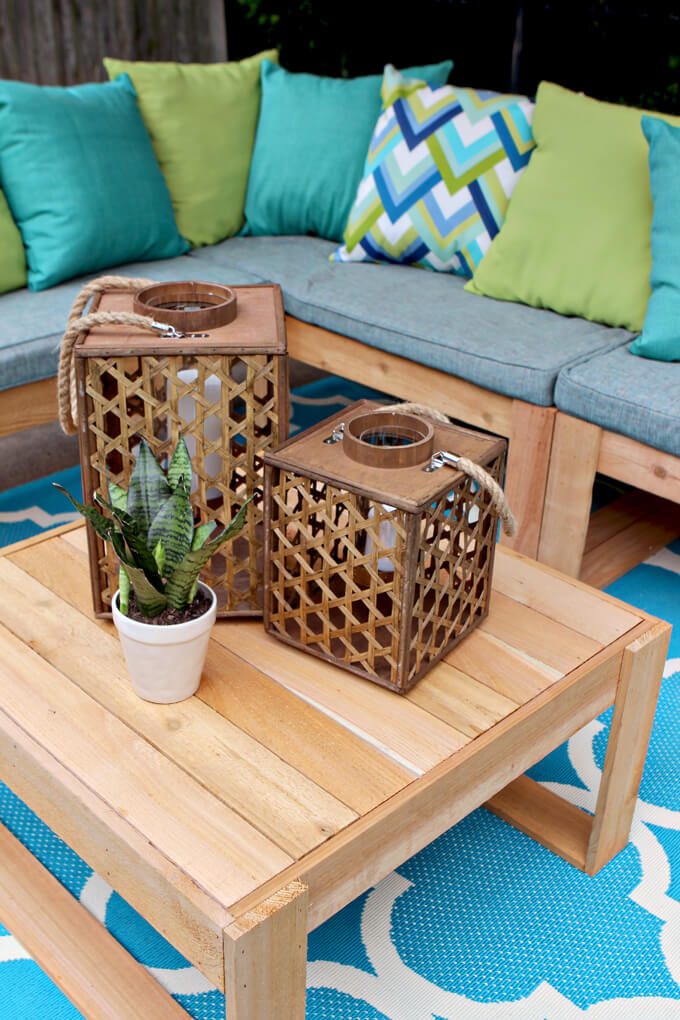
We built the coffee table to match our outdoor sectional and it was the perfect place to put these super cool lanterns that were our splurge items (they were not very expensive, they just were not on our initial list) during our shopping trip. They hold candles so they can add a little mood lighting at night.
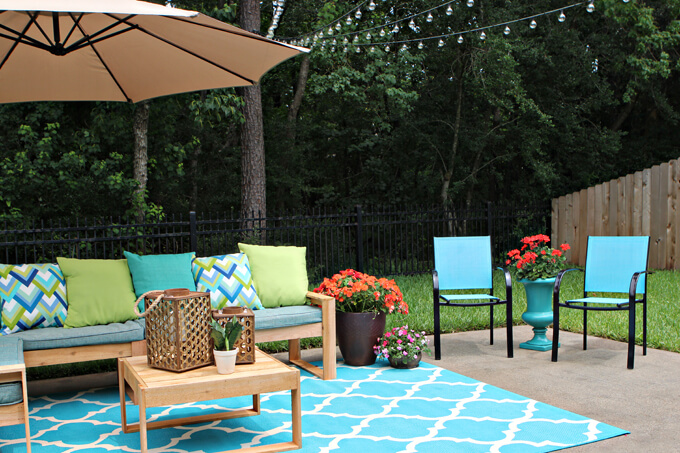
Can we talk about how awesome this umbrella is? It is functional, covers almost the entire sectional providing much needed shade during the day, and really helps define the space. And it was only $80. Boom.
We love the color and pattern of this rug and how it contrasts with the new color of our concrete. It is so bright and cheerful and just invites you to kick off your shoes and stay awhile. Bonus, the large rug covers a huge nasty crack in the concrete slab easily helping to disguise the faults in the concrete.
These blue chairs will eventually go around our outdoor table that we plan on building but for now we added them to the lounge area to provide extra seating. They are really comfy and we like that the mesh fabric will allow them to dry out with all this rain we are getting here in Houston.
I love relaxing in our new lounge area. We are so happy with all of our choices and how everything came together to really give this space a much needed refresh.
So what do you think? I know there isn’t much to compare it to since we literally started with a blank space but we are really proud of our back patio makeover and just the overall tone it sets in our backyard. Its funny, adding just a few bright outdoor decor pieces can make a huge difference in a space and make it much more enjoyable and welcoming.
If your backyard is in need of a little refresh, we hope this gives you a few ideas for your back patio makeover and the confidence that you don’t have to spend a ton of money to create your perfect outdoor oasis. For more awesome outdoor living inspiration, be sure to check out HGTV’s Spring House for lots more spring refresh ideas!
Tell Us: What is your favorite outdoor decor item to transform a space?
This is a sponsored conversation written by me on behalf of At Home. The opinions and text are all mine.