This DIY Photo holder made from a hula hoop is an inexpensive way to show off photos at a party or display Christmas cards.
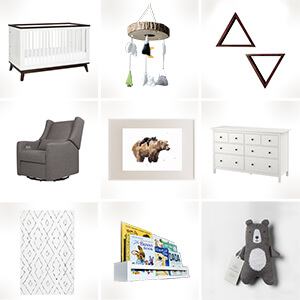
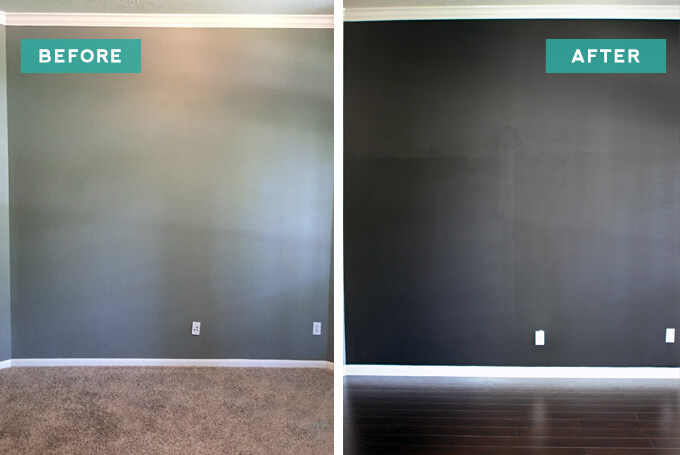
Planning a Neutral Nursery
See our plans and DIY projects for designing a neutral nursery for our nephew.

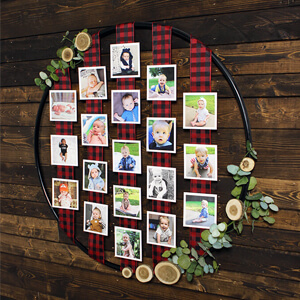
This DIY Photo holder made from a hula hoop is an inexpensive way to show off photos at a party or display Christmas cards.
See our plans and DIY projects for designing a neutral nursery for our nephew.

To get ready for the holiday season we created a set of DIY marble dipped mason jars to serve decadent dessert drinks.
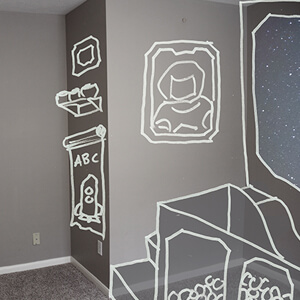
We’re sharing all of our plans for our son’s spaceship themed playroom!
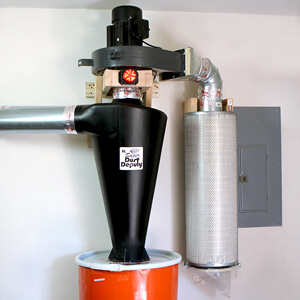
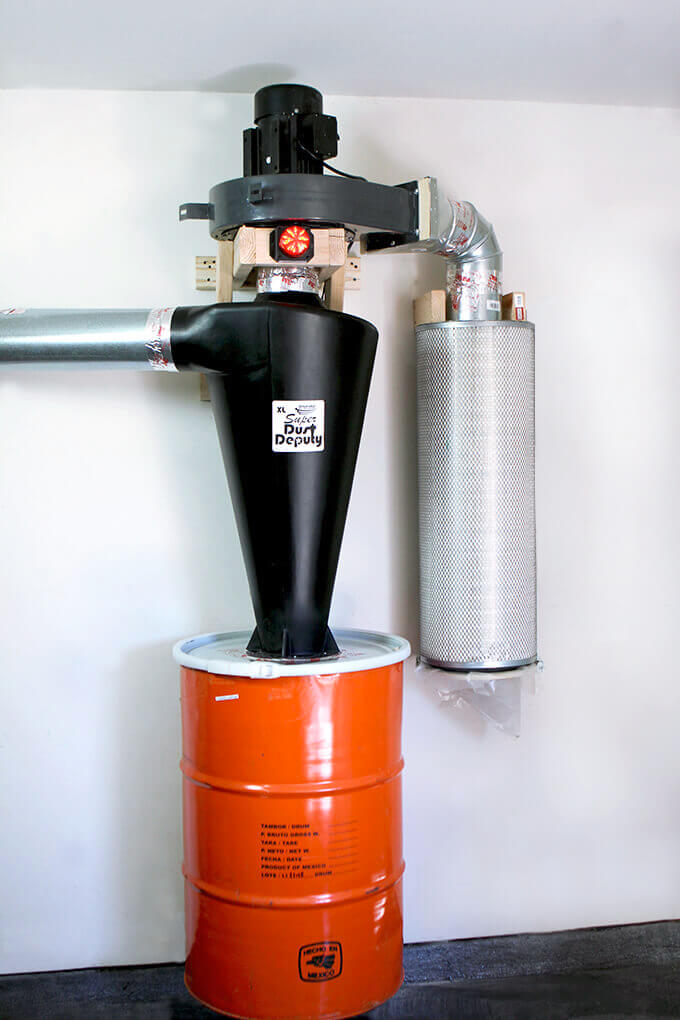
In this tutorial we will show how we upgraded a Harbor Freight Dust Collector with the Super Dust Deputy XL from Oneida Air Systems.
My latest undertaking helped our garage look and function more like a woodworking shop.
There comes a time when you work on enough DIY woodworking projects that a shop vacuum just won’t cut it anymore.
I was finding it was inconvenient because I was constantly having to unhook it from my table saw and then wheel it across the room to hook it up to my miter saw and then unhook it from my miter saw and wheel it back across the garage to the table saw.
It was also fairly ineffective because quite often the filter on the shop vacuum got clogged because the bin filled up so fast.
Well, that might be on me because I never cleaned it out, but when you are in the middle of a project, who wants to stop the fun part to clean out a vacuum after every few cuts? Obviously not me. So much sawdust would end up on the ground that Courtney joked she could make sawdust angels.
I would procrastinate cleaning the floor until I started a new project which meant if I ran out into the garage to get something, I most likely definitely tracked in a good amount of sawdust on my socks.
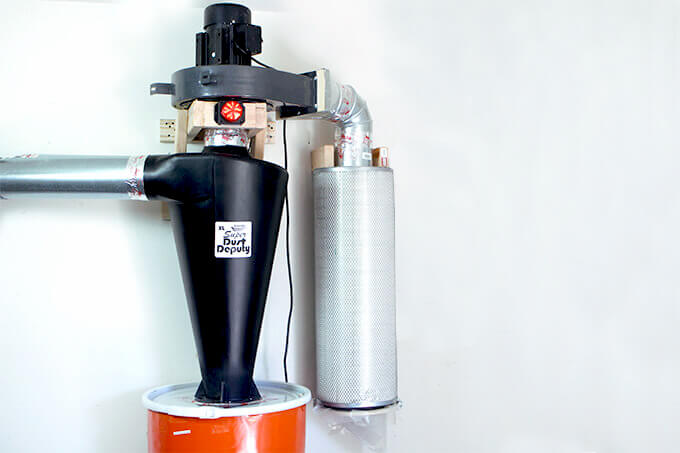
It became clear to me that I needed to build a dust collector so I finally built one for the Gray House Studio shop by taking a Harbor Freight dust collector and upgrading it to a 2 stage cyclone dust collector.
I did this with the Super Dust Deputy XL Cyclone Separator. Oneida Air Systems was kind enough to send us one to use and it made a huge impact.
My goal for my dust collector was to have it service multiple tools at the same time. Since the tools are separated by 10 to 20 feet I needed more power than the Harbor Freight dust collector could provide. It just wasn’t cutting it so I modified it with a larger impeller so that I could use a six inch duct.
Also, the filter bag that came with the Harbor Freight dust collector didn’t filter out the tiniest particles. What I really like about the Super Dust Deputy XL Cyclone Separator is it separates the wood chips and the dust so only air and very fine particles pass through the blower to the filter. This prevents any microscopic particles from entering back into the air in the shop.
Alright, enough talk, here is how I upgraded my Harbor Freight Dust Collector.
Shop the products we used for this project in one place.
FYI: This post contains a few affiliate links to products we used to make this project. Gray House Studio does receive commissions for sales from these links but at no extra cost to you. We appreciate you supporting this site. Read our privacy and disclosure policy. You can also easily shop our recommended products here.

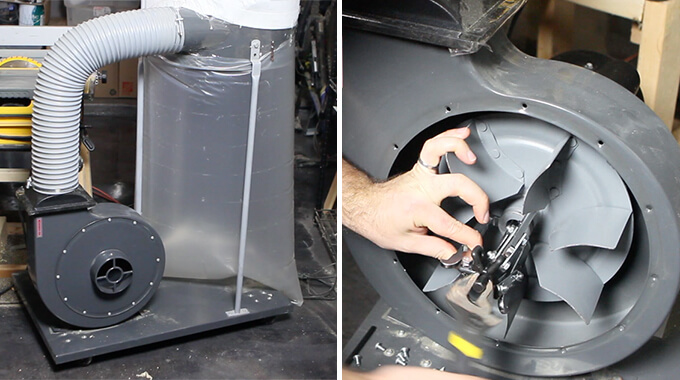
1. The dust collector build started with a stock 2hp single phase Harbor Freight dust collector.
To seamlessly connect to the Super Dust Deputy XL I’m going to upgrade the impeller. The stock blower can’t push enough air to support a 6″ opening. I removed the impeller using a puller tool.

2. The stock harbor freight blower has a 10″ impeller so the new 12″ impeller should boost performance significantly.
Plus, the stock Harbor Freight impeller as a forward-inclined fans whereas the larger Rikon impeller has a backward inclined.
Forward inclines provide more flow but lose power when pressure increases. The backward incline provides more consistent performance as the pressure increases.
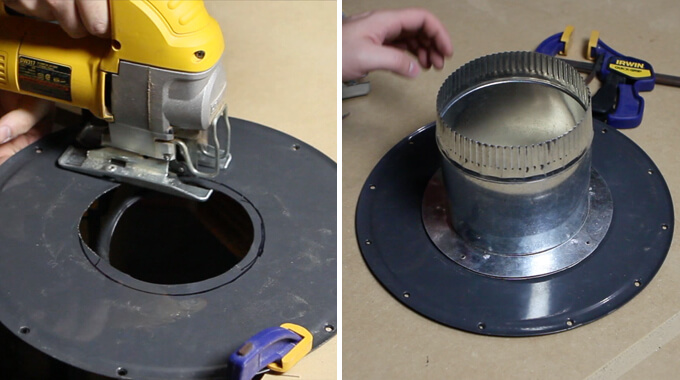
3. Using a jigsaw and sheet metal blade the intake port was widened from 5″ to 6″.
A 6″ duct collar was then attached to the intake faceplate with rivets.
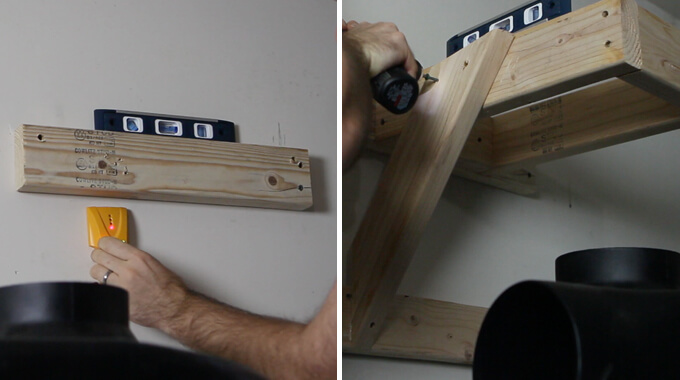
4. To hold the blower to the wall we made a mounting bracket with 2x4s anchored to the wall studs.
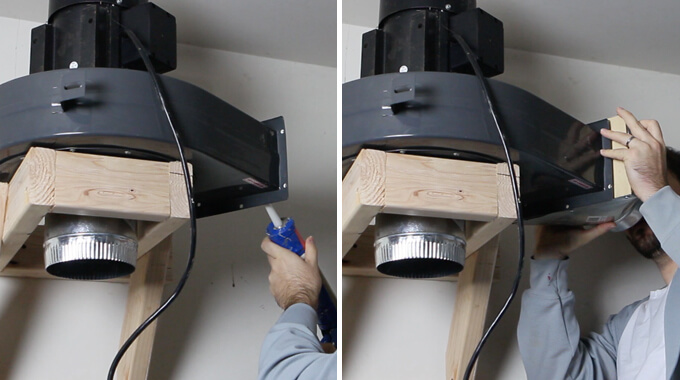
5. After mounting the blower on the 2×4 bracket the outlet port was converted to a 6″ outlet by attaching a duct transition with 1/2″ sheet metal screws
and liquid nails.
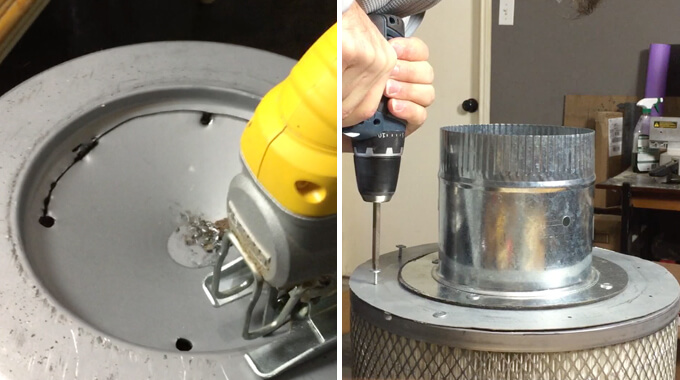
6. Before mounting the filter to the blower I used a jigsaw to open the closed side of the filter.
Then, cut a donut shaped mounting plate out of sheet metal to mount the 6″ collar and secured the mounting plate to the filter with 1/2″ sheet metal screws.
7. I made a U bracket out of 2x4s to hold the filter in place against the wall. The filter attached to the bracket with screws from the top.
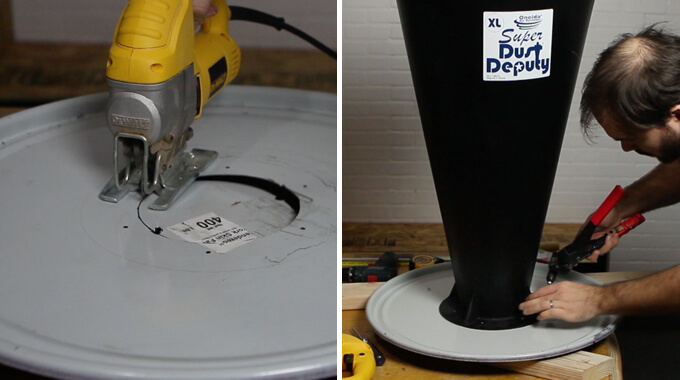
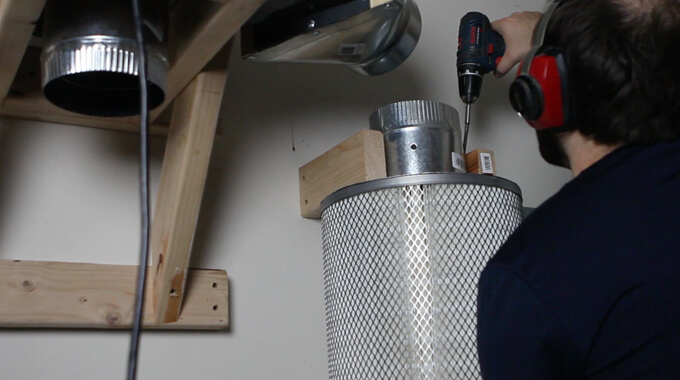
8. The Super Dust Deputy XL cyclone is designed to mount directly to the lid of the barrel.
The opening at the bottom of the cyclone is roughly 6″, so I cut out another 6″ hole with a jigsaw in the top of the barrel lid.
The cyclone comes with hardware to mount the cyclone and a gasket. Since I misplaced the hardware I used construction adhesive and large rivets.
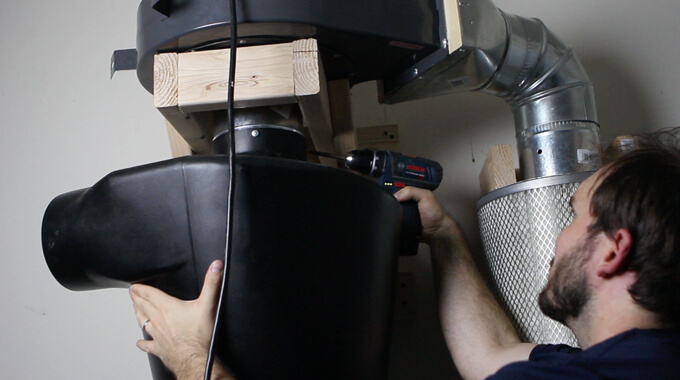
9. Once connected to the barrel lid the cyclone was attached to the inlet of the blower with 1/2″ screws.
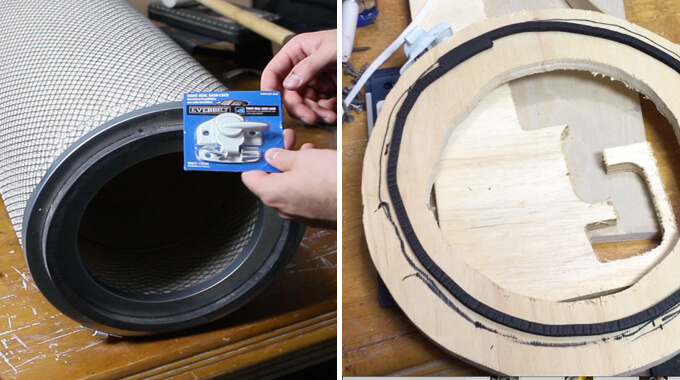
10. To seal the bottom of the filter I attached two latches to the filter allowing me to secure and remove a plywood donut and plastic bag.

11. The bag will catch any particles that makes it though the blower to the filter. Once particles accumulate they can be easily cleaned by emptying the bag.
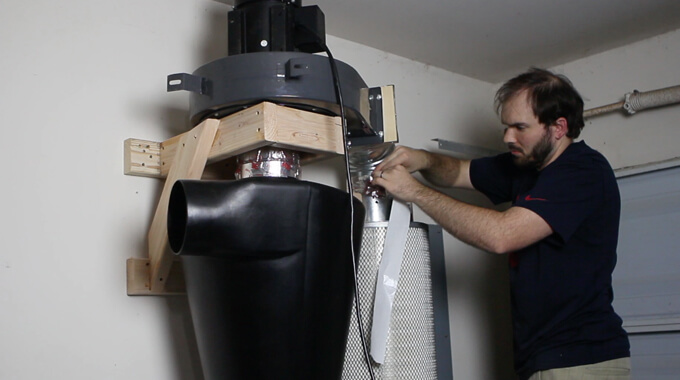
12. Before turning on the dust collector I taped all the joints with foil duct tape.
I tested it out and it was nice to have it work just how I wanted and not be near as loud as my old shop vacuum.
I am looking forward to the connivence and having a cleaner shop.
The Cyclone Separator made a huge difference in taking my dust collector to the next level and making it more powerful and effective. I was also excited to attach the ONEIDA Dust Sentry Level Sensor.
I can’t wait to work on my first woodworking project with my new upgraded dust collector.

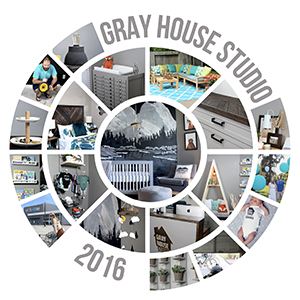
We are reflecting on this past year and looking back at our favorite 2016 DIY Projects and the highlights from a busy year.

It’s hard to believe that the year is already coming to an end today. 2016 marks the second full year for our DIY home renovation blog, Gray House Studio and it was one chalked full of room makeovers, large scale DIY project builds, exciting features, and one huge life changing event.
Yes, 2016 was a busy one for Brent and I. We started the year chugging along at our relatively fast pace pace, by the middle of the year we went into overdrive with our projects working warp speed to make sure we finished all of our scheduled projects on time for a certain someone’s arrival and then we ended the year slowing way down as DIY projects took a backseat to family life.
Today we are looking back at some of the highlights from this busy year and our favorite DIY home renovation projects.

COURTNEY: We started off the year by appearing on Houston’s local morning show Great Day Houston. This was our second time on the live show so we weren’t nearly as nervous as the first time. We demonstrated some of our favorite ways to transform ceramic items into DIY tiered stands and DIY table lamps. Although, it felt like our old college days because we were wrapping up these projects just hours before we went on air. Oops.
BRENT: From my perspective we gave a flawless performance. I even really stepped up my game and brought the energy. Unfortunately, my 120% can still seem a bit, how should I say this, dull.
Courtney found a comment where someone watching the show asked, “Who is that dope head drilling a hole in a pot.” She thought it was hilarious and now sings, Who’s that dope head? Who’s that dope head? It’s Brent! (to the tune of the New Girl theme song).
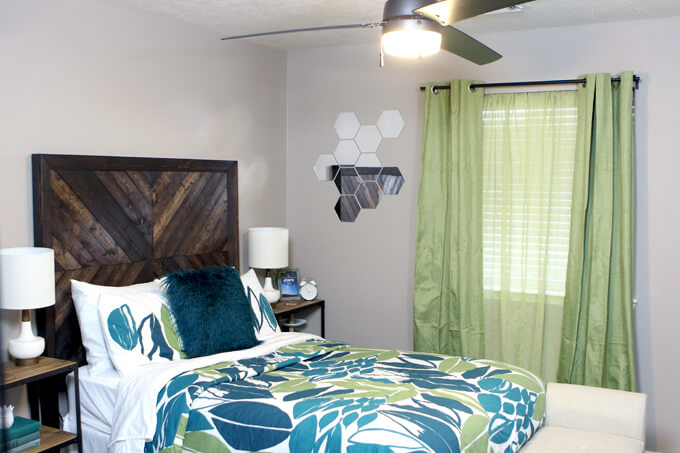
COURTNEY: In February we did a complete makeover of our guest bedroom. When we received news that Brent’s mom would need to undergo treatment at MD Anderson for a few days every month starting in February, we knew we wanted them to stay with us to make the process a little easier.
It was our goal to transform our mismatched spare room into a relaxing oasis guest bedroom where they could rest and feel comfortable every time they came to Houston.
We put this room together in just two weeks and it was our first complete room transformation. I loved designing this room around the tropical duvet cover. Our favorite DIY project has to be the DIY headboard we built for under $50.
BRENT: I knew my parents wouldn’t care what room they stayed in or what it looked like, but it was fun to surprise them on their first visit. It’s like I always say, “When you are at a loss for words, decorate.”

COURTNEY: In February we had the awesome opportunity to teach a video course for the Bob Vila Academy. This was an honor. Who doesn’t know and love Bob Vila?
In this course we taught a course on how to make DIY wall sconces like the one next to Brent’s side of the bed. Somehow life got in the way and we have yet to make the matching sconce. I am hoping 2017 brings a little light to my side of the bed.
BRENT: It was a dream come true getting to virtually rub elbows with THE Bob Vila. As a kid I found great humor watching the classic rivalry between Tim and Bob on the sitcom Home Improvement. Of course Courtney didn’t even realize Bob Vila was on the show because she was too consumed by Johnathan Taylor Thomas.
COURTNEY: I was convinced I was going to marry JTT.

COURTNEY: February was a big month for Gray House Studio. We found out we were selected as one of the top ten DIY and decorating blogs in this year’s Better Homes & Gardens Blogger Awards. While we didn’t win, we felt over the moon excited and honor to be included in a group of talented DIY bloggers.
With our blog just a little over a year old at the time, it was encouraging to get awesome feedback from Better Homes and Gardens.
BRENT: She said what I was going to say.
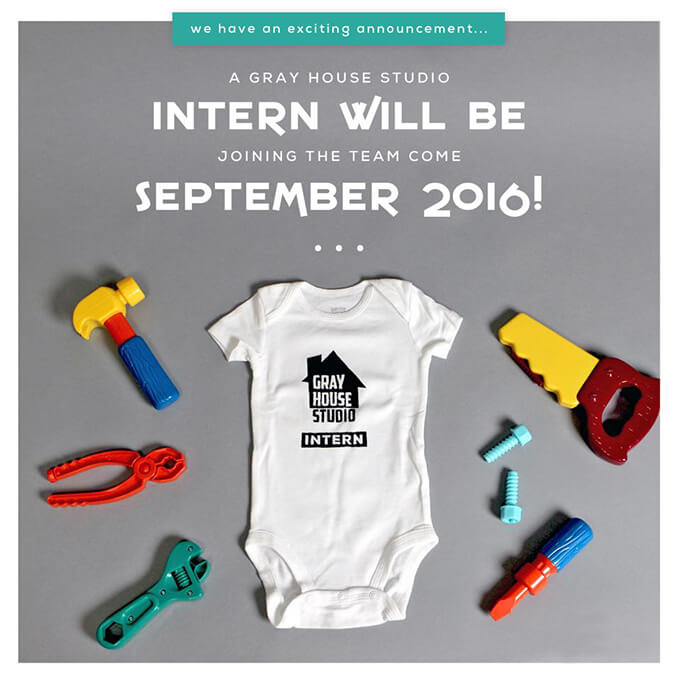
COURTNEY: In March we announced our big news that we had been holding onto for two months, we were expecting a baby and that the Gray House Studio intern was set to join the team in September! We were so excited for the good news and knew some big changes were about to go down for Gray House including my limited ability to help with DIY projects as the months rolled on.
BRENT: I don’t think we could have been more excited to know that Courtney was pregnant. We immediately began brainstorming nursery ideas even though I found great joy pretending like we hadn’t given any thought. I liked to tell friends, “We will probably get a crib and pick some diapers up on the way home from the hospital.”
COURTNEY: We have been trying to grow our family for two years and when it wasn’t happening, we decided to go ahead and make the spare back room a gym (which we love) rather than let it just sit collecting junk. We figured that if or when the time came, we would make the second back bedroom the nursery, but in January we needed the second back bedroom to be a guest room.
Since we had JUST finished the guest room makeover when we found out we were pregnant, we didn’t want to have to redo this room quite yet. This led to the great room reshuffle of 2016. April was the month of planning. We needed to move the office across the hall to where the work table was (the work table got bumped to the garage) so we could use the room that I was using for the office for the nursery.
And while we were moving the office, we might as well make it exactly how we want so before we started the nursery we started planning how to makeover the office.
Oh and as if we didn’t have enough on our plate, we thought, “What the heck, let’s plan a back patio makeover as well!”. It’s like we find great excitement in getting in over our heads.
BRENT: Well, Courtney and I had been playing paper rock scissors to determine whether to redo her office or the garage but once the nursery was on the table, we knew we had to redo Courtney’s office. I declare 2017 as the “year of the garage”.
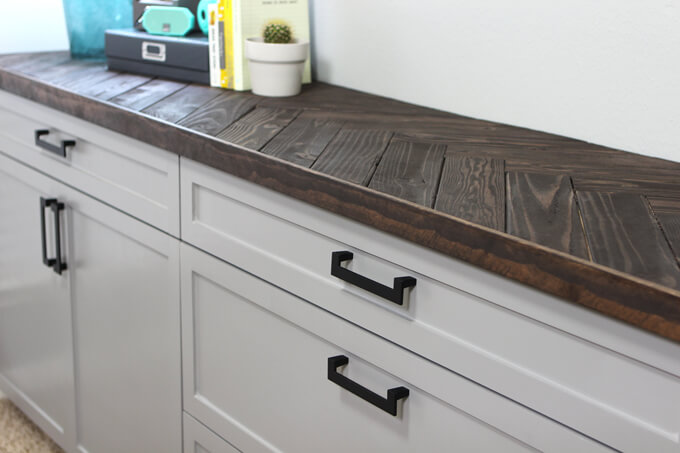
COURTNEY: April was also the month that we built the massive cabinets that line the large wall in our new home office. We built them all from scratch, including the DIY herringbone countertop.
They turned out awesome and really allow me to keep all of my paperwork and office supplies neatly organized and hidden which is important because the office is in the front of our house in a room that has no doors.
The cabinets were one of our largest projects to date and unfortunately coincided with when I really stepped up my napping game leaving Brent to shoulder the majority of the work which would become a trend for the remaining large DIY projects throughout the rest of the year.
BRENT: I tried to play it cool but these cabinets were a big project. We rolled the dice on a few design ideas and Courtney left me to make all the final building decisions. Luckily, I didn’t stray too far from our design conversations as I built the cabinets and we love the results.

COURTNEY: In May we found out the Gray House Studio intern would be a boy! We were so happy to find out that we were having a healthy baby boy. I did have to remind Brent that it would be quite awhile before Connor could join him in the garage and use the power tools. Once we found out we were having a boy, we started brainstorming ideas for his nursery.
BRENT: I said all along I thought we were having a girl, but secretly I was very happy to know we were having a son. What dad wouldn’t be? Plus, I felt like I had more useful ideas when it came to a boy nursery as opposed to a girl nursery.
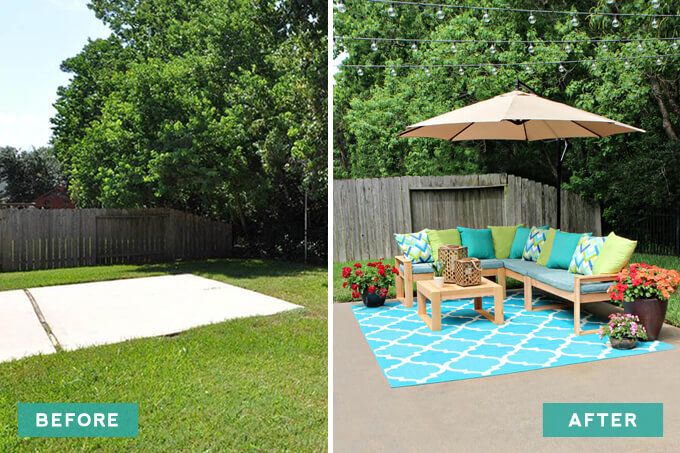
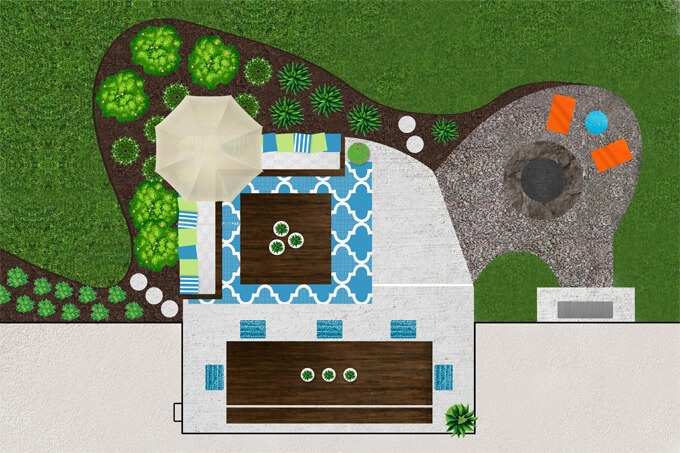
COURTNEY: We also knocked out about half of our back patio makeover in May. We love our backyard but the back patio was a mess so we spruced it up by building a DIY outdoor sectional for under $100 out of cedar fence planks (here are the free outdoor sectional plans) and decorating it with brightly colored accessories.
It made a huge difference in the space and we couldn’t wait to sit out on the back patio and enjoy our hard work. But dang if we don’t live in Houston and by the time the end of May rolled around it was already too hot and humid to enjoy sitting outside for longer than five minutes. So we will have to wait until the spring to reap the benefits of our hard work.
BRENT: This must be our most colorful project to date. Courtney’s right, its way too hot to enjoy a beautiful patio but I have sweated it out a few times on the patio just to pretend to enjoy the space.
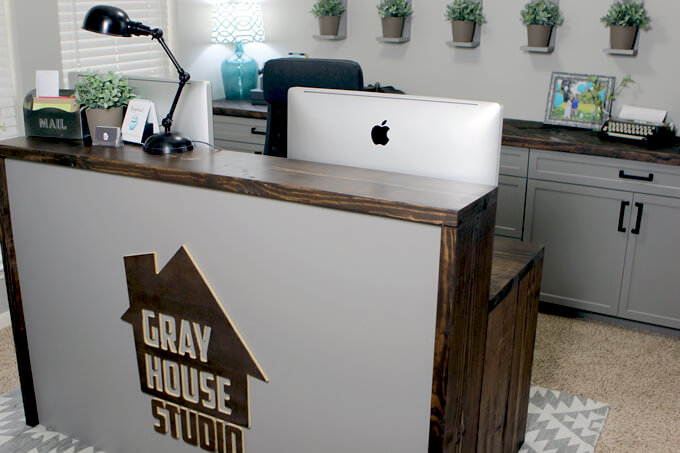
COURTNEY: In June we completed our home office makeover! I ended up really liking having my office open and adjacent to the library. We decorated the room with DIY wall-mounted plant shelves above the cabinets. We also incorporated several cool industrial home office organization pieces.
Brent built me a brand new two-level desk based on a display stand I liked at Restoration Hardware. I believe the desk was the DIY last project I was able to work on. A garage in Houston during the summertime is no place for a pregnant Courtney.
BRENT: We dodged a bullet with the desk. Since I was the only one in the garage for most of this build, I moved as quickly as possible. Plus, it is hard to think while your trying to avoid a heat stroke.
I never considered measuring the width of our front door and it wasn’t until move-in day that Courtney asked if it would fit through the front door. Luckily, the desk was not one inch deeper. There was just enough room to move the desk in as long as you didn’t hold it by the sides.
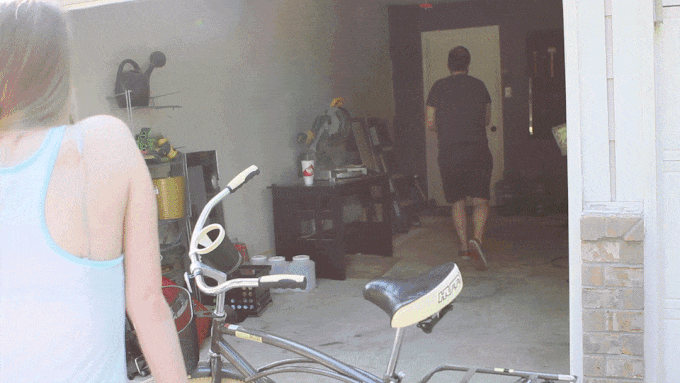
COURTNEY: June was also the month that we partnered with Security by Reliant to show what life is like without a smart home security system. While we were making this silly video, our new neighbor was moving into the house next door. I am pretty sure she thought we were absolutely crawling under the garage door. I promise we are usually very quiet neighbors.
I don’t know if anyone else thought we were as funny as we think we were, but it was a blast putting together since every part of it was based on true events. If you missed it, watch the video here..
BRENT: Bucket list item 126: Successfully crawl under a garage door (without a helmet). CHECK!
COURTNEY: T minus three months until the Gray House intern was set to make his arrival and we finally began working on the room that would be the nursery. We started the room makeover from the ground up Literally, the foundation was a mess. It took almost a month just to get the carpet pulled up, the foundation corrected and to lay the new laminate flooring.
BRENT: When we pulled up the carpet I was optimistic about finishing the nursery in plenty of time but after seeing the state of the foundation hidden by the carpet, I was a bit worried. The laminate floor turned out great it just took longer than we though do to the concrete slab repair.

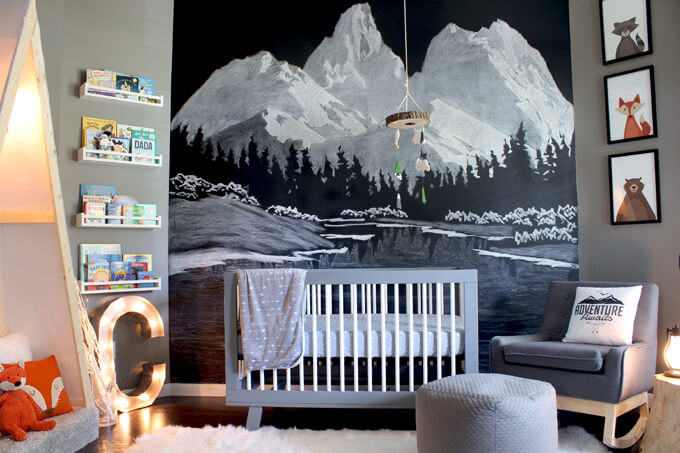
COURTNEY: August was all about the nursery. We decided on a theme, a modern outdoor nursery, and were working fast and furious to get all of our DIY nursery projects completed on time. We made a log side table as well as a mobile with a nursery camera built into it.
BRENT: I definitely have a few hoarder tendencies, like surfing the FREE section on Craigslist.org, but this time it paid off. We scored the perfect log for out DIY Log Side Table for nothing!

COURTNEY: September was due date month and my doctor said she thought he could come any day starting the second week of September. Which left poor Brent scrambling to finish the nursery. There were some days where I honestly didn’t think we would finish.
But wouldn’t you know, Connor was already very polite and waited until we finished building two large DIY projects, the changing table and the baby clothes rack (my two favorite pieces in the room) and two smaller DIY projects, the nursery book shelves and the nursery wall storage.
September was only a few months ago but it seems like a blur. Waiting on pins and needles to have a baby that could come any day keeps you on your toes and lights a fire under you to finish a room.
BRENT: We had the essential items in the nursery, crib and changing table, but it didn’t feel complete. Although I tried to keep my composure I was in full panic mode. It felt good to get a few more functional decor pieces finished before Connor was born.
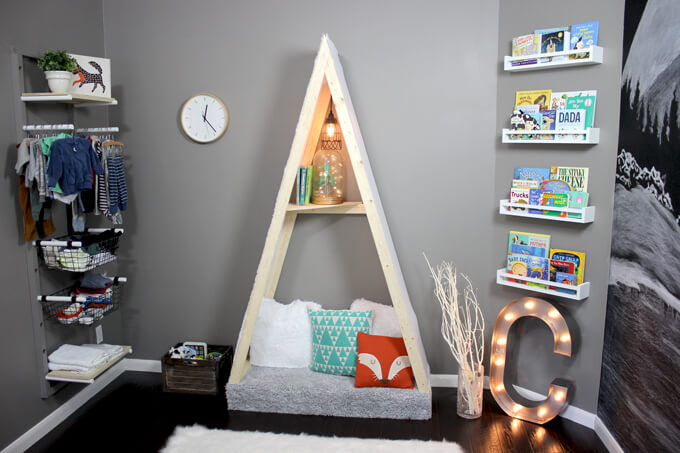
COURTNEY: Since the Gray House intern was taking his sweet time to make his way into the world, we managed to squeeze in one more large bonus DIY project, a kid’s reading nook tent! This is another project where we got our inspiration from a store display and I am so glad we were able to add this piece to the room. It adds a lot of character.
BRENT: I’m glad Connor held out because this is the project I looked forward to the most. To this day our cat, Jake, is the only one that has taken advantage of the tent reading nook but soon I’m sure Connor will enjoy spending time under the tent.

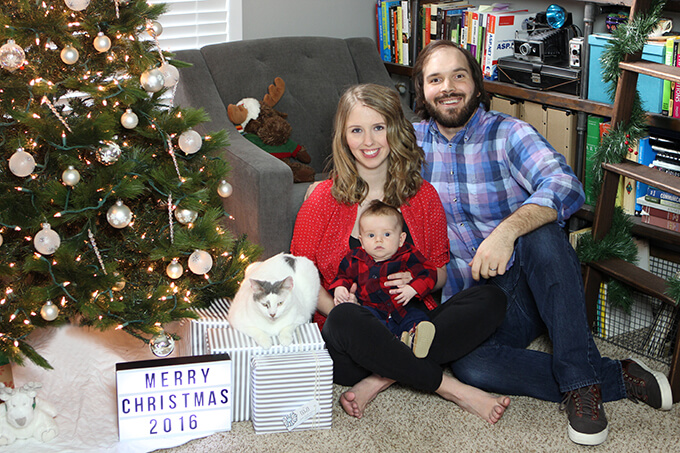
COURTNEY: On October 1, 2016 at 5:12pm, Connor Jack Richardson was born weighing 9lbs. 6oz.! A week late, we finally got to meet our little Gray House intern face to face. It was the most painful few hours (I decided to forgo the epidural to see if I could because I am stubborn and like a challenge) but also the best day of the year and our lives.
We had been planning for him for months and months and to finally have him here in our arms was surreal.
BRENT: After ghosting my phone for several weeks expecting “the phone call” any minute and then planning to speed off to the hospital, wouldn’t you know Connor was a week late and Courtney had to be induced. It was well worth the wait, although I am still looking for an excuse to drive somewhere fast.
COURTNEY: By November our modern outdoor nursery was finished! This was the first room in our home that was completed floor to ceiling. I am so in love with how this room turned out and it feels magical getting to hang out in this space with our little guy.
I had this idea in my head that we might keep our same pace with the DIY projects and blog after Connor was born. Ha. I was so young, so naive three months ago. Taking care of a newborn is a full time job and is exhausting so the Gray House Studio projects have slowed down significantly these last few months of the year. But that’s okay because our lives have changed for the better and this is a new but short season and I want to be present and enjoy every second of it.
BRENT: We only thought it would be just the cat that kept us up at night. Caring for a baby is on a new level of being tired but worth all the work. We are excited to keep making more DIY projects but have has to adjust our expectations of what is possible to get done.
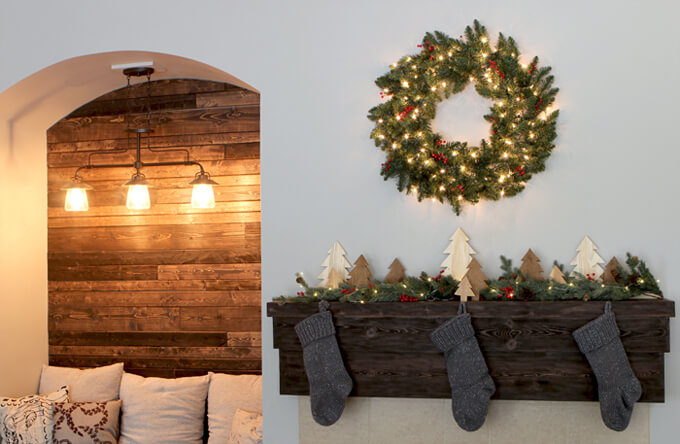
COURTNEY: I was NOT on my Christmas decor game this year. I guess having a new baby will do that to you. But we did get our Christmas tree up and spruced up our fireplace mantel. Brent built a mantel cover and cut out cute wooden trees to create a simple rustic Christmas mantel which rounded out our last DIY project for the year.
BRENT: When we first shared our reading nook, we received some negative comments about how the reading nook was cool but the mantle was ugly and didn’t match. Well, I hope whoever felt that way is reading this because now they do match and we agree it looks much better. Boom!
When Brent and I were looking back through all of our projects from this year to write this post we kept saying, “Wow, that was this year!?” Three room makeovers + a back patio makeover, a tv appearance, lots and lots of large but fun DIY projects, oh and having a kid made 2016 quite a busy year for Gray House Studio and our DIY home renovation blog.
It was fun to look back and reflect on this year as we look forward to what is in store for us in 2017. Things will probably start off slow this year as we are still adjusting to life as a family of three (plus Jake the studio cat). I am excited to focus on some organization projects, master closet I am coming for you! Brent is excited to transform the garage into a more legit shop.
We are working on a complete overhaul of the website, which we can’t wait to launch soon. We are also hoping to make more videos, including behind the scenes videos so be sure to subscribe to our YouTube channel to follow along!
We want to thank everyone who stops by our blog, leaves comments, asks questions, builds our projects (please send them to us so we can feature them here on the blog), and follows along with our DIY journey.
Happy 2017!