Lighting

DIY LIGHTING PROJECTS

5 DIY Lighting Projects

We have rounded up five of our favorite DIY lighting projects that we have made. These weekend lighting projects are easy to make, cost effective and have made a big difference in our home.

DIY Lighting Projects

Light fixtures, pendant lights, and table lamps can be expensive depending on the style you like. For some reason the style we like is always out of our price range. That is why DIY lighting projects are some of our favorites to tackle here at Gray House.

Brent and I love finding lighting options that we like and then figuring out a way to make our own in a similar style but for way cheaper. We have created knockoff versions of a pendant light from Rejuvenation and a table lamp from Urban Outfitters.

We have had to create DIY lighting projects as solutions to lighting problems we were facing. And then sometimes we work on lighting projects just to create a fun atmosphere. Whatever the reason, we love creating our own DIY lighting projects and today we are sharing five of our favorites we have worked on so far.

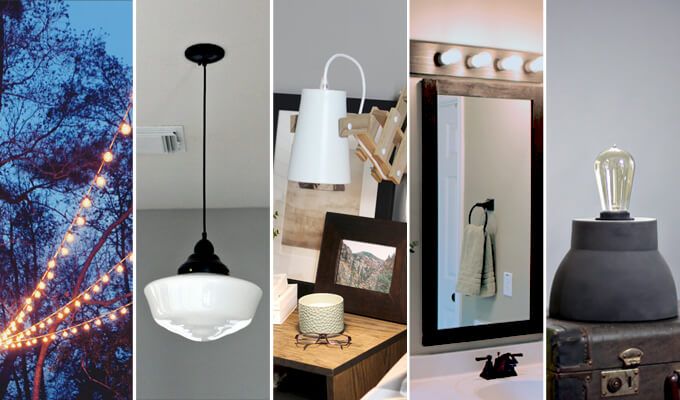
Our 5 Favorite DIY Lighting Projects

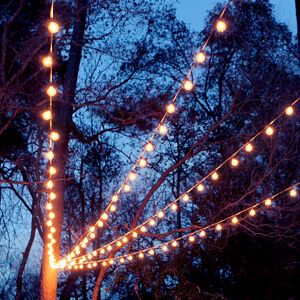
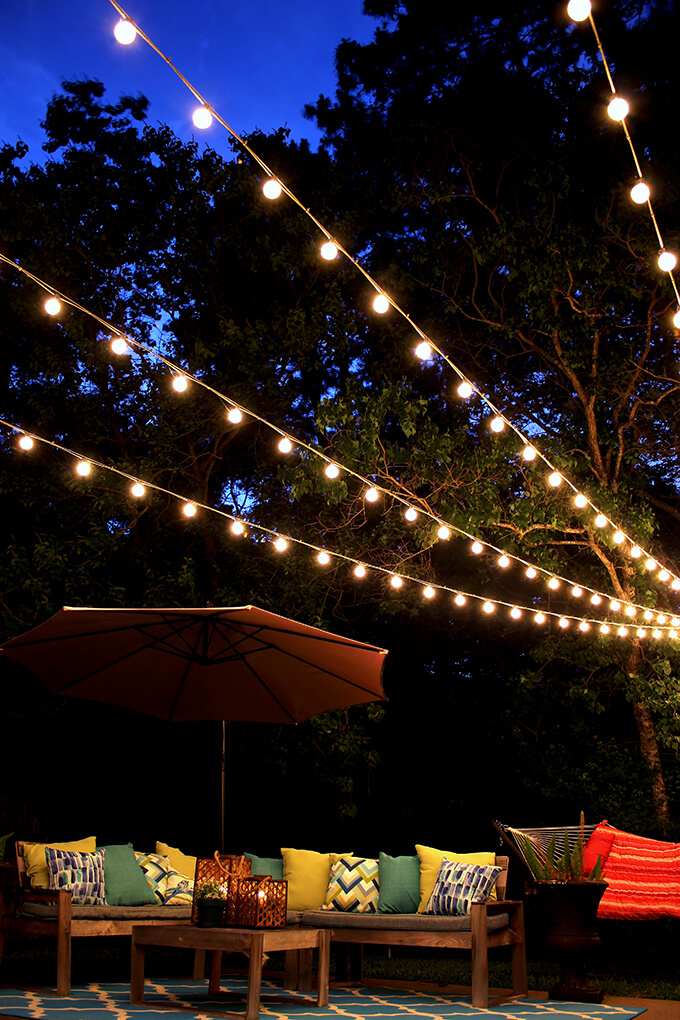
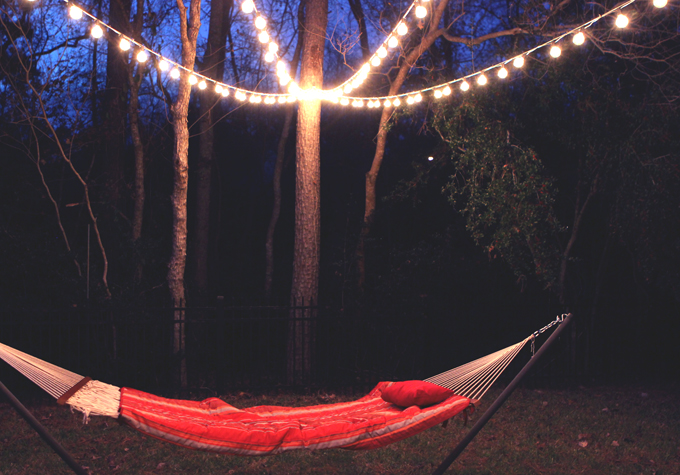
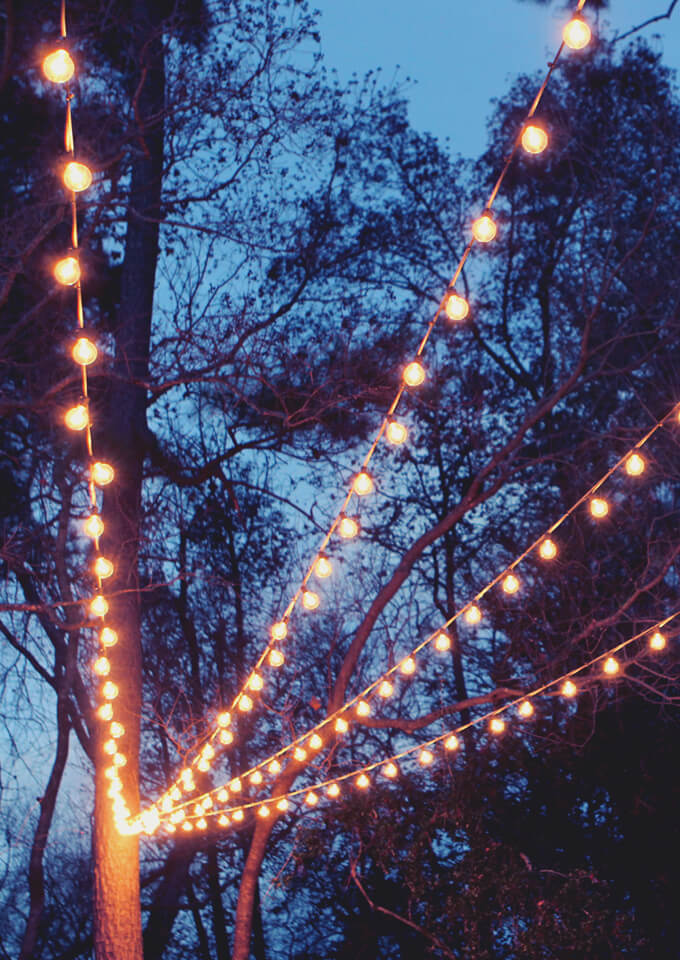
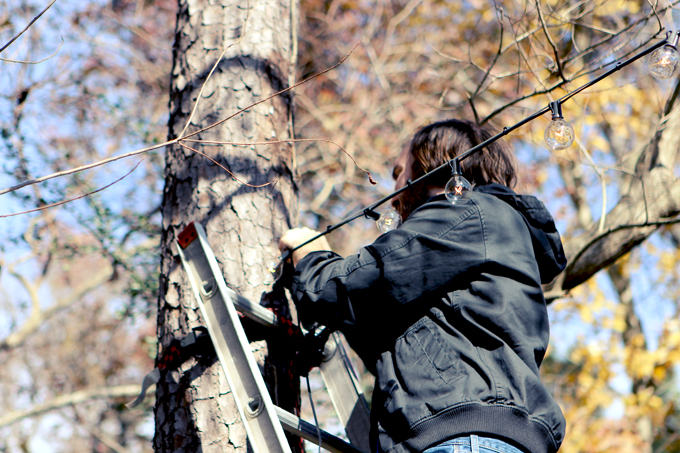
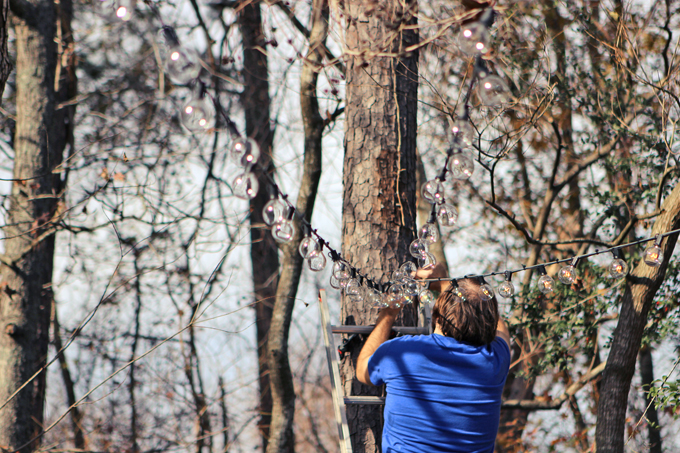
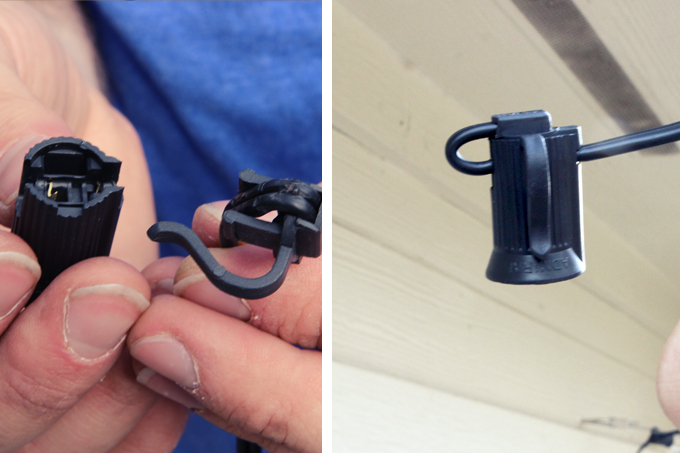
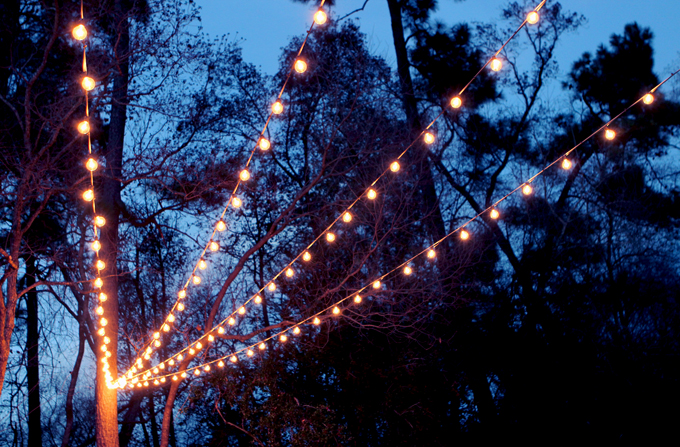
#1. Canopy of String Lights

DIY Lighting Projects
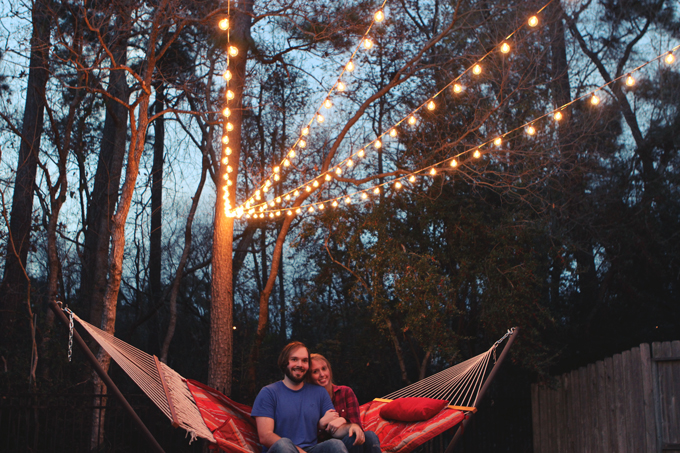
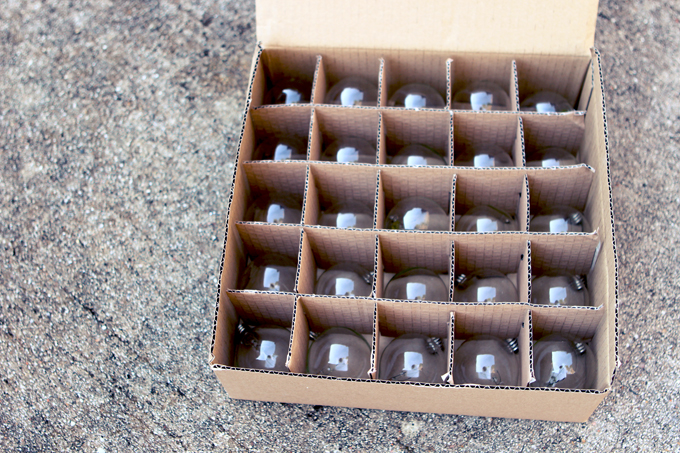
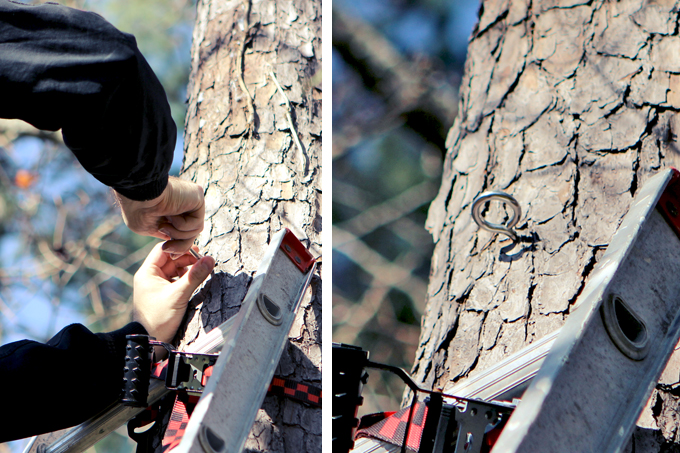
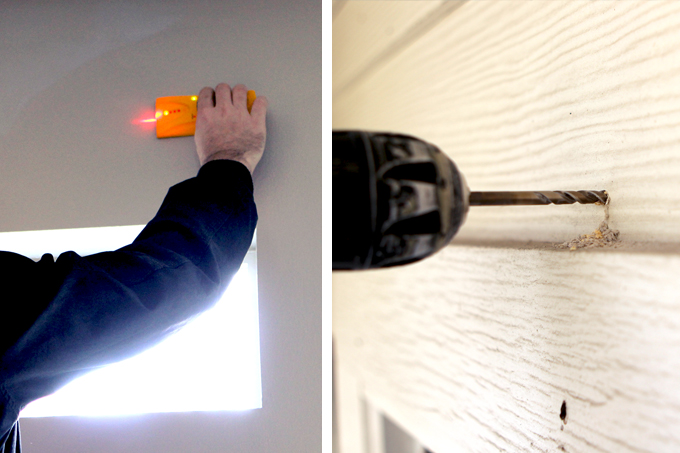
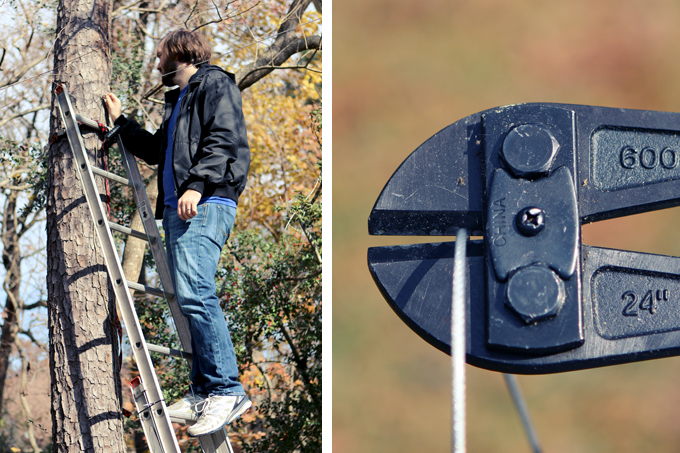
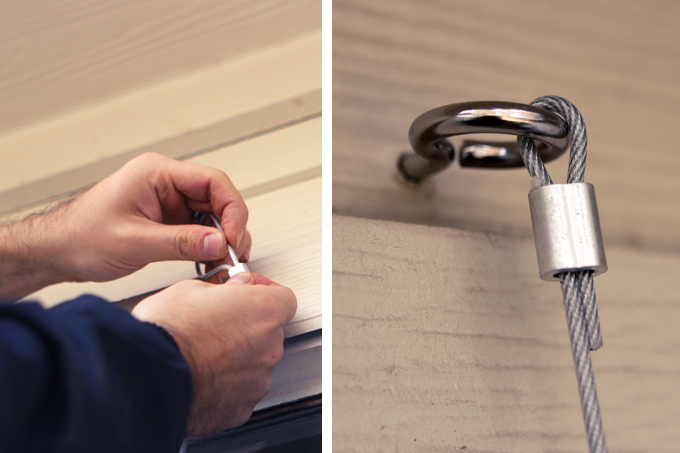
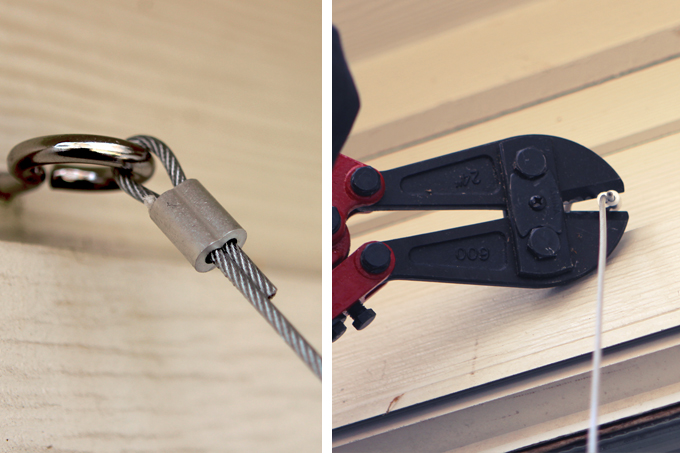
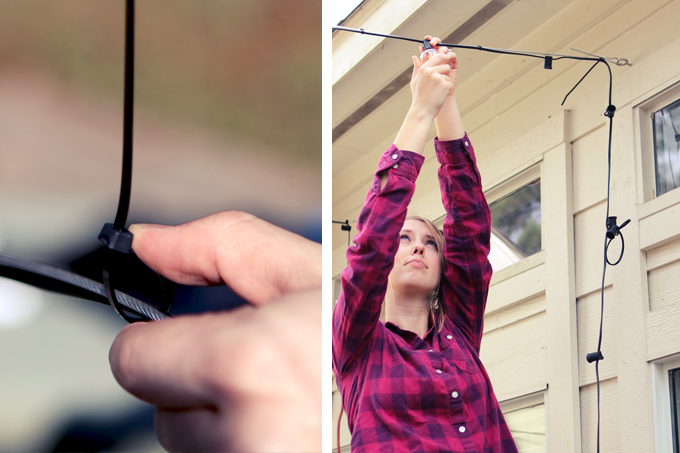
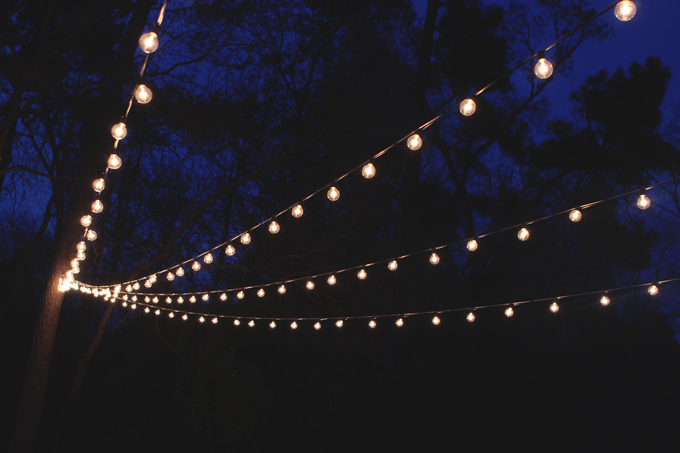
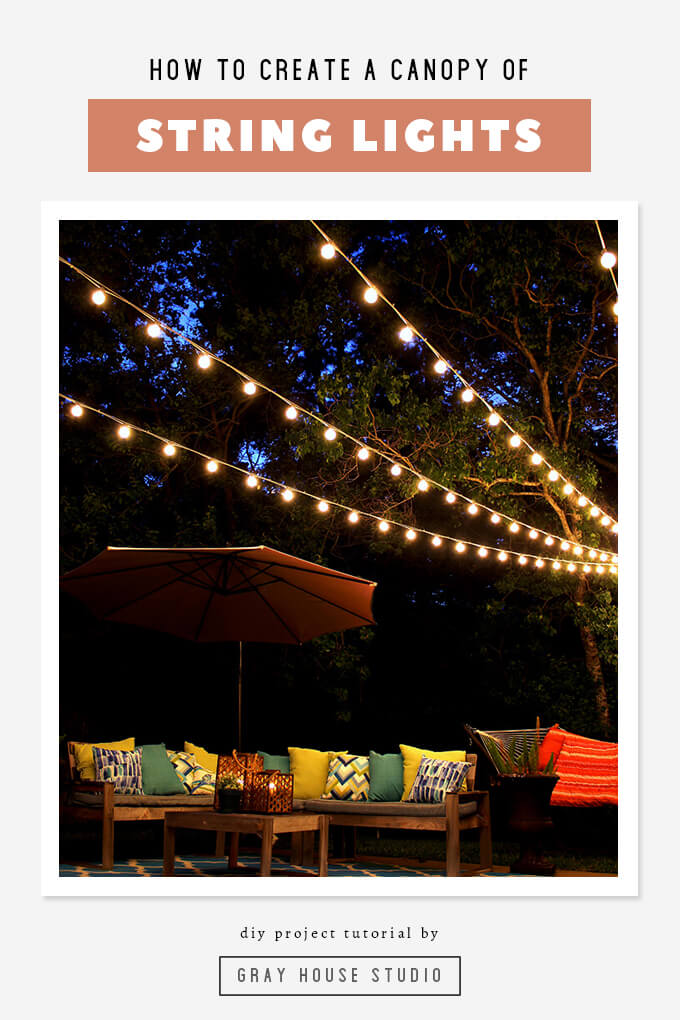
By far one of my favorite lighting projects and one of our most popular Gray House Studio projects to date is our canopy of string lights we created in our backyard. It is just as dreamy and magical as I had hoped. We love spending summer nights under these lights that were inspired by the backyard in Parenthood.

Our neighbors even created their own canopy of string lights in their backyard after seeing ours so at night when both backyards are lit up it looks awesome and is REALLY bright. Ha. We like our string lights so much that we also hung them around our family boat dock for our fall party last year.

☆ Check out our full tutorial on creating a canopy of string lights.

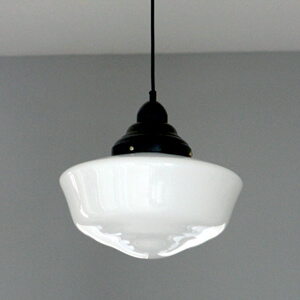
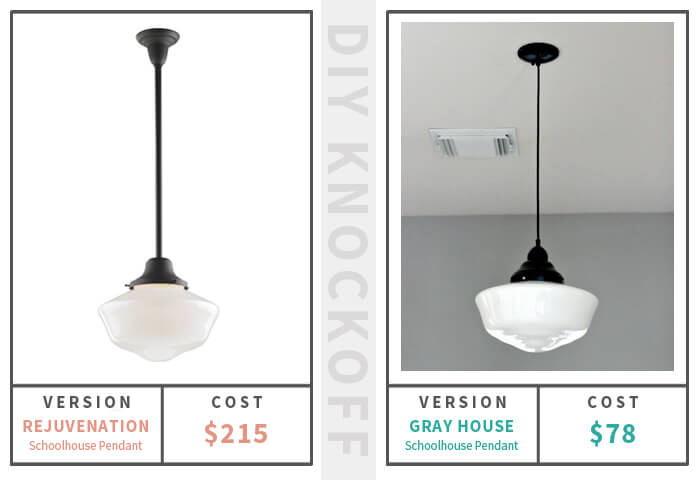
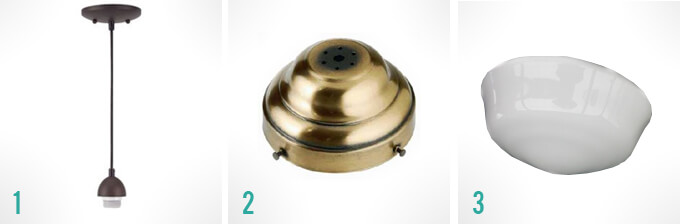
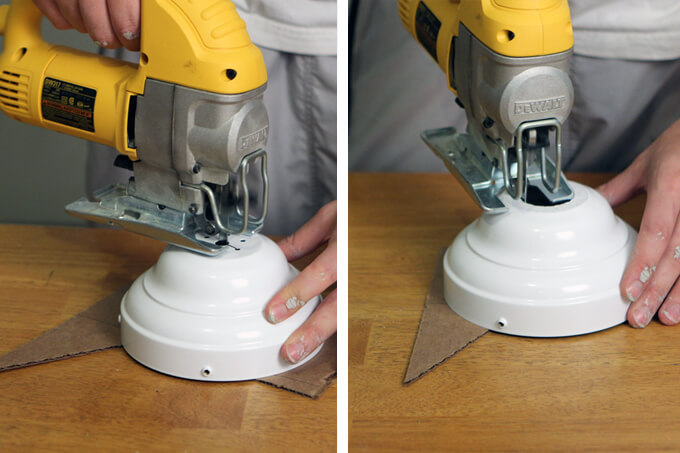
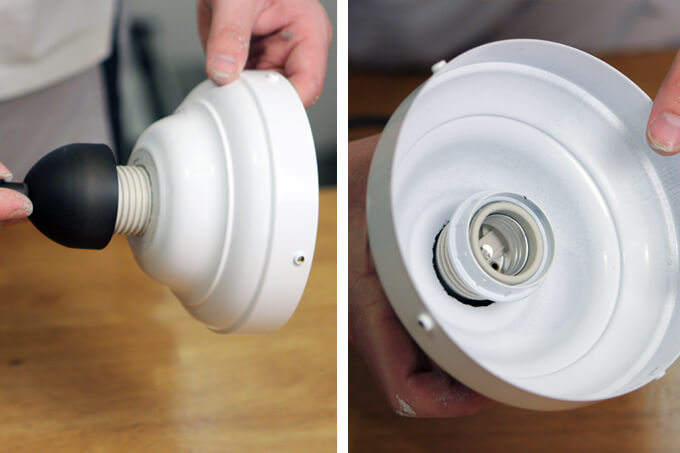
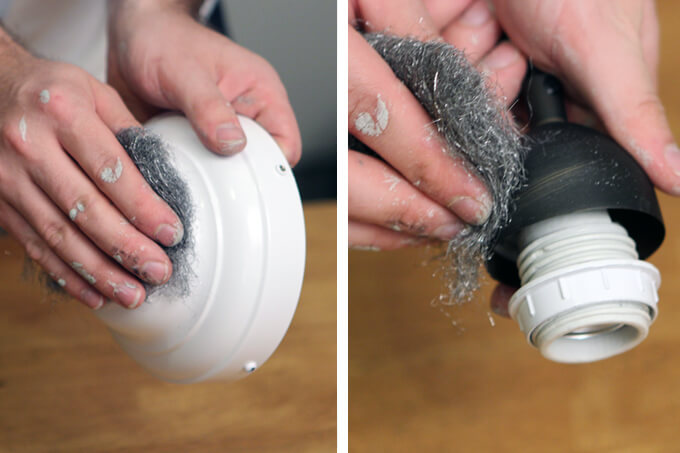
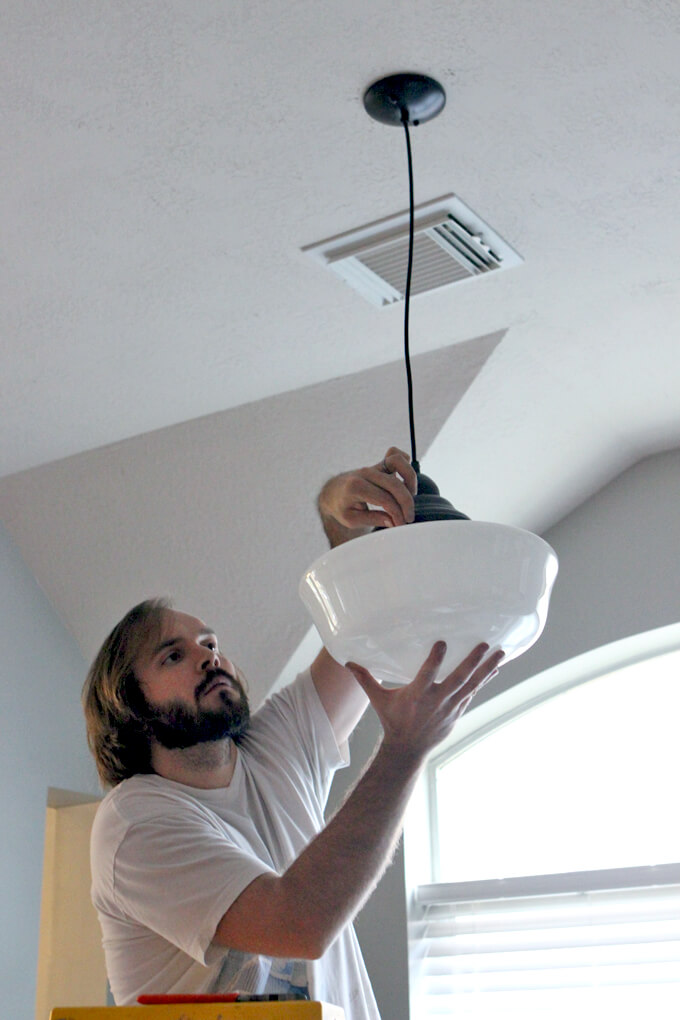
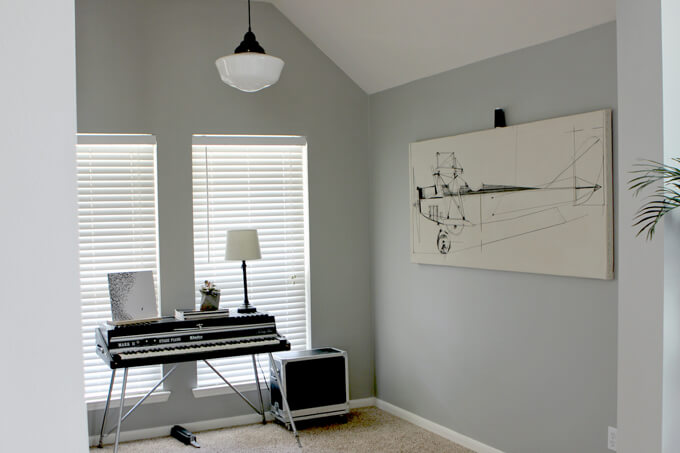
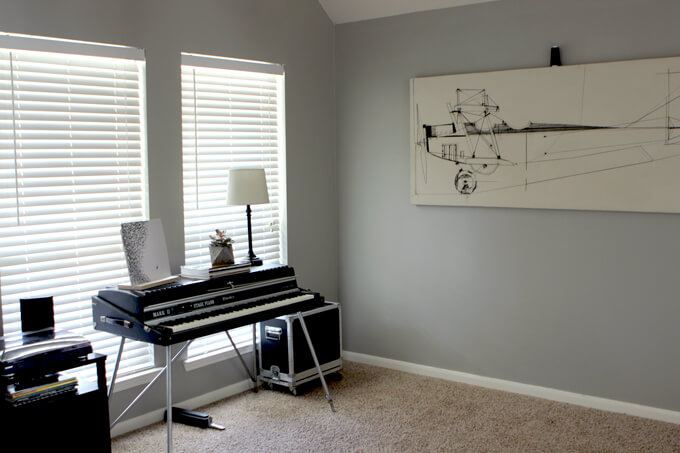
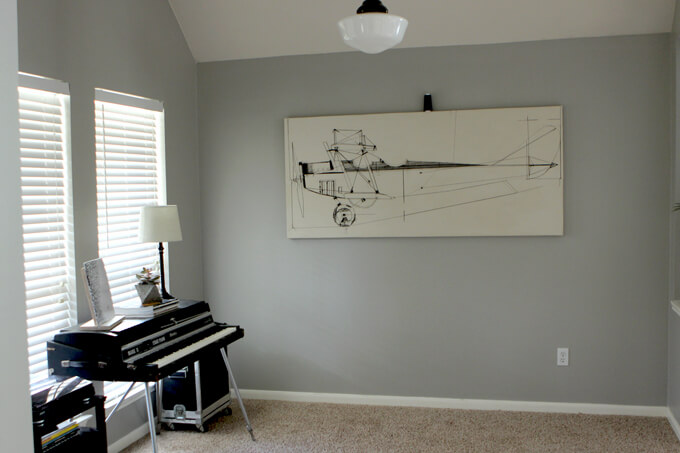
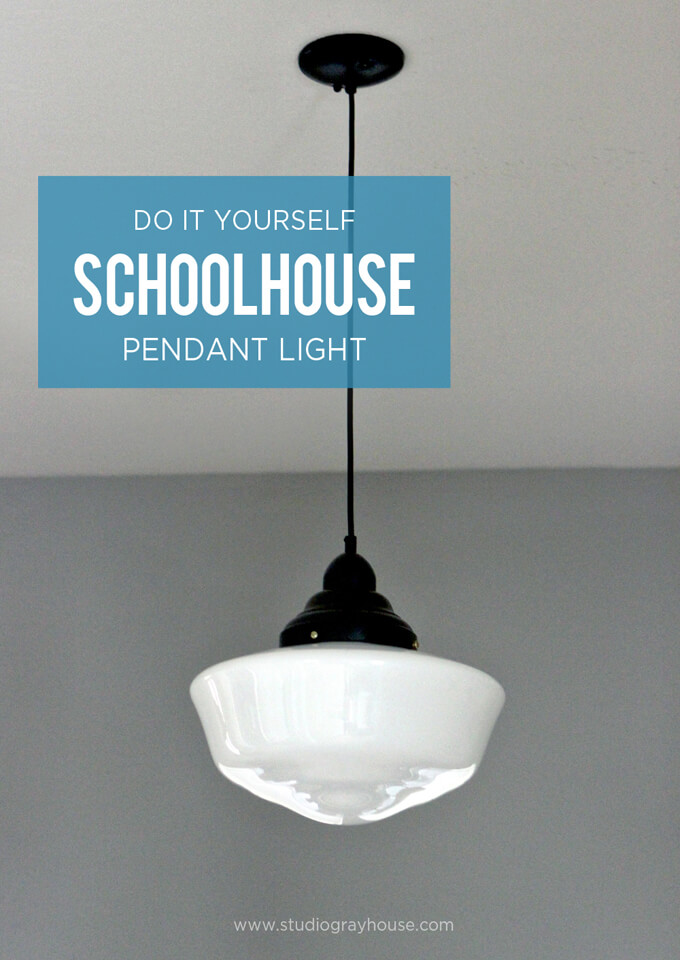
#2. schoolhouse pendant light

DIY Lighting Projects
When it came to creating our home library, we knew the old light fixture had to go and a schoolhouse pendant light was the perfect replacement. But the prices at the store were out of our budget. We couldn’t even really afford one let alone the two that we needed.

So we bought two vintage schoolhouse globes off of E-bay and got to work DIY-ing our own version of the one we had been eyeing at Rejuvenation. We were so happy with how they turned out and that we could make two for less than it cost to purchase one. They are the perfect addition to our home library.

☆ Check out our full tutorial on making a schoolhouse pendant light.

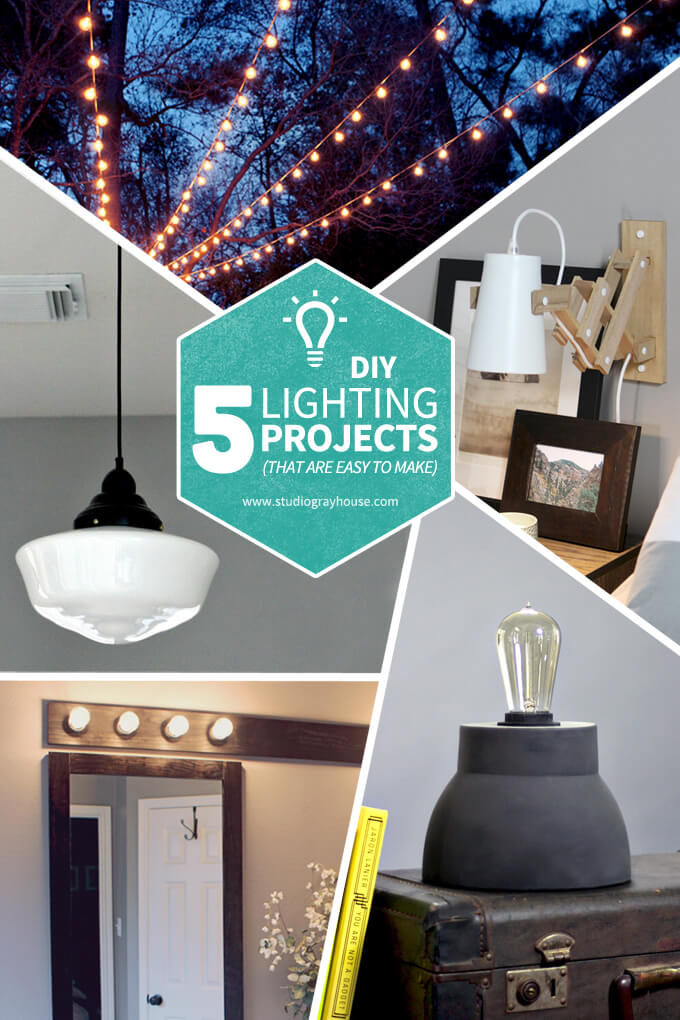
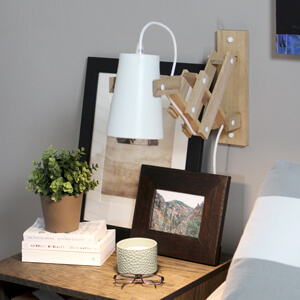
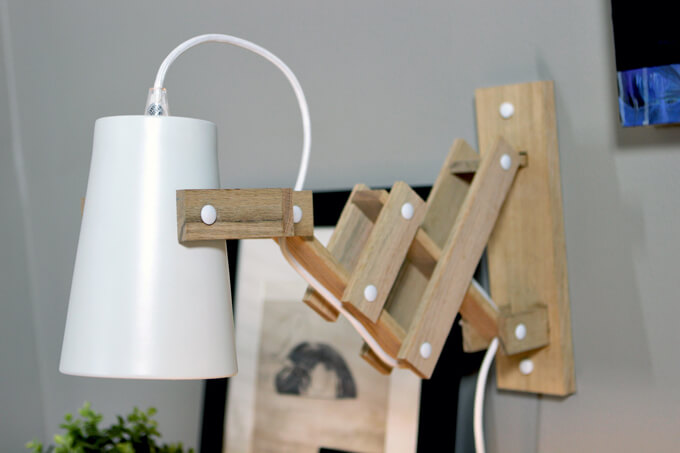
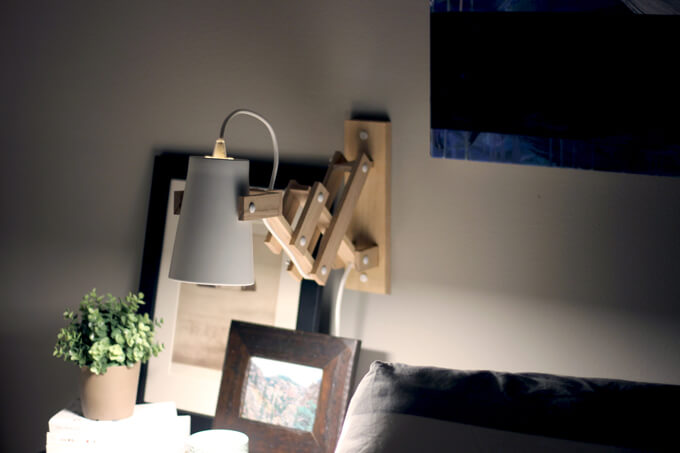
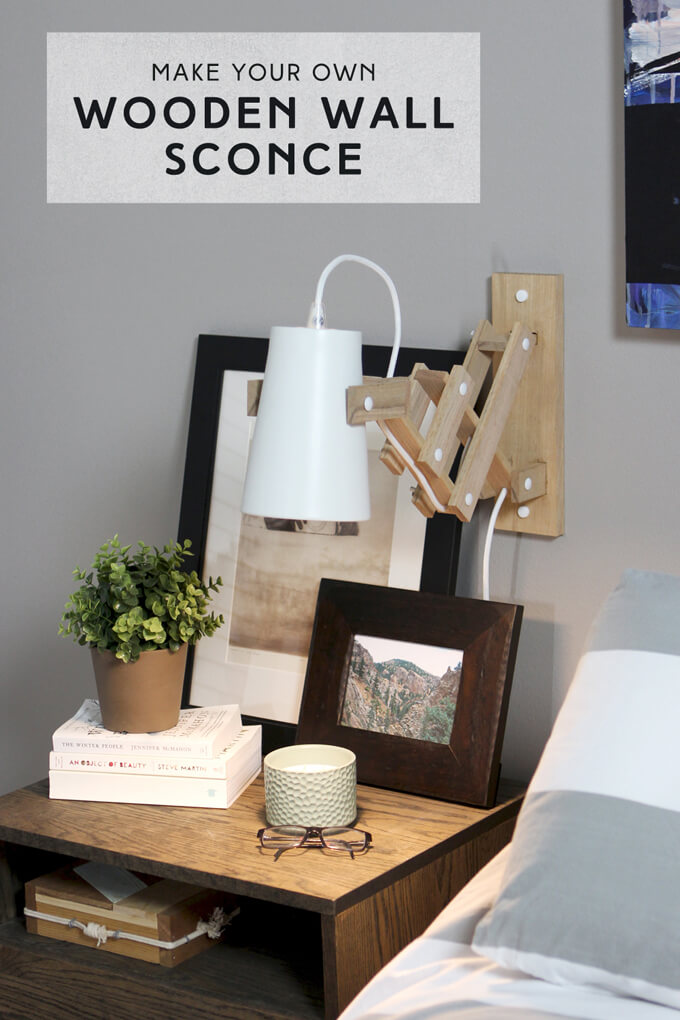
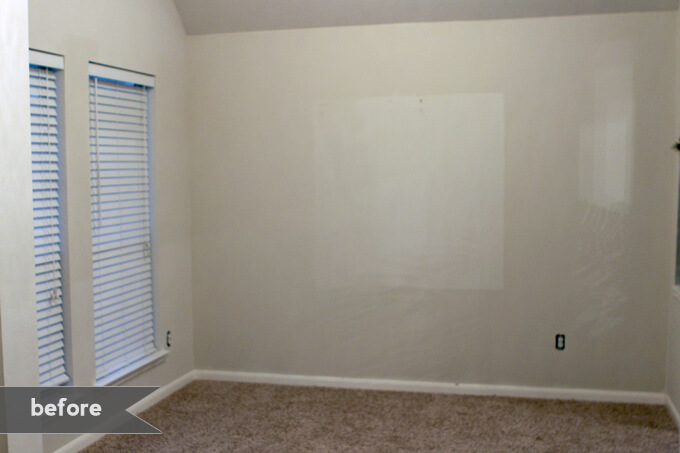
#3. DIY wooden wall sconce

DIY Lighting Projects
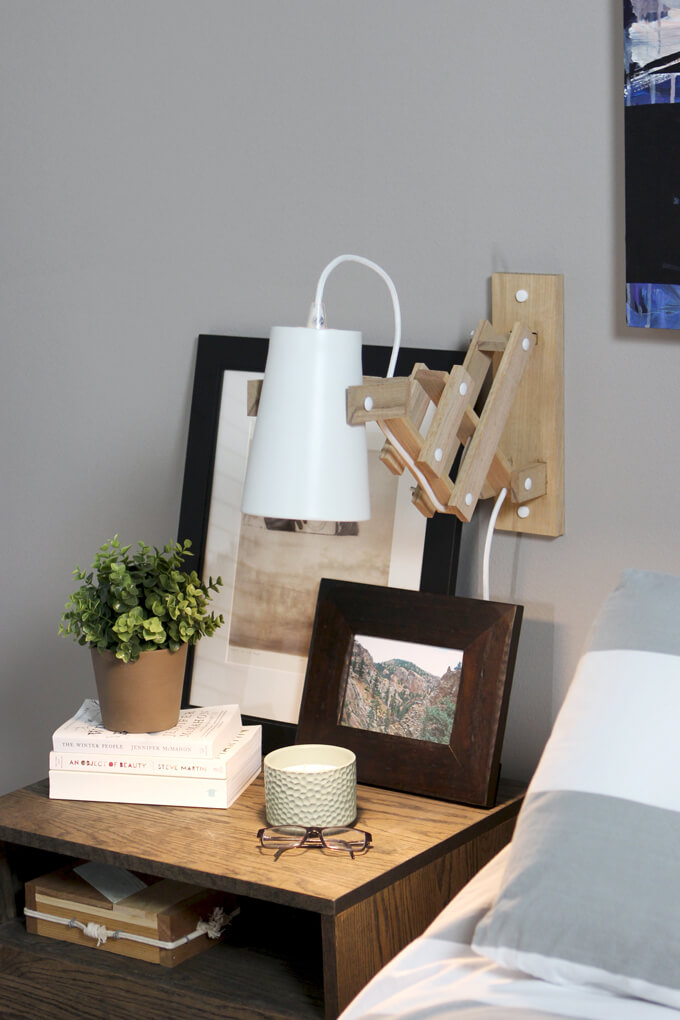
We haven’t worked on very many projects in our master bedroom yet but due to mismatched lamps that Jake the studio cat was constantly knocking over and putting holes in the lamp shades, we decided to try our hand at making our own wall sconces we could mount on the wall.

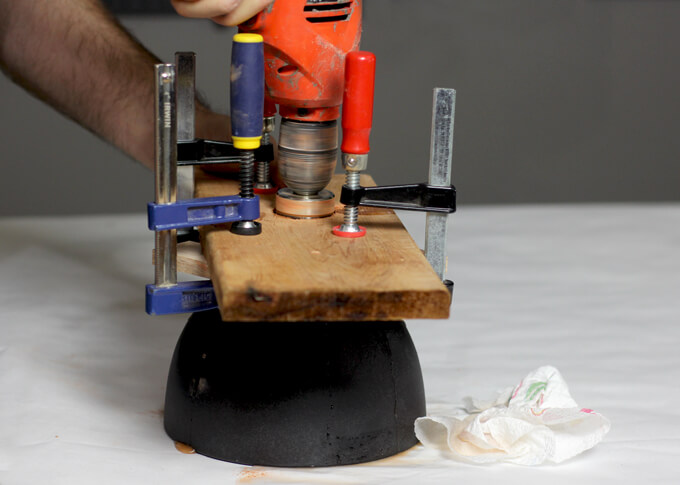
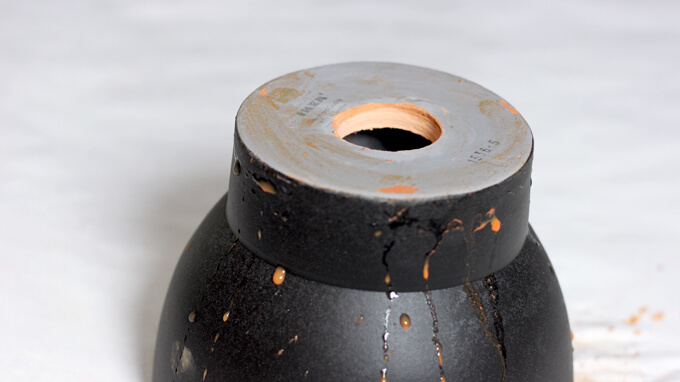
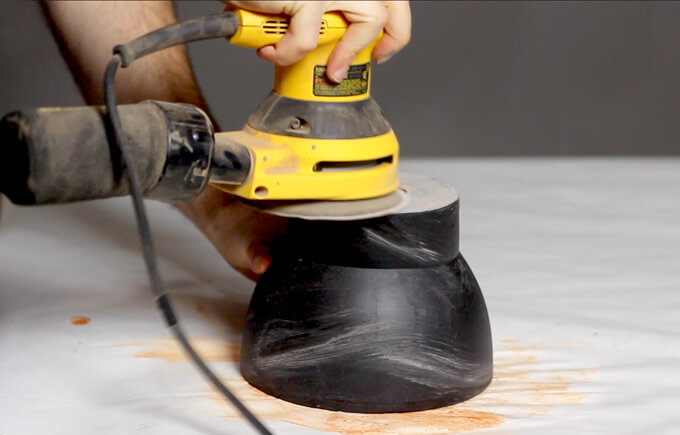
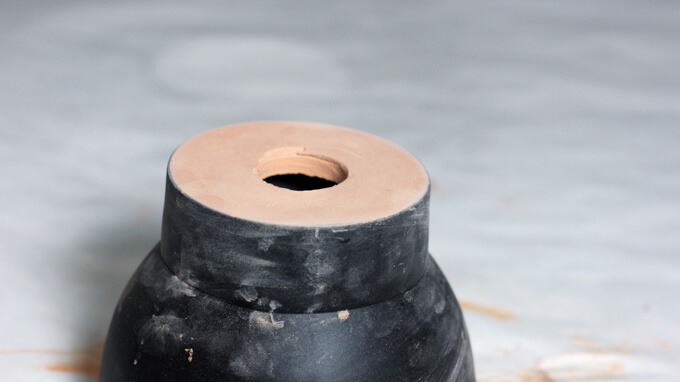
We wanted them to look modern and found that inexpensive ceramic IKEA pots made for the perfect lamp shades and all we had to do was drill a hole in the bottom of the pot for the light cord set to go through. Now we have matching lamps and they are safe from being knocked over by the cat.

☆ Check out more details on building a DIY wooden wall sconce.

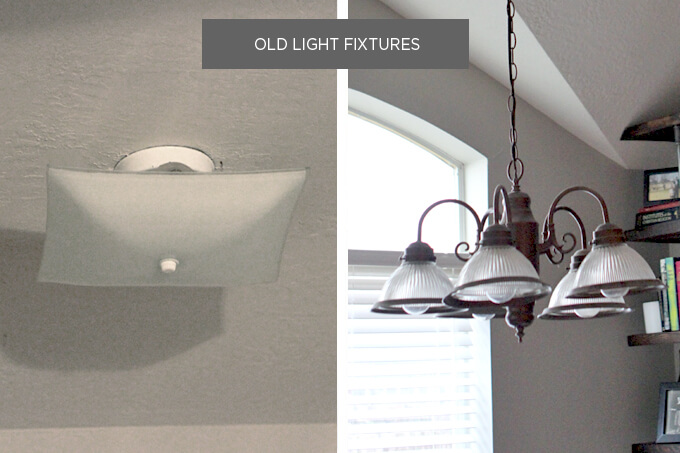
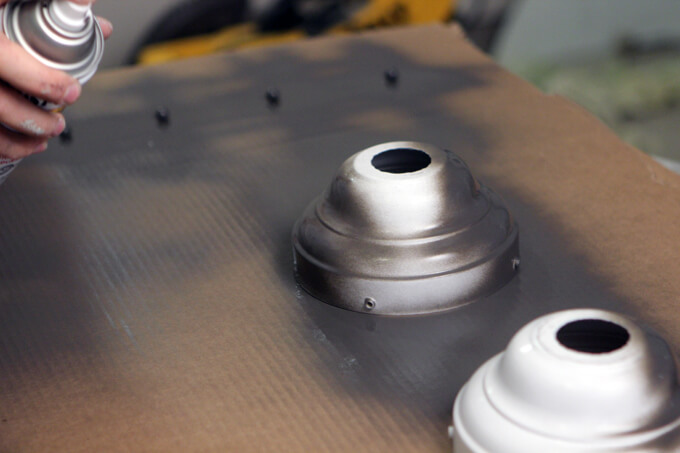
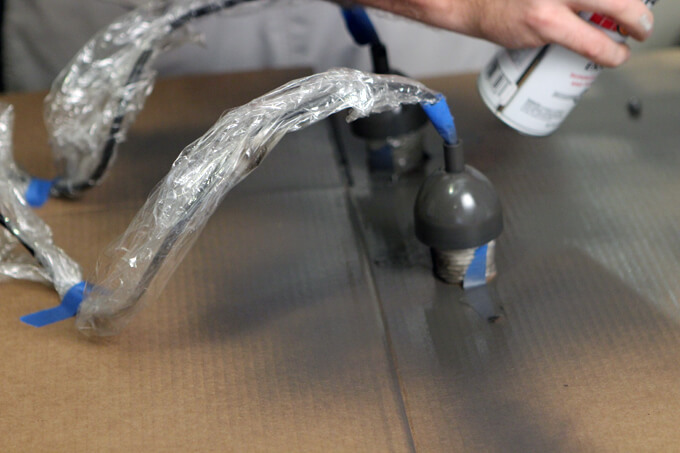
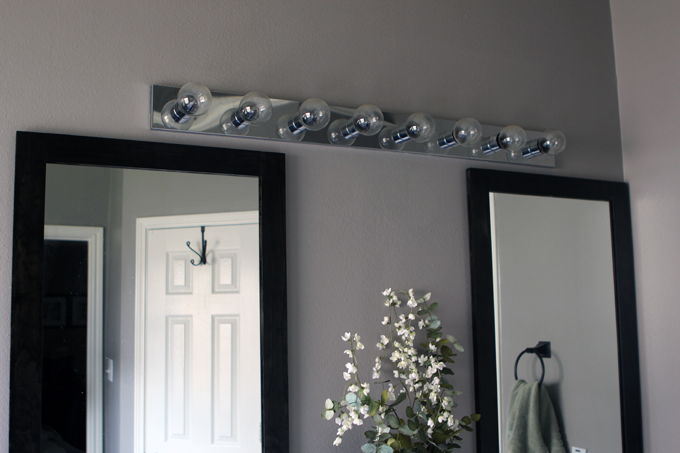
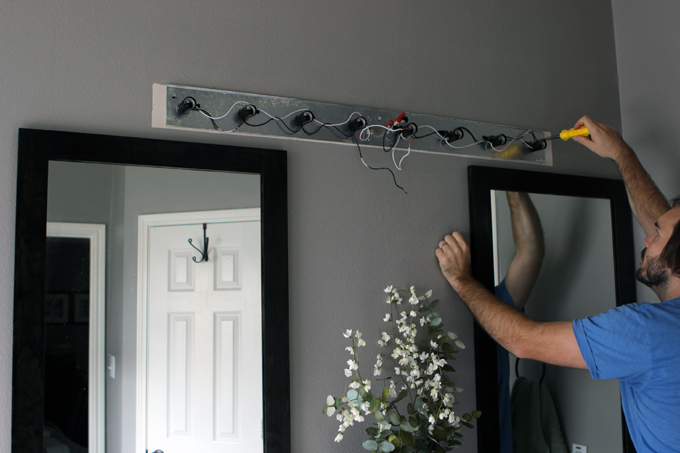
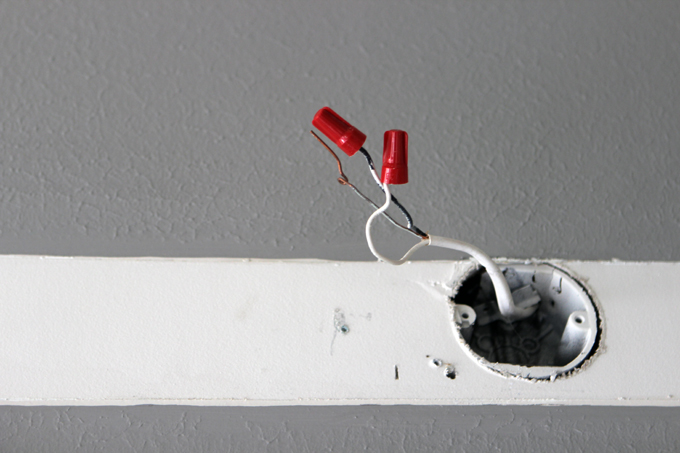
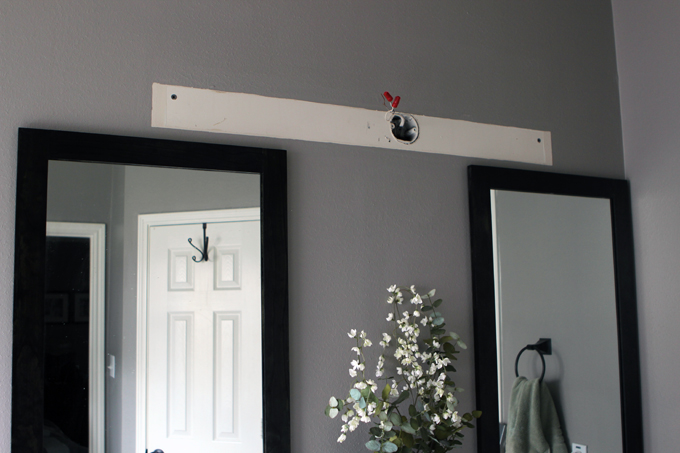
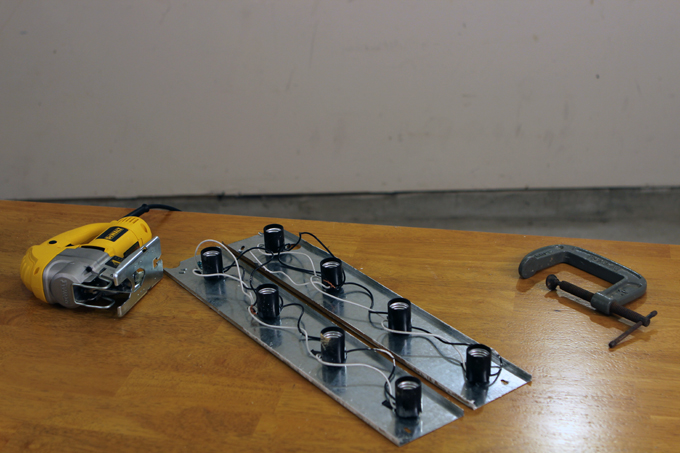
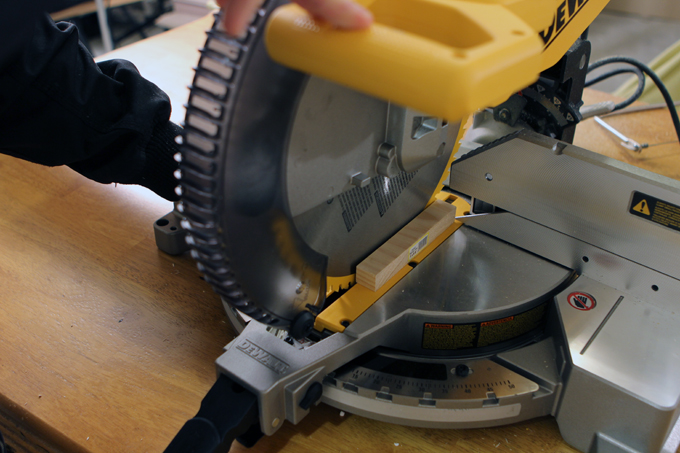
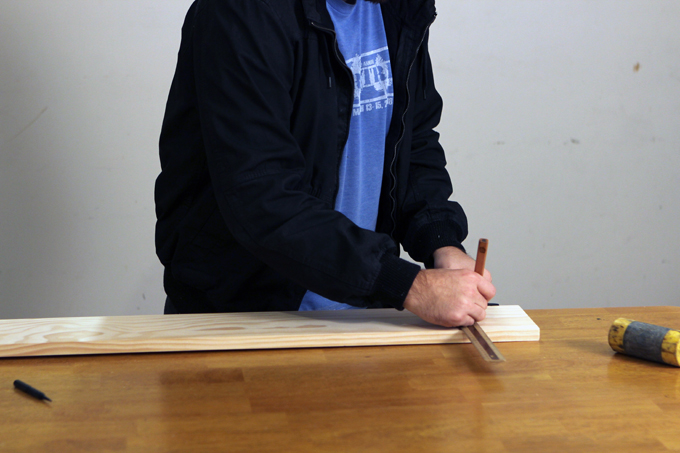
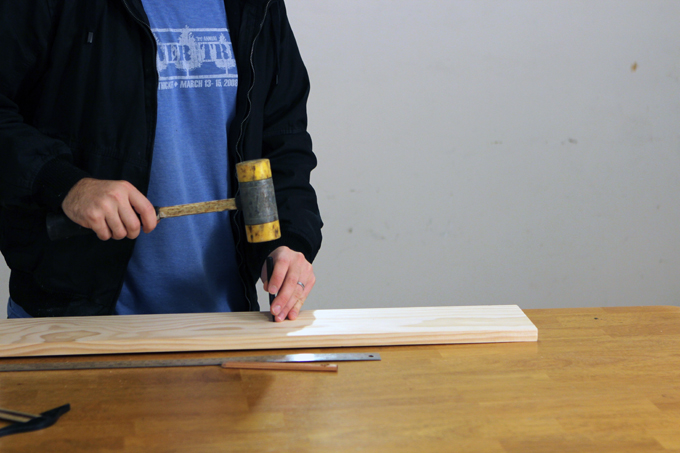
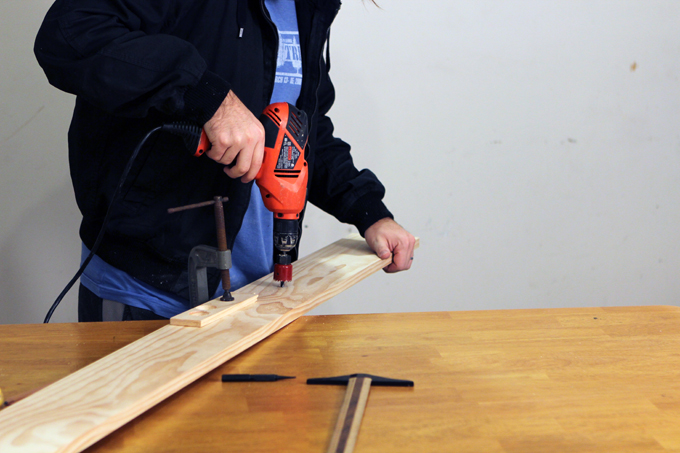
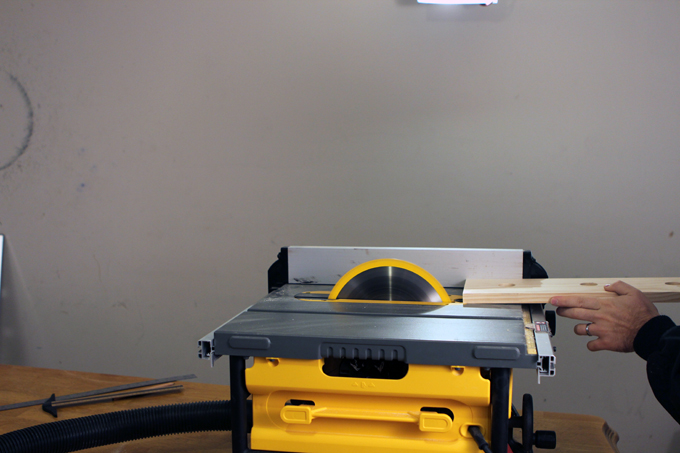
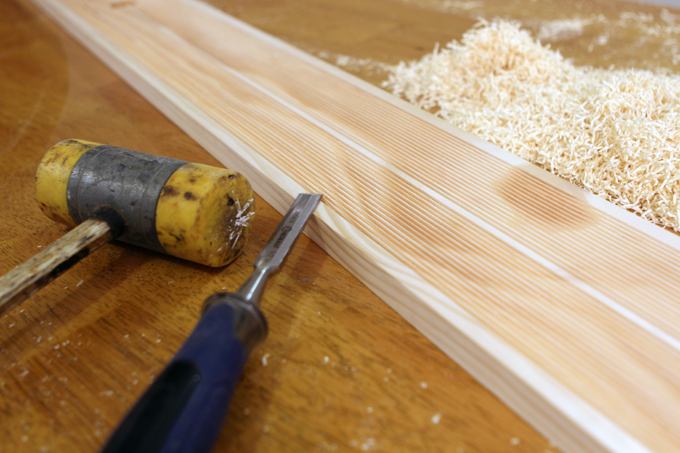
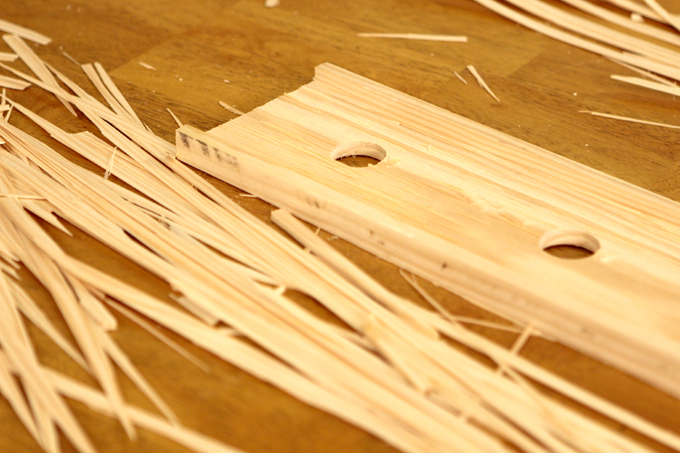
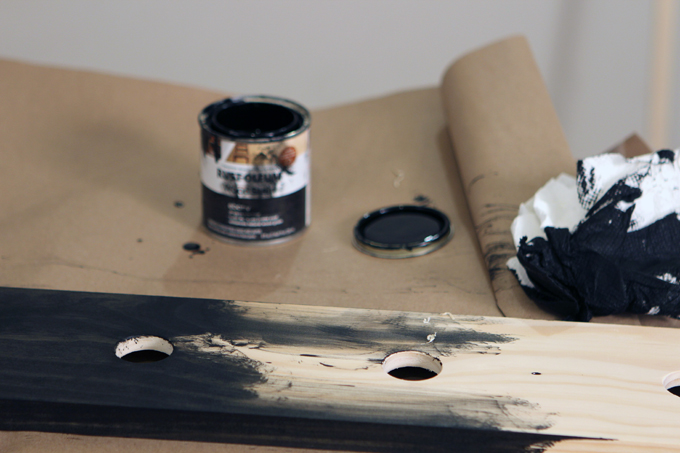
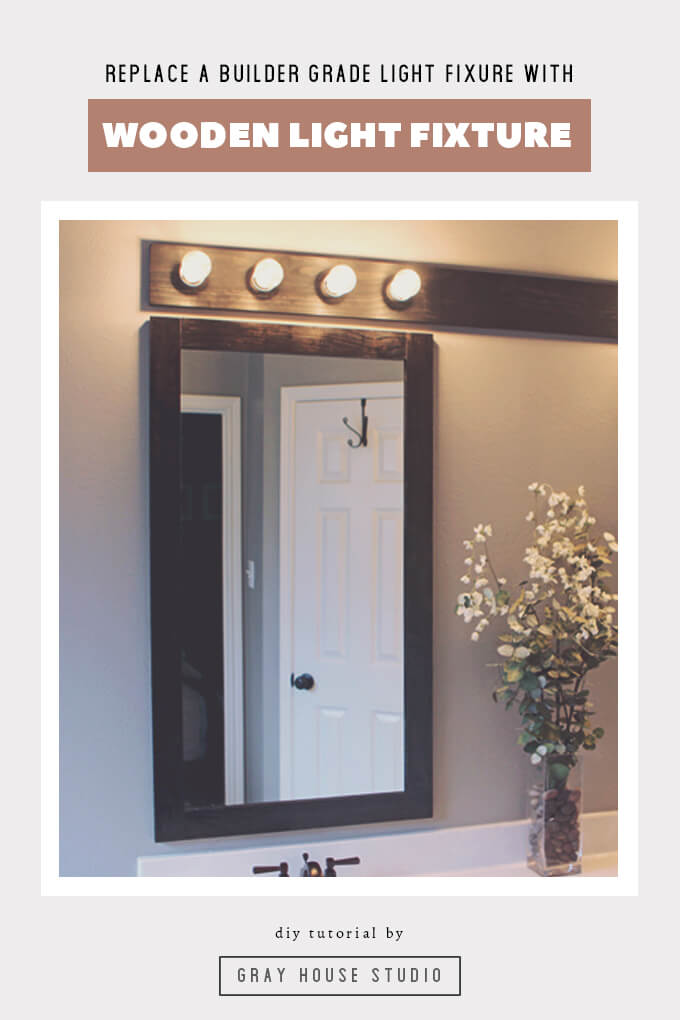
#4. DIY wooden light fixture

DIY Lighting Projects
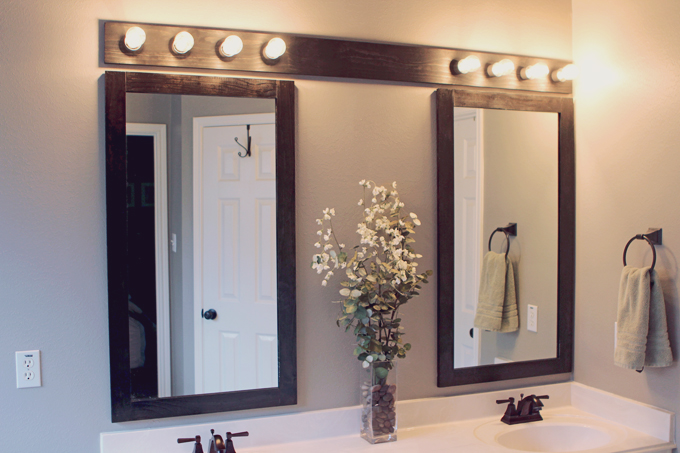
Who likes those silver builder’s grade light fixtures in the bathroom? Anyone? We hated ours and wanted to replace it with something more our style in our master bathroom. However, after taking it down off the wall we found that the electrical box was off centered.

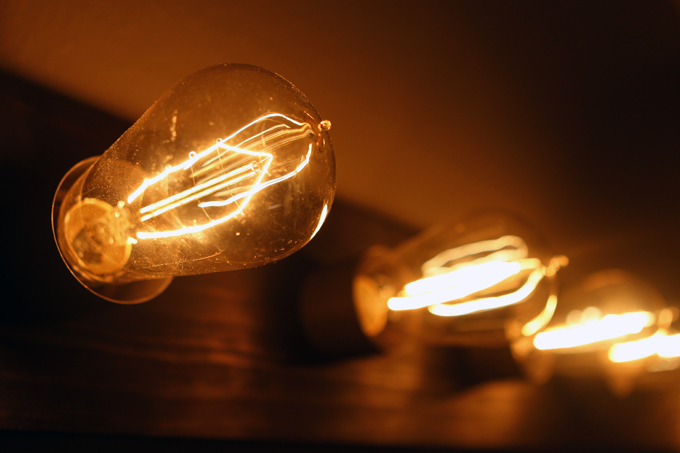
We were forced to come up with a solution other than hanging two new light fixtures over each mirror like we had originally planned. Thus, the idea for a custom wooden light fixture was born. We were easily able to transform the old silver light fixture into a wooden one that matched our mirrors and even added some new Edison light bulbs for a fun touch.

☆ Check out our full tutorial on making a DIY wooden light fixture.

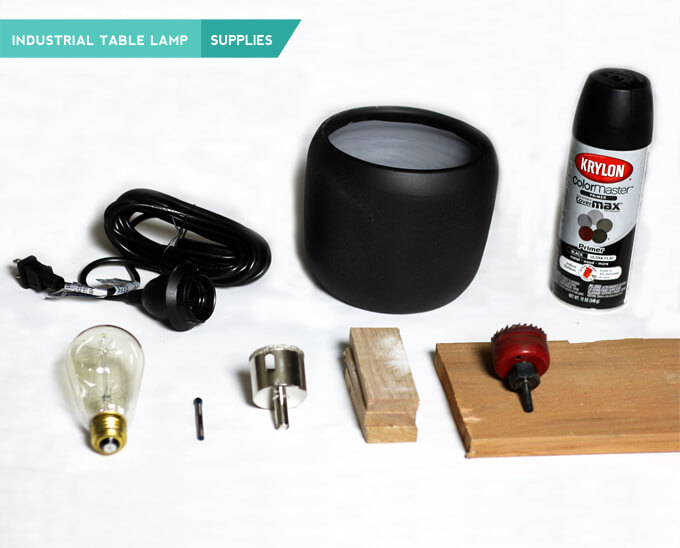
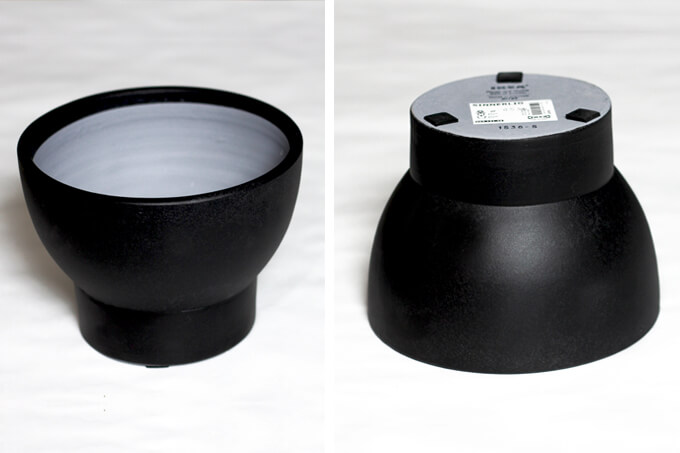
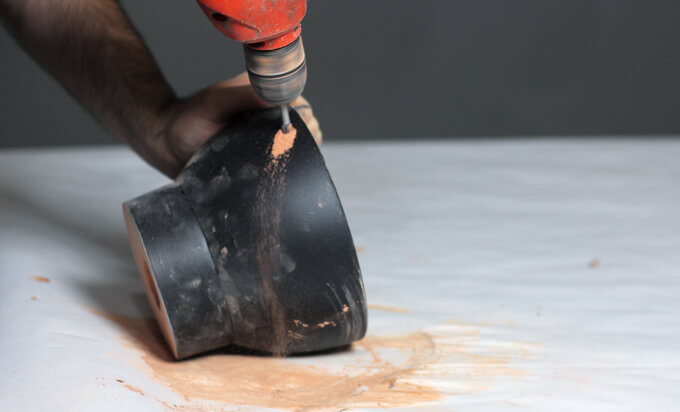
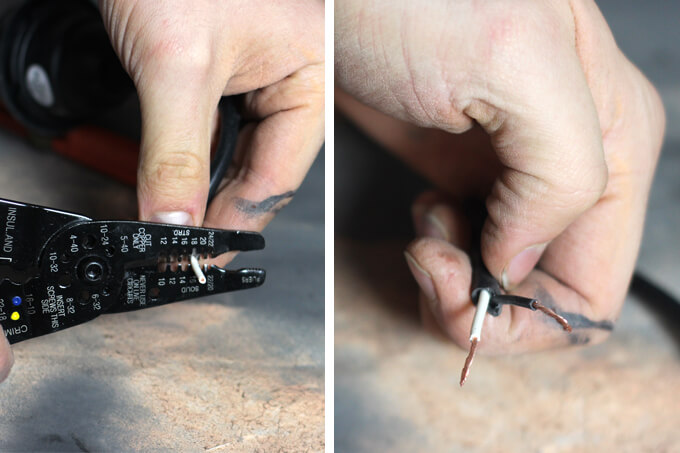
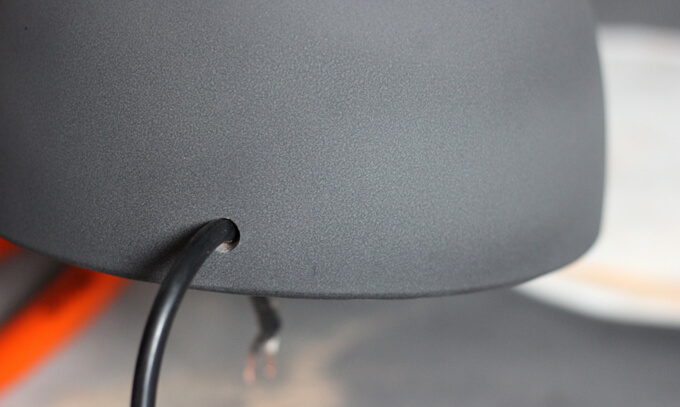
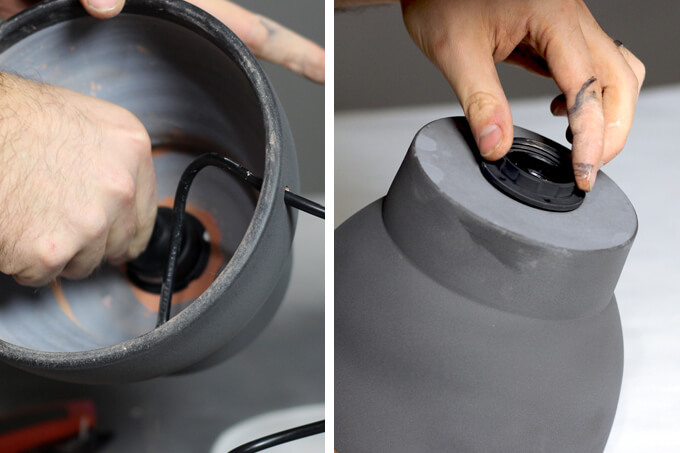
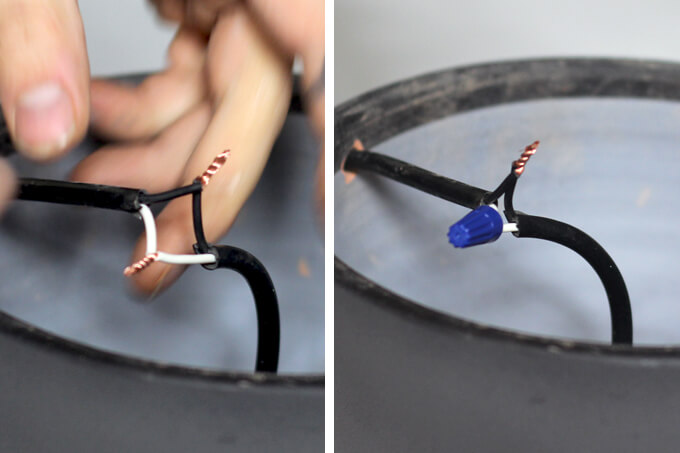
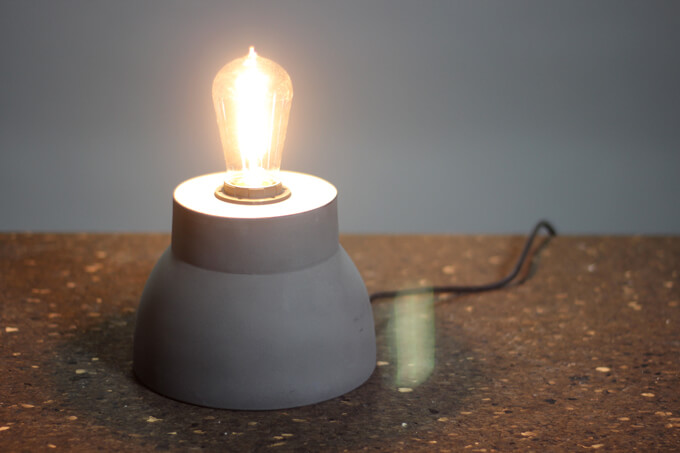
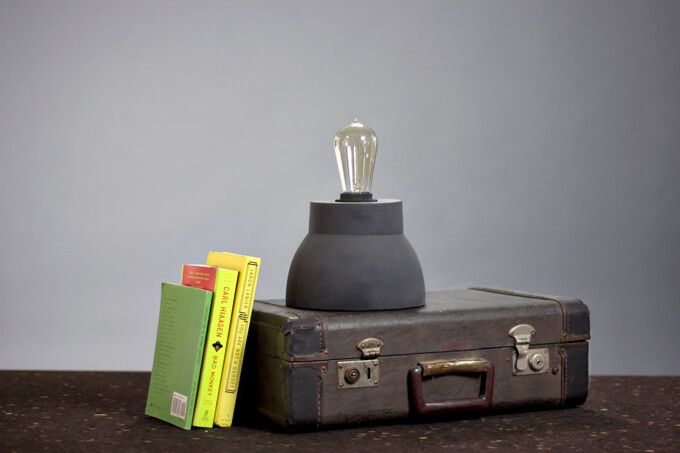
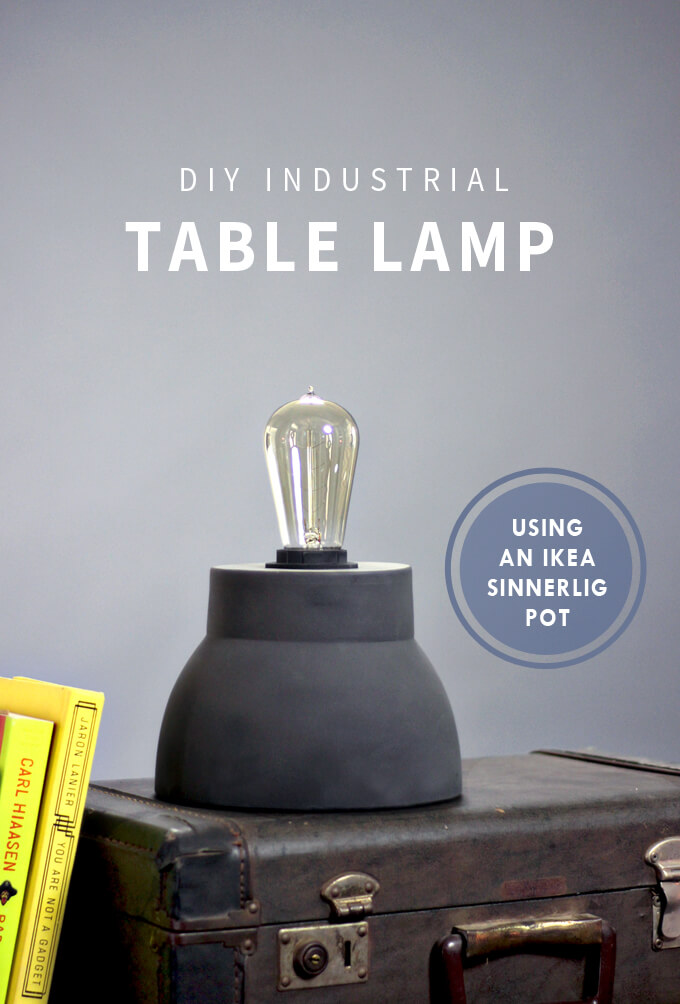
#5. DIY industrial table lamp

DIY Lighting Projects
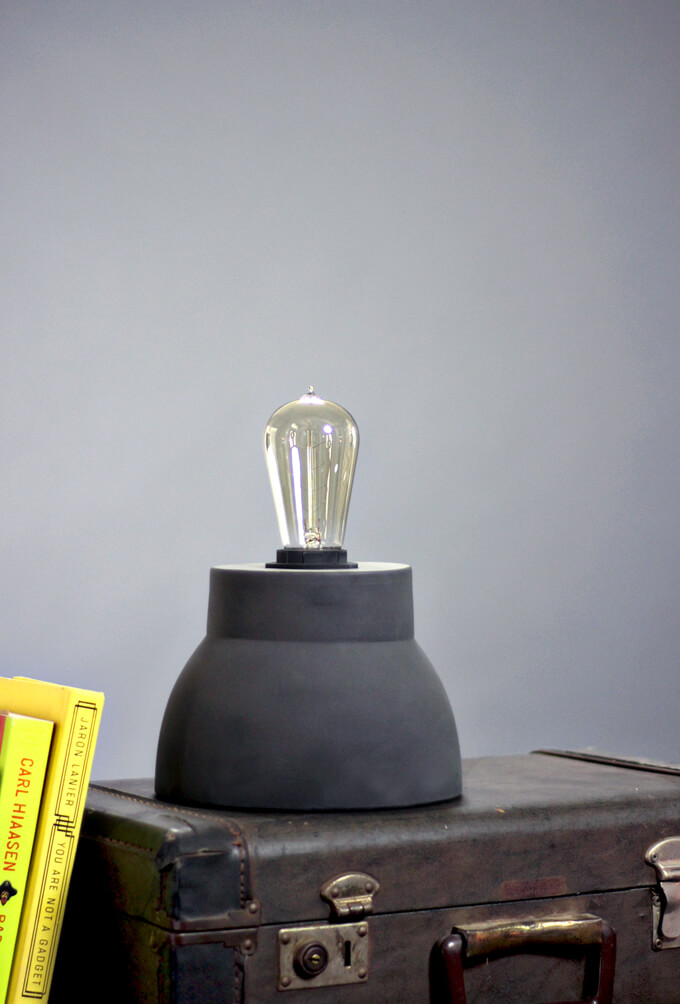
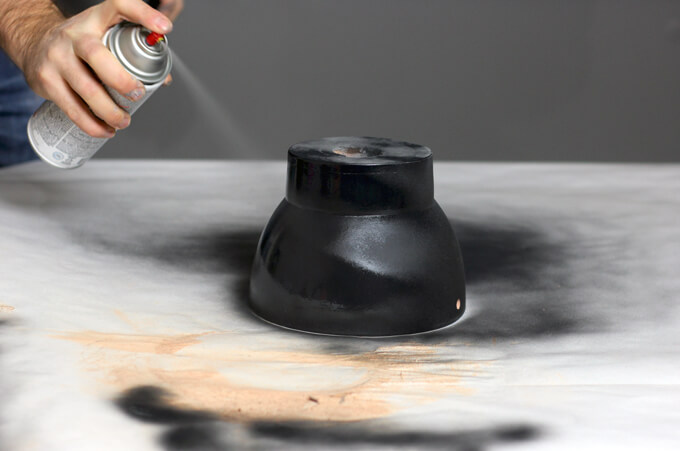
Once we got the hang of drilling holes in ceramic pots, we came up with the idea to make a table lamp out of another type of pot from IKEA that had an industrial style to go in our home library. This one looked very similar to a lamp I liked from Urban Outfitters.

This project was inexpensive and only took a couple of hours to make but looks awesome sitting on our industrial shelves. It is probably the least complicated and fastest DIY lighting project we have done but was fun to make.

☆ Check out our full tutorial (including a video) on how to make our DIY industrial table lamp.

I’m sure there are many more lighting projects in our future and we can’t wait to come up with new ideas for our gym, dining room, kitchen and guest bathroom.

PIN THIS PROJECT

DIY Lighting Projects

DIY Wooden Wall Sconce

DIY Wooden Wall Sconce

If you are interested in making your own DIY wooden wall sconce like the one below, we would love for you to enroll in our Bob Vila Academy course.We appreciate your support!

DIY Wooden Wall Sconce

We have a cat. A cat that likes to knock over every last thing on my nightstand to try and wake me up when he is hungry at 5:00 in the morning. He knows no boundaries. Recently, he knocked my lamp off and then proceeded to fall off the nightstand with the lamp and land in the lamp shade. This resulted in a Jake’s paw sized hole in my lamp shade. He has no grace or balance either. I proceeded to scold him in my half asleep state, “This is why we can’t have nice things!” He meowed and walked away. He apologizes to no one.

The lamp and lamp shade were from my college days and while I hate to see anything get ruined, they were old and it was at least an excuse to finally begin a lighting project we have been wanting to work on in our master bedroom for awhile now, a DIY wooden wall sconce for each side of the bed.

I was really excited about this project, one because the DIY wooden wall sconce we were going to build for each side would look much nicer than the mismatched lamps and lamp shades we currently had and unless Jake possesses some cat hulk strength I don’t know about and could rip them from the wall, they were safe from being knocked over.

Building our DIY Wooden Wall Sconce

DIY Wooden Wall Sconce

We made the modern accordion DIY wooden wall sconce base for each side of the bed out of oak. We were not sure what we were going to do for the lamp shade but then while browsing around IKEA for a cloth light cord set we stumbled upon these ceramic white plant pots and it was as if a lightbulb went off in my head (I am not sure if I intended that to be a pun or not) and it turned out to be the perfect choice. I love repurposing items for other uses. It is a fun challenge that Brent and I like to tackle together.

DIY Wooden Wall Sconce

Brent worked really hard planning and drawing out the wood wall sconce base so that we knew the exact measurements we needed to cut so it would come together perfectly. He rocked it, I am so impressed. I love the added touch of painting the head of the carriage bolts white to match the lamp shade.

DIY Wooden Wall Sconce

Having a DIY wooden wall sconce on each side of our bed makes our bedroom already feel more grown-up and less college mismatch. We are one step closer to our overall design goal for our master bedroom. I am also happy to say they are completely hungry cat resistant.

Project Featured in Bob Villa Academy

Bob Vila Academy

Brent and I are 90’s kids. And what was one of the staple family television shows for 90’s kids? Home Improvement. Brent aspired to be the host of his own tool show like Tim “The Toolman” Taylor and I, well, I dreamed of dating Randy Taylor (Jonathan Taylor Thomas). And didn’t we all wish we could just walk into our backyard and our neighbor would peek over and give us all the answers to life? That was the dream.

One of our favorite reoccurring story lines was Tim’s rivalry with Bob Vila. That hot rod race between the two is a classic. We are feeling all nostalgic just thinking about it.

Growing up Bob Vila was the real life go to guy for us when it came to home improvement. I think DIY home renovation was Brent and I’s destiny because we both grew up watching Bob Vila and helping our dads with home improvement projects, you know, typical kid stuff. So you can imagine our excitement when we got an email asking if we would be interested in being professors in the Bob Vila Academy. It is cool to see that the Bob Vila brand continues to grow and morph with the ways we approach DIY projects these days offering in-depth video e-courses to get hands-on experience.

Which brings us back to our DIY wooden wall sconce. The e-course we are teaching in the Bob Vila Academy is how to make a modern wooden wall sconce, just like ours. We will show you what tools and materials you need as well as break down all the steps and demonstrate how to make this affordable lighting solution.

The benefit of this e-course is instead of just one video, we break up the project into a series of videos so we can cover each and every step in great detail allowing you to follow along and build your very own wall sconce with us as we make it.

If you are interested in making your own DIY wooden wall sconce, we would love for you to enroll in our Bob Vila Academy course. As always, we appreciate your support!

PIN THIS PROJECT

DIY Wooden Wall Sconce

DIY Industrial Table Lamp

DIY Industrial Table Lamp

We have another super easy IKEA hack for you today. In this post we will show you how to take a SINNERLIG pot and a cord set from IKEA and turn it into a DIY industrial table lamp.

DIY Industrial Table Lamp

When Courtney and I brainstorm projects we usually underestimate how long a project is going to take. No matter how simple we think a project is, when we are making something for the first time we almost always run into some sort of problem we have to solve. This is especially the case when we have a short amount of time to work on it.

We wanted to make a DIY industrial table lamp based on a lamp we saw at Urban Outfitters for our library and figured what better time to experiment on making something for the first time than the night before you have to present it on live TV.

On the plus side, we worked out all the kinks and can now share with you the best way to approach this project.

VIDEO TUTORIAL

In the video below we will walk you through how to make an industrial table lamp using an IKEA pot plant and a light cord set.

To see new DIY videos on Thursdays, be sure to subscribe to our channel ⇾


SUPPLIES

MATERIALS

  • (1) SINNERLIG Pot of from IKEA
  • (1) Cord set
  • (2) Wire nuts
  • (1) Light bulb (Edison)
TOOLS

  • Drill
  • 1-5/8″ Diamond coated hole saw
  • 1-3/4″ Wood hole saw
  • 5/8″ Glass and tile ceramic drill bit
  • Sander and 220 grit sand paper
  • Matte spray paint
  • Scrap wood
  • Wood clamps

*This post contains an affiliate link. You can read our disclosure policy here.

DIY Industrial Table Lamp

Here is an outline of our crazy day

    — 10:00 AM —

  • Feeling optimistic, Courtney emailed me a detailed shopping list complete with pictures of the lamp she wanted to recreate and all the supplies need.
    — 04:00 PM —

  • Off work and headed to Ikea before traffic gets bad.
    — 04:05 PM —

  • Made it to Ikea and should be in and out super fast because I know all the secret passageways. Proud of myself for not even stopping for a cinnamon roll on the way in.
    — 04:08 PM —

  • Oh no! They don’t have the cloth cord set we are looking for. Guess, I will try and find and employee in case I am missing them.
    — 04:20 PM —

  • Slight setback, they are out of cloth cord sets but after talking to employee, they helped me find an alternative one that will work.
    — 04:25 PM —

  • Okay, made it to the pots and plants section. I should be out of here in no time.
    — 04:35 PM —

  • Oh no, took two laps around the pot and plants section but can’t find the pot on my list.
    — 04:45 PM —

  • Spent five minutes trying to pronounce the name of the pot I am looking for to another employee because apparently, black pot isn’t descriptive enough. He asks me to type it into his computer to find the name.
    — 04:55 PM —

  • The employee informs me that they don’t carry that pot. Panic is now officially setting in since our entire project is based around this particular pot. Contemplate getting a $1 hot dog to cheer me up but instead head back to the pots section to do one final walkthrough.
    — 05:00 PM —

  • I can’t believe my eyes. Suddenly it as if a ray of light strikes those beautiful pots. I found the hidden stash behind the palm trees. Grateful that I don’t have to tell Courtney I couldn’t find them.
    — 05:05 PM —

  • Well, that was another IKEA trip that took too long. Oh, hello Houston evening traffic.
    — 07:00 PM —

  • Finally made it home after fighting rush hour traffic. On a positive note Courtney has dinner ready. On a negative note “It’s raining Ben” (The Bachelor) on TV starts tonight but we can’t watch because we need to knock this project out. I reassure Courtney we will be done in time for the “final rose”.

How We MADE a DIY Industrial Table Lamp

DIY Industrial Table Lamp
1. First we flipped over the pot and carefully removed the stickers and felt feet.

The fun thing about this project is we are using the SINNERLIG pot for the base which comes in a variety of shapes, giving us options when it came to the style of the light fixture. We purchased a few to test and chose the shape above for an industrial look.

DIY Industrial Table Lamp
2. To turn this pot into a lamp, we needed to drill a hole in the bottom of the pot with a 1-5/8″ diamond coated hole saw. To keep the hole saw centered as we drilled, we found it helpful to use a jig to hold the hole saw in place.

To make a jig, we drilled a hole with the 1-3/4″ hole saw in a board larger than the base of the pot. Then used clamps to hold pieces of scrap wood around the base of the pot to hold the top board with the hole in it center on the pot.

DIY Industrial Table Lamp
3. The diamond coated hole saw leaves a smooth finish but exposes the clay center which is why we needed to paint it. When we pulled off the sticker and felt feet from the bottom, it left three squares of exposed clay.

DIY Industrial Table Lamp
4. Through a frustrating and unsuccessful trial run, we found that the red clay absorbs the spray paint more leaving those areas a different color.

To make sure the entire bottom of the pot is a consistent texture, we found it necessary to sand the entire bottom of the pot before spray painting it. For this step we used a sander and 220 grit sand paper.

DIY Industrial Table Lamp
5. Before painting, we drilled a hole with a 5/8″ glass and tile drill bit in the side of the pot towards the bottom for the cord to go through. This step will also expose some of the red clay but it will also be covered up by the spray paint.

DIY Industrial Table Lamp
6. We wanted to give our industrial table lamp a matte finish so we spray painted the entire pot with black matte spray paint.

DIY Industrial Table Lamp
7. In order to thread the wire through the pot, we cut the cord six inches from the light fixture. Then we stripped the wires exposing half an inch of copper on both the white wires and both the black wires.

DIY Industrial Table Lamp
8. Then we threaded the stripped ends of the long side of the cord through the small hole in the pot.

DIY Industrial Table Lamp
9. We pushed the fixture through the large hole and screwed the threaded flange tight.

DIY Industrial Table Lamp
10. Finally, we twisted the copper parts of the black and white wires together and then screwed the wire nuts on each wire to hold them together. Our DIY industrial table lamp is finished!

    — 10:30 PM —

  • Now for the moment of truth, we plugged the light in, flipped the switch and we have light! It was the wonderful sign that our DIY industrial table lamp is complete and it’s bedtime! Oh wait, we still have to make our DIY tiered stand.

DIY Industrial Table Lamp

    — 01:30 AM —

  • After prepping that project, it is finally time for bed.
    — 05:30 AM —

  • Rise and Shine Courtney! Its time to get ready for Great Day Houston.
    — 07:30 AM —

  • As we are on our way to the studio we ponder why we procrastinate on these projects. Is it all really worth it? Sometimes they are so much work and stress.
    — 10:00 AM —

  • The show went great. At brunch Courtney and I discuss how much fun that was and how much we love how the projects turned out and look in the room. We agree we should do it again and start brainstorming our next project. Omelets really do wonders for morale.

DIY Industrial Table Lamp

Don’t let our crazy day deter you from making this DIY industrial table lamp. It is a great weekend project that turns out awesome. We are growing quite fond of these quick and easy (now that we have the process figured out) IKEA hacks.

PROJECT FEATURED ON GREAT DAY HOUSTON

Out DIY industrial table lamp was one of the repurposing ceramic projects we shared on the local live morning show, Great Day Houston. In case you missed it (or don’t live in Houston) you can watch our DIY segment here.

Brent and Courtney Richardson of Gray House Studio on Great day Houston

PIN THIS PROJECT

DIY Industrial Table Lamp

Custom Made School House Pendant Light

Schoolhouse Pendant Light

For this knockoff lighting project we created much cheaper versions of our favorite schoolhouse pendant light from Rejuvenation.

Schoolhouse Pendant Light

You may remember in our library planning post last month that we had plans to switch out the lighting in our library. We wanted to replace the overly decorative light fixture with something that had clean lines and was simple.

DIY KNOCKOFF

Schoolhouse Pendant Light
We found the Rose City Classic Schoolhouse Pendant light fixture at Rejuvenation and thought the style was a perfect match. However, the price was not so perfect for our budget. Just buying one was going to be a stretch and we wanted two, one for each of the front rooms. We knew we definitely could not afford to buy two from the store any time soon so we got to thinking and decided to piece one together ourselves. We created the one above and are very happy with the results.

Today we are sharing our affordable solution for creating a classic schoolhouse pendant light that came in $137 cheaper than it’s Rejuvenation counterpart. The lower price allowed us to make two for less than the cost of purchasing one. It was a great solution for our budget.

Schoolhouse Pendant Light
Here is what we started with when we moved into the house. The light on the left was the light in the front room (formerly the formal living room). It was small, plain and lacked character.

The light on the right was in the library (formerly the formal dining room) and was the opposite. It was almost too ornate and long. It was a nice light fixture, it just didn’t fit with the style of our library or our house in general.

We wanted the two light fixtures to match to create a cohesive feel between the two rooms since the space between the rooms is open. So we set out to assemble matching schoolhouse pendant lights.

How We Put Together Our Schoolhouse Pendant Light

Schoolhouse Pendant 
Light
1. First, we purchased the three pieces of the light fixture we needed: the pendant, the glass holder and the vintage schoolhouse globe.

1. Light Oil Rubbed Bronze Adjustable Mini Pendant – $16.47
2. 6-in. White Glass Holder – $11.25
3. Antique Art Deco Schoolhouse Tiered Globe 14” Diameter – $49.99

*We bought the vintage schoolhouse globes off of E-bay where the seller had acquired schoolhouse globes and fixtures from an old church. They were in great shape!

Schoolhouse Pendant Light
1. Brent used a jigsaw with a sheet metal blade to cut a hole in the top of the glass holder large enough so the ceramic part of the pendant light fixture would fit through it.

Schoolhouse Pendant Light
2. In between cuts he would test the size of the hole to make sure it was the perfect fit.

Schoolhouse Pendant Light
3. Before painting the glass holders, Brent roughed up the smooth surface with medium grade steel wool. The scratches the steel wool makes give the surface of the glass holder a rough texture so the paint can adhere to the surface. Because the bronze pendant light fixture we bought was a different color bronze than the spray paint we already had to paint the white glass holders, we ended up spray painting the pendant light fixture as well so it would match. Brent roughed up the surface of these pieces also.

Schoolhouse Pendant Light
4. Next, we applied an even coat of spray paint to all the parts.

Schoolhouse Pendant Light
5. To paint parts of the light fixture, we wrapped the cords in plastic wrap and secured them down to the cardboard with tape.

Schoolhouse Pendant Light
6. After the paint was dry, Brent assembled all the pieces to create our schoolhouse pendant lights and then hung them in each room.

Yesterday not only did we hang up our new lights, we also painted the last few areas (the front room and hallway) in our house gray. That means there are only two rooms left to paint and then the inside of our house will all be painted. Two projects in one day, that is a productive Saturday! Our front room/music room/photography studio is coming along great. *Shout out to my Dad for all the help with the painting!

Here is what the room looked like yesterday morning:
Schoolhouse Pendant Light

Here are some progress shots of it now:
Schoolhouse Pendant Light
The gray paint color we used is Mindful Gray from Sherwin-Williams and is the same color we used in our library, kitchen and living room. It looks so nice to now have the front two rooms have the same wall color and light fixtures. It makes the front of the house flow really well. I would call this a successful weekend.

PIN THIS PROJECT

Schoolhouse Pendant Light

A Canopy of String Lights in Our Backyard

A Canopy of String Lights in our Backyard

Our backyard is an ongoing project. But at least we have string lights! Check out how we created a canopy of string lights in our backyard.

A Canopy of String Lights in our Backyard

If you have ever seen the show Parenthood (I am obsessed) you may remember the part in the opening sequence or in the show itself where the family is gathered around the table eating dinner outside with these gorgeous string lights hanging above them. When I saw that scene I fell in love with those string lights.

I kept dropping subtle or maybe not so subtle hints to Brent about wanting lights strung up across our backyard. I wished for a canopy of lights. I believe my description to him was I want our backyard to be “dreamy”.

A Canopy of String Lights in our Backyard

I have been talking about these lights for awhile now but was still completely caught off guard when Brent surprised me and for Christmas gave me this HUGE box filled with 200 feet of string lights and 200 round light bulbs.

He said he promised to make our backyard dreamy. He knows the way to my heart, I tell you.

A Canopy of String Lights in our Backyard

This weekend was the first weekend in Houston since Christmas that it hasn’t rained. Since it was in the high 60’s and sunny we decided it would be a great day to create the canopy of string lights in our backyard.

A Canopy of String Lights in our Backyard

It was a full day of work believe it or not to hang all those lights and Brent got them all wired up just minutes before dusk. It was down to the wire. There were a few mishaps throughout the day but as Brent always says “It’s not a Gray House Studio project if you don’t end up at some point frustrated and bleeding”. (More on that later in the post).

We obviously still have a ways to go to get out backyard completed, but for now I am one happy girl snuggling in my hammock under my canopy of lights.

How to Hang a Canopy of String Lights

SUPPLIES

FYI: This post contains a few affiliate links to products we used to make this project. Gray House Studio does receive commissions for sales from these links but at no extra cost to you. We appreciate you supporting this site. Read our privacy and disclosure policy. You can also easily shop our recommended products here.

A Canopy of String Lights in our Backyard

We used lots of light bulbs. We had eight boxes just like this one. And we didn’t even break one.

STEP BY STEP GUIDE

A Canopy of String Lights in our Backyard

1. We utilized the large pine tree that sits right along our fence line as the support for one side of the lights. Brent used our drill to make a small hole in the tree and screwed a stainless steel eye hook into the tree.

A Canopy of String Lights in our Backyard

2. Even though Brent was sure there would be a wood header above the windows along the back of the house he double checked with a stud finder on the inside.

When drilling for the eye hook on the house you can see wood shavings came out indicating he was indeed drilling into wood.

A Canopy of String Lights in our Backyard

3. Brent measured how much of the galvanized steel rope we needed and then we cut off the excess with a wire rope cutter.

We chose to use galvanized steel rope to bare the load of the string lights.

This should extend the life of the string lights drastically because the cable won’t stretch or break.

A Canopy of String Lights in our Backyard

4. It is also easier to attach the steel cable to an eye hook than attaching the string lights to an anchor would be.

To attach the cable to the eye hook we threaded the galvanized steel rope through a ferrule.

A Canopy of String Lights in our Backyard

5. Once the wire was in place we took a wire rope cutter and crimped the ferrule to make the wire secure.

A Canopy of String Lights in our Backyard

6. Next, we attached the string lights to the cable. Brent uses zip ties to tie the cable and string lights together and I followed behind him and screwed in the light bulbs.

A Canopy of String Lights in our Backyard

7. After we got all the lights zip tied and bulbs screwed in, Brent attached the other side of the cable to the eye hook suspending the string lights at the correct height.

A Canopy of String Lights in our Backyard

8. We initially planned to have five runs of string lights from the house to the tree but realized after completing two entire runs that the odd number of runs would leave one of the two plugs at the tree instead of the house.

That was a “Doh!” moment for us. Both strings needed to plug in at the house and we recognized that wasn’t going to happen the way we were doing it so panic set in until we calmed down and had to rethink our game plan.

The solution turned out not to be too difficult. We removed one of the eye hooks and relocated the two inner eye hooks so they were spaced evenly, giving us four runs instead of five.

The one challenging part was after cutting down the second cable we had no slack cable left making it really hard to handle getting it back wrapped around the eye hook through the ferrule.

The cut wire kept poking Brent in the hands and his arms got really tired as he tried to work with the cable above his head. But he was a trooper and made it happen.

A Canopy of String Lights in our Backyard

9. Because we ended up only making four runs instead of five, we had excess string light.

Brent was able to take the light on the end of the string, which caps the wires, and move it to the spot where we needed and then cut off the left over string lights.

A Canopy of String Lights in our Backyard

There you have it, our canopy of string lights in our backyard!

A Canopy of String Lights in our Backyard

Our backyard still has a ways to go until it is up to the Parenthood backyard standards but this is a great start and we are excited to tackle more projects for this space.

PIN IT FOR LATER

A Canopy of String Lights in our Backyard

Wood Light Fixture for Master Bathroom

Wooden Light Fixture Over Bathroom Mirrors

We faced a big hurdle when we tried to upgrade the standard silver bathroom light fixture in our master bathroom. We made a wooden light fixture with Edison bulbs as a solution to stay within the limits of our wiring situation but still bring personality to the space.

Wooden Light Fixture in Master Bathroom

Remodeling or replacing bathroom light fixtures can be tricky when a builder installs and wires one up specifically for the light fixture they installed.

We learned this the hard way when we recently attempted to remodel the light fixture in our master bathroom. We wanted to get rid of the small silver light fixture over our mirrors and replace it with two separate light fixtures, one over each mirror but we ran into a few set backs that eventually led us to creating one large wood light fixture.

Today we are sharing our process on how we created a custom wood light fixture for our master bathroom.

Wooden Light Fixture

BEFORE – The above photo shows what the light fixture looked like when we moved in. Before we split the mirrors, we had one large mirror and the light fixture was centered above it. Since we cut the mirrors, the small light fixture looked a little weird above them. Plus, we have slowly been trying to de-silver our bathroom so the silver light fixture was the next thing to go. Instead we opted to go with a wooden light fixture in our master bathroom to match the mirrors.

How We Made Our Wooden Light Fixture for Our Master Bathroom

SUPPLIES

FYI: This post contains affiliate links to the supplies and tools we used to make our wooden light fixture. As an Amazon Associate Gray House Studio earns from qualifying purchases. This is at no extra cost to you. We appreciate you supporting this site. Read our privacy and disclosure policy.

STEPS

Wooden Light Fixture

1. The first thing we did was to remove the old bulbs and to use a screwdriver to take off the front piece of the light fixture to expose how this thing was wired up and put together.

Wooden Light Fixture

Wooden Light Fixture

Unfortunately, after we took everything off the wall we found that the electrical box was between the two mirrors and off centered so there was no easy way to hang two light fixtures (one above each mirror).

Another problem we ran into was that the wall behind the light fixture was not textured and therefore did not match the rest of the walls in the bathroom.

It’s like the builder wasn’t even trying to care when they installed these lights. So we decided to make our own wooden light fixture front to span across the entire length of the two mirrors and fit in the space better.

Wooden Light Fixture

Wooden Light Fixture

2. Using a jigsaw with a metal cutting blade, Brent cut the back of the silver light fixture into two pieces.

Wooden Light Fixture

3. Next, Brent cut the piece of wood board to the appropriate length using his new miter saw. Even though he only needed to make one cut on this project, he was pretty excited to use his Christmas present.

Wooden Light Fixture

4. Brent measured and laid out where the holes would need to be drilled into the piece of wood so the light bulbs would fit into the new wood light fixture.

Wooden Light Fixture

5. Brent used a mallet and a punch to create a small hole in the surface of the wood that would guide the drill bit.

Wooden Light Fixture

6. He attached the board to our table using a clamp to keep it from moving. Then, Brent used a hole saw attached to a drill to cut out the eight holes where the light bulbs would go.

Wooden Light Fixture

7. Using a table saw, Brent cut the board to the appropriate width so that the holes were centered on the board.

Wooden Light Fixture

8. Then he lowered the blade and made multiple passes right next to each other to remove the wood to create an inset on the back of the new wooden light fixture so it would fit over the back half of the old fixture. He used a chisel to remove the excess wood.

Wooden Light Fixture

9. Once all the excess wood was removed from the back, it looked like the above.

Wooden Light Fixture

10. Finally, we stained the wood using the same ebony wood stain as the frames of the mirrors so everything would match.

Wooden Light Fixture

11. We replaced the old large round light bulbs with Edison light bulbs to give it a unique look.

Wooden Light Fixture

While we are happy with the results of how the wooden light fixture turned out and how it looks in this space more than the original silver light fixture, we have decided to revisit this project in the future to find a solution that better suits this wall as a whole and take advantage of the height in our bathroom.

Now that we know the obstacles we faced while attempting to remodel this light fixture, we are going to try something new in our guest bathroom. We have a few ideas on how we can improve on this project and if all goes well with our second attempt in the guest bathroom, we will try it again here in the master bathroom. Stay tuned.

PIN FOR LATER

You want to give your  boring builder's grade silver light fixture in your master bathroom an upgrade but you quickly discover that your are stuck with how it is wired. Check out how to give your master bathroom an easy upgrade with a wooden light fixture with Edison light bulbs!