Tips + Tricks

Framing Prints

Framing Prints (Plus, a free artwork download)

Our technique for easily and inexpensively framing prints printed from your home printer to make them look high quality. Plus, a free artwork download.

Framing Prints Gray House Studio

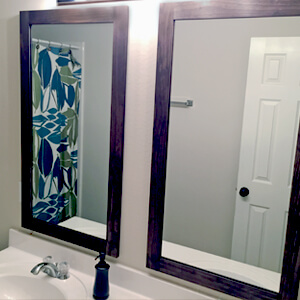
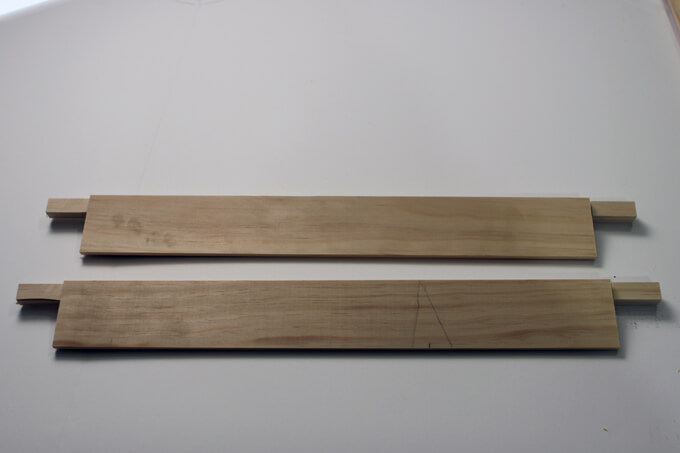
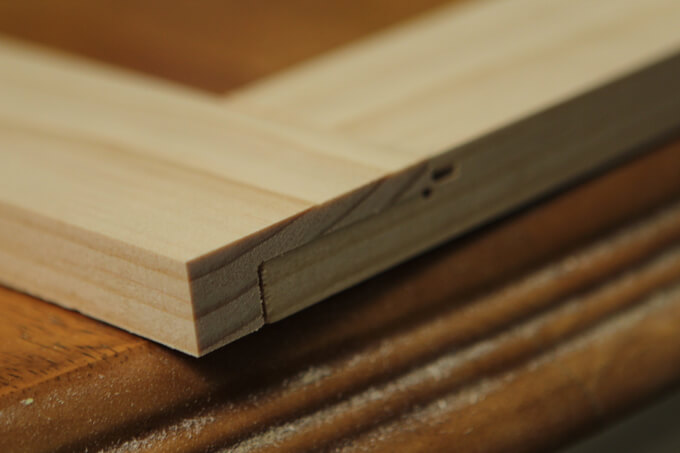
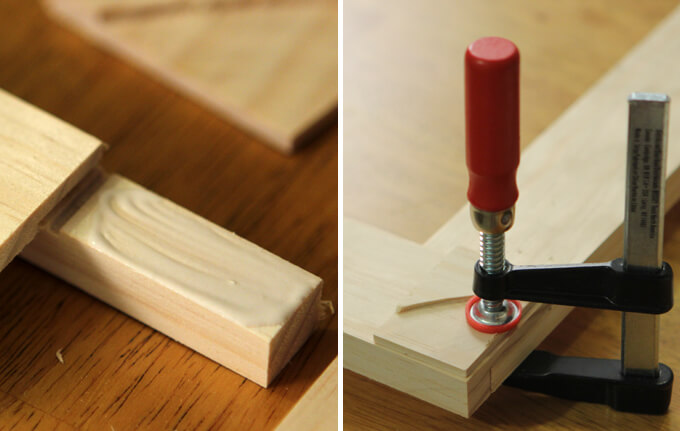
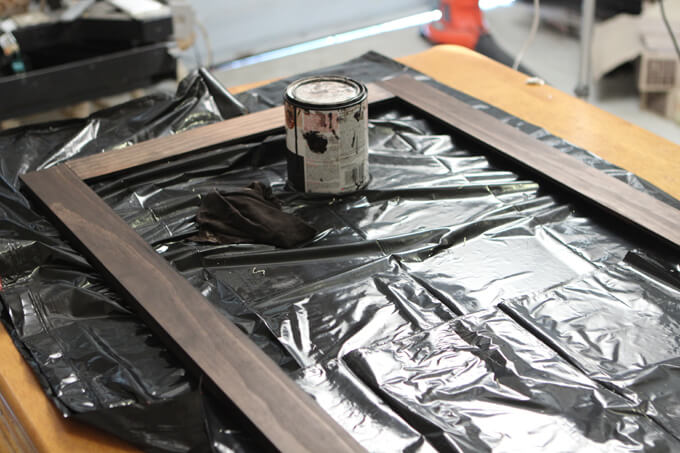
Hello! I hope you all had a fantastic Easter. Brent’s parents came to Houston and we had a great time visiting with them for the long weekend. But just because we had company, didn’t mean the home projects came to a halt, they got in on the action! Brent and his mom worked together on Saturday to build a towel rack for her bathroom. It turned our really nice. Here is the finished product.

We also managed to squeeze in a quick and simple art project yesterday afternoon. Today we are sharing that project as well as an inexpensive technique to frame prints straight from your home printer so you can get an expensive art look on a limited budget.

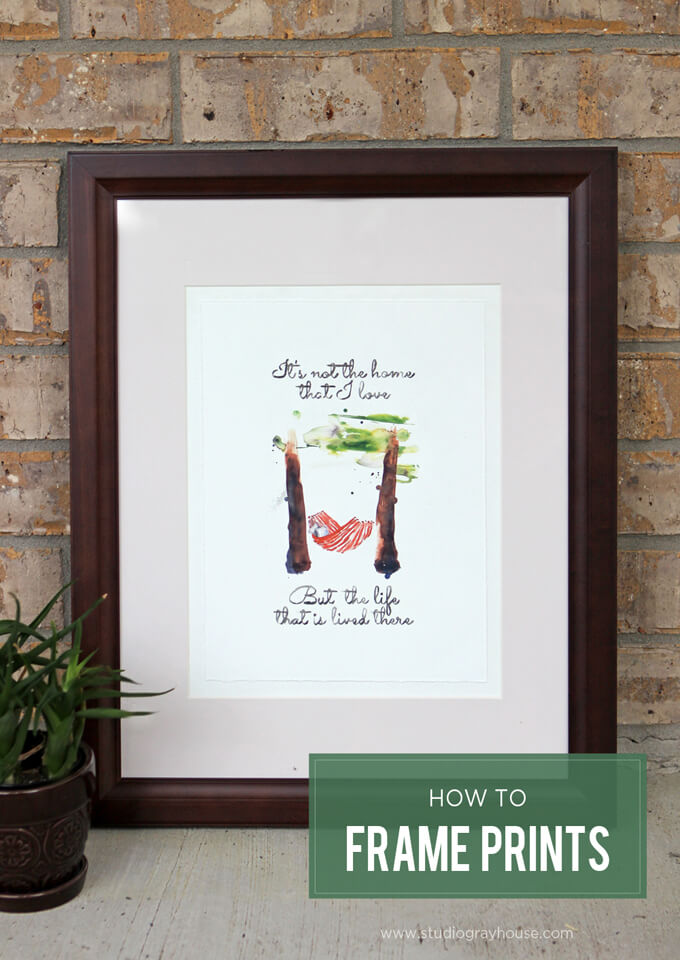
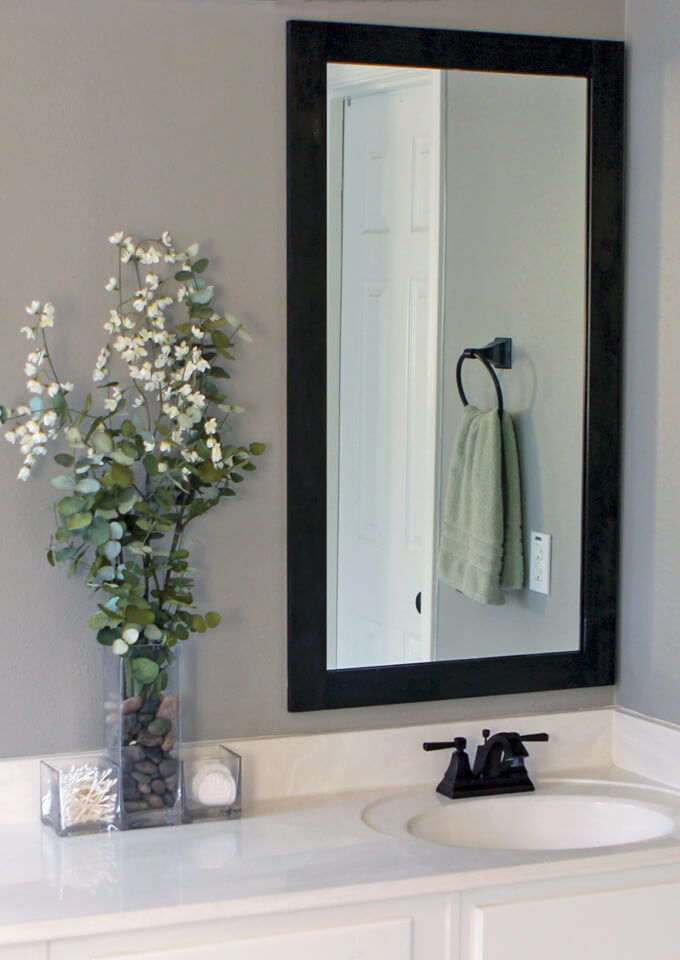
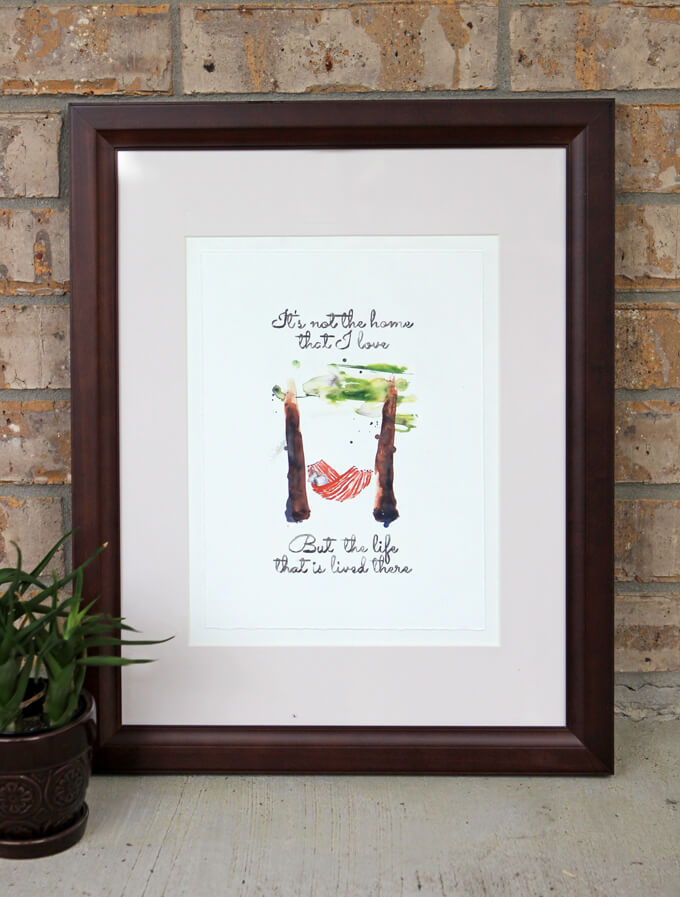
Brent’s undergraduate degree is in printmaking and when we were framing the print for our guest bathroom, he had a really cool idea to turn a $5 dollar digital print into a high end work of art. We replicated that process with an original watercolor painting that Brent made this weekend to frame in our guest bedroom.

Framing Prints Gray House Studio
Brent is a talented artist, I can’t draw to save my life. Which is funny because we were in the same art class together in 12th grade. I couldn’t pick up the skill but that may be because I spent most of my time trying to think of ways to “accidentally” kick Brent’s feet under the table to get his attention so he would talk to me.

I threw out ideas of creating a minimal piece that captured our dreamy backyard and Brent made it come to life with watercolors. If you have the artistic ability to paint or draw then the first step would obviously be to create your work of art. If you are like me and not as skilled with watercolors as Brent, then there are lots of really cool prints that are fairly inexpensive on Etsy as digital downloads or you can download this watercolor print Brent made for free at the bottom of this post

Below Brent explains his technique for framing prints.

Framing Prints and Artwork

Framing Prints Gray House Studio
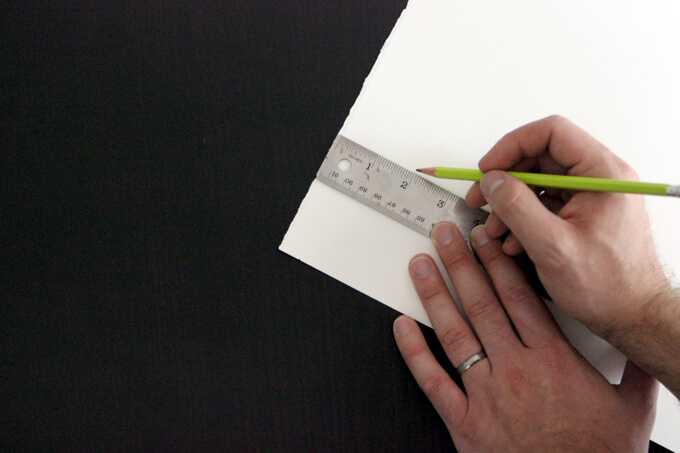
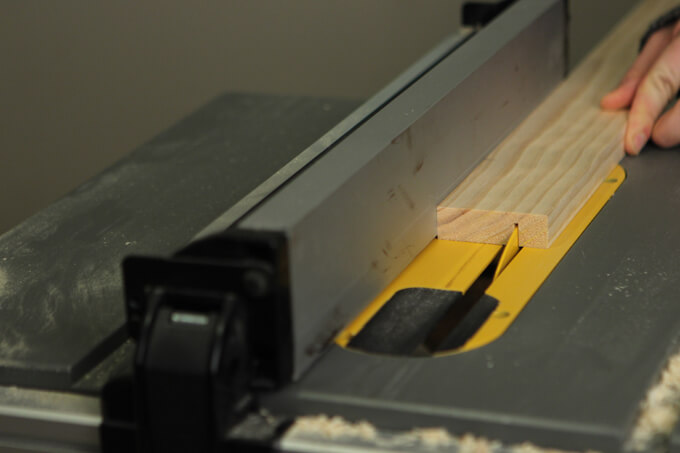
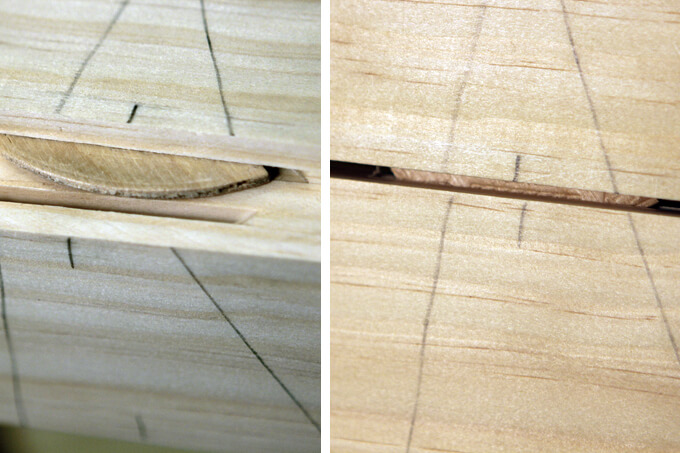
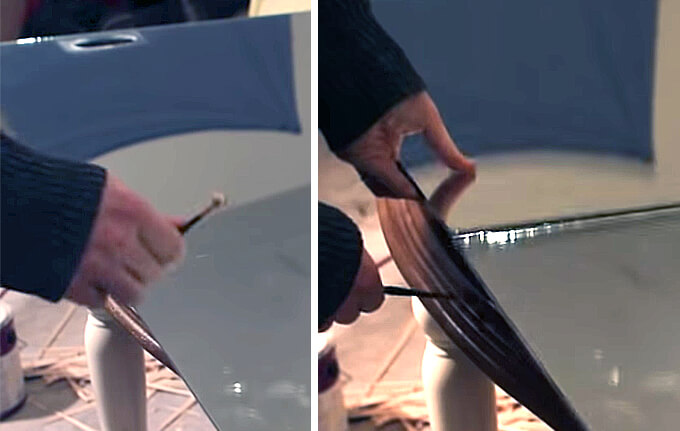
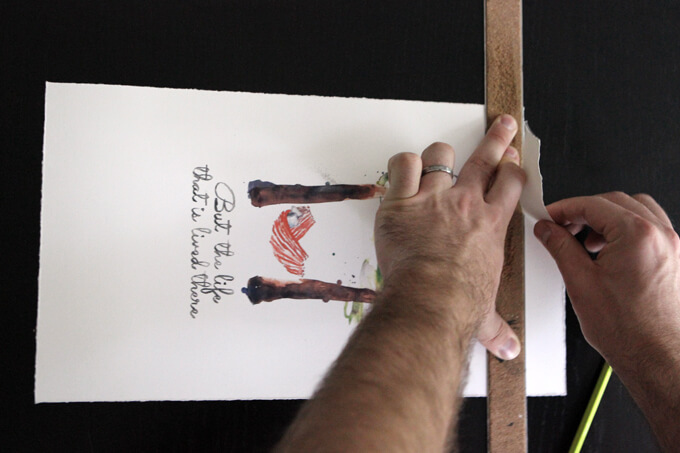
1. Traditionally, fine art prints are printed on thick 100% cotton paper with a torn edge. I replicated this effect with paper that we found at an arts and crafts store. The typical size of this paper is 19.5″ by 25.5″ so I had to tear it down to size. When tearing the paper down to the size, I measured at least 2 inches in from the edge so I had enough paper to hold on to.

Framing Prints Gray House Studio
2. Before tearing the paper, I flipped my ruler over so it was upside-down with the metal edge flush against the paper. For a consistent edge all the way around the artwork, I always place the ruler on the paper I plan to use and pull the extra paper. Don’t worry, I know what you are thinking, but you don’t have to have hairy arms to be good at tearing paper it just takes practice.

Framing Prints Gray House Studio
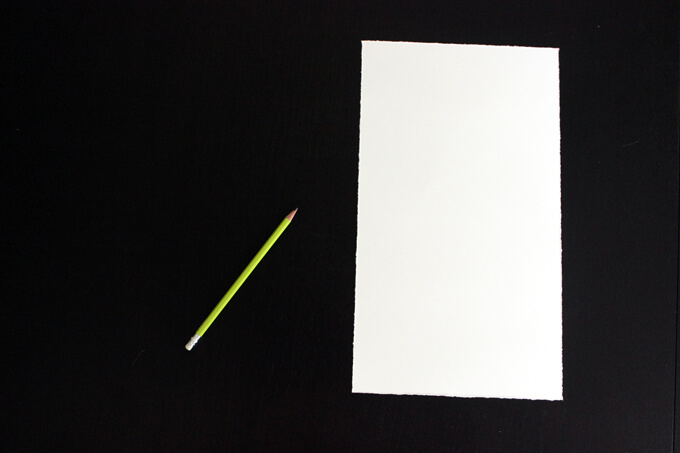
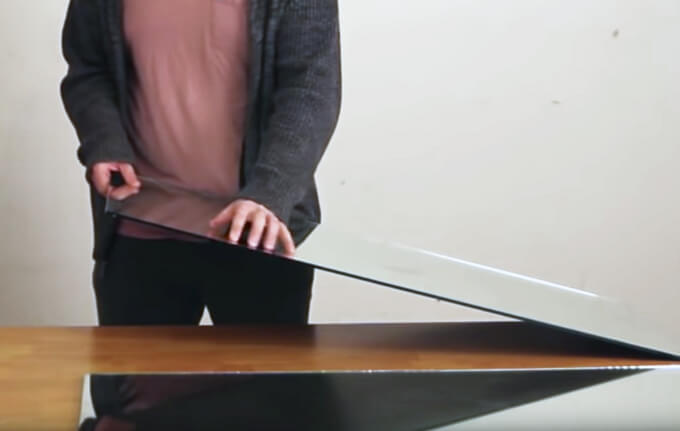
3. For this project I tore my paper down to legal size 8.5″ x 14″.

Framing Prints Gray House Studio
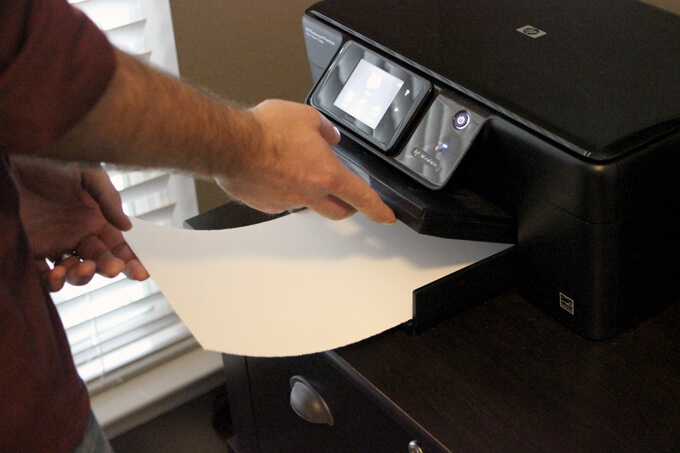
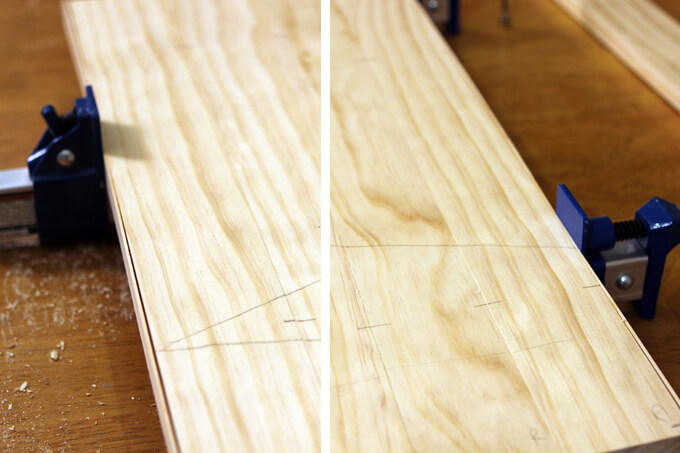
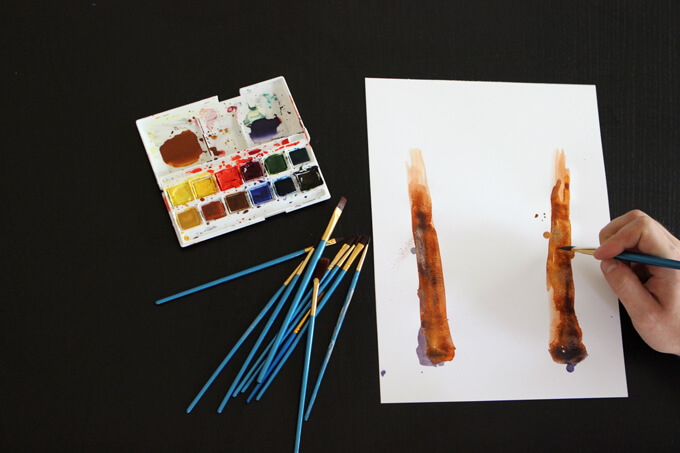
4. I scanned my watercolor piece into the computer for the purpose of this project so I could print it. I placed the paper in our home printer and made sure to select the same size paper I tore. I also made sure the paper setting was set to “best” or “photo” quality and “cardstock”.

Framing Prints Gray House Studio
5. I’m a bit of a perfectionist when I make artwork. A crease in the paper of any fine art is highly frowned upon so I stand and wait to grab the print from the printer to avoid having the printer throw it on the floor when it is finished printing.

Framing Prints Gray House Studio
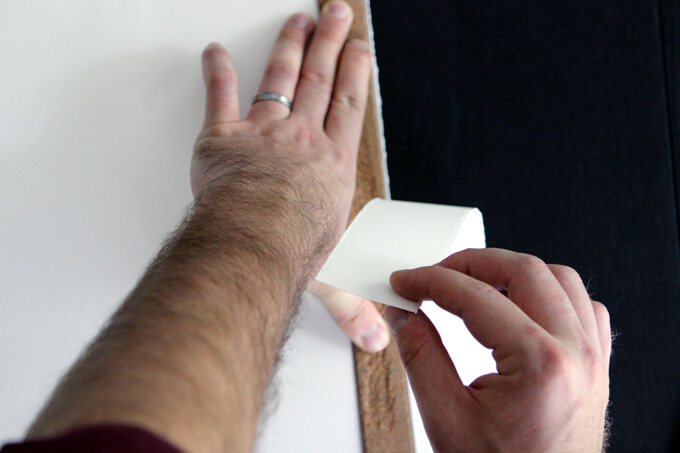
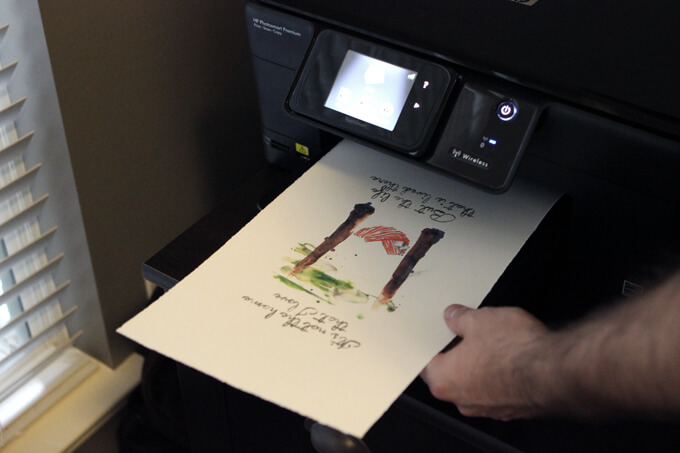
6. When printing on legal sized paper there is a lot of white space above and below the image. I never trust the printer to center the image on the paper exactly so this extra space allows me to tear off paper on the top and bottom of the page to center the image.

Framing Prints Gray House Studio
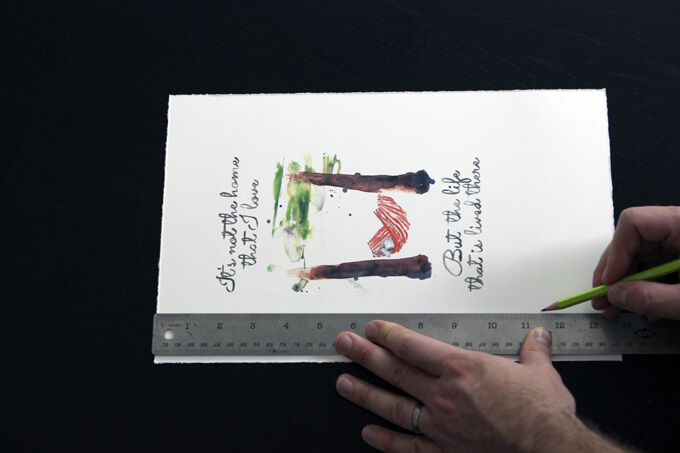
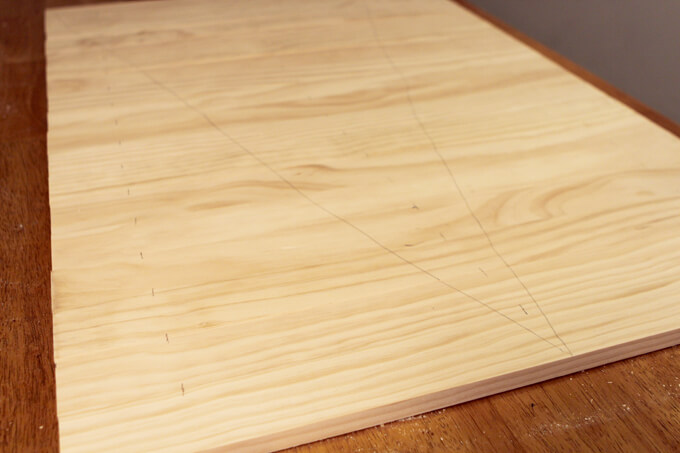
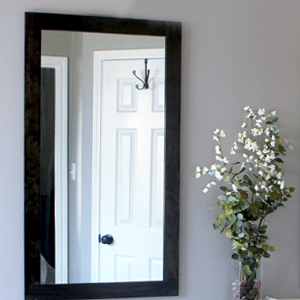
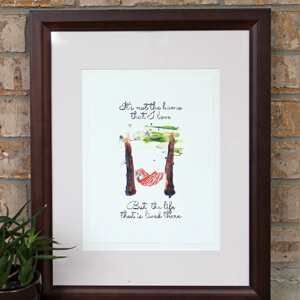
7. The final size I tore my paper down to is 8.5″ x 11.5″ because the mat opening in the frame is 10″ x 13″. This give some space all the way around the artwork to show off the print’s torn edges. I used an additional piece of the same paper I tore behind the torn piece with the image to fill in the gap between the artwork and the mat.

Framing Prints Gray House Studio
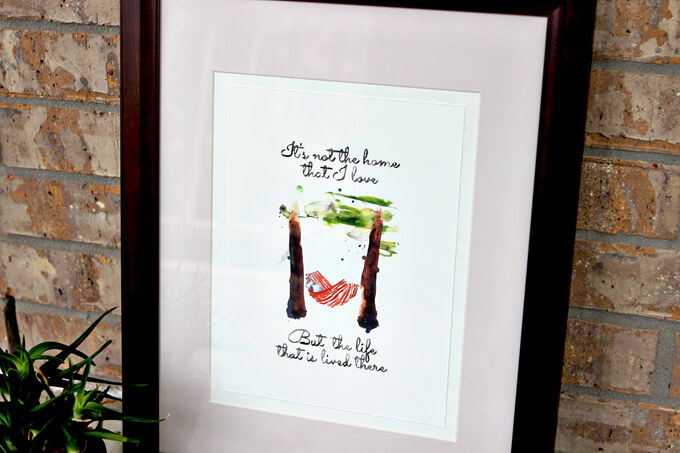
Here is the finished product. The torn edges and layering two pieces of paper gives the print depth and reflects a more traditional fine art piece. If you are interested in trying out this technique of framing prints and need a print, feel free to download Brent’s watercolor print for FREE!

PIN THIS TUTORIAL

Framing Prints Gray House Studio

Framing Bathroom Mirrors

How to Frame Bathroom Mirrors

In this tutorial we are showing how to frame bathroom mirrors. We will also show how to build the frames and how to hang them on the wall.

How to Frame Bathroom Mirrors

Remember back in January when we showed how we cut our large bathroom mirror into two pieces? Today we are sharing the second half of the project which includes how to frame bathroom mirrors and hang them back up on the wall. We have found that a simple and inexpensive way to freshen up a bathroom’s appearance is to take down the large unframed mirror and replace it with two narrow mirrors over each sink.

In both our master bathroom and now our guest bathroom we cut the large builder grade mirror that came with the house into two pieces, built frames for each one out of wood and then stained the wood to match the bathroom. By cutting the mirrors and building the frames ourselves, we saved money and had complete control over the size and appearance of our mirrors.

We really like the look of tall narrow mirrors but finding that style without the high price tag was a difficult task. Building the frames ourselves was a great solution for us.

SUPPLIES

MATERIALS

  • (2) 1″ x 6″ boards of select pine (1 for each frame)
  • Wood Glue
  • Rust-Oleum Wood Stain, Kona
  • All Purpose Adhesive Caulk
  • Brown Acrylic Latex Sealant
  • D-Ring Hangers
TOOLS

  • Table Saw
  • Clamps
  • Screwdriver

*This post contains an affiliate link. You can read our disclosure policy here.

How to Frame Bathroom Mirrors

How to Frame Bathroom Mirrors
1. To save money we bought a 1″x6″ board that we cut down the middle to be the width of one side of the frame. Cutting the board in half gave us both the left and right side of the frame.

How to Frame Bathroom Mirrors
2. We cut all the boards to our desired width for the mirrors. Then we made two cuts using the table saw to create a recessed area in the board where the mirror would sit.

The first cut, which is shown in the photo above, determined how far the mirror will sit inside the frame. We chose to make the lip on the inside of the frame 1/4 of an inch.

How to Frame Bathroom Mirrors
3. Next we raised the blade to meet up with the line of the previous cut and ran the boards through the table saw.

How to Frame Bathroom Mirrors
The two cuts we made removed the piece of the wood on the left. The piece of wood on the right is what we used for the frame.

How to Frame Bathroom Mirrors
4. After measuring the length of each side of the frame so we could mark where the cut needed to be, we cut the left and right side pieces of the frame at the same time and the top and bottom pieces at the same time to guarantee that there would be no variations between the matching sides of the frame and that the four pieces would make a rectangle.

How to Frame Bathroom Mirrors
5. Finally, we made two cuts on each side of the top and bottom board of the frame. This cut removed a piece of the wood allowing the side boards of the frame to be glued on top of the top and bottom board. This type of joint is called a rabbet joint.

How to Frame Bathroom Mirrors
6. This is what the top and bottom boards of the frame looked like after the previous step once the pieces of wood on each side were removed.

Framing Bathroom Mirrors Gray House Studio
7. By cutting the pieces of wood out, each piece of the frame fit perfectly over the other piece of the frame. This process makes for a very strong joint and prevents the need to nail or screw the frame together.

Framing Bathroom Mirrors Gray House Studio
8. We then applied glue to each board and clamped the frame together. After several projects we finally remembered to put a scrap board between the wood and the clamp. When we forget to put a scrap piece in between the board and the clamp, a lot of times the surface of the project will get indentations from the clamp.

Framing Bathroom Mirrors Gray House Studio
9. To match all the other stain in our bathroom, we decided to stain the frame with a Kona stain. We learned from staining our first set of mirrors that it is important to stain the back as well as the front of the frame.

The mirror reflects the backside of the frame. If only the front side is stained, once the mirror is glued in place, you will be able to see the non stained wood in the reflection.

Framing Bathroom Mirrors Gray House Studio
10. We placed the mirror in the frame and lined it up so it was centered. Then we traced the mirror outline on the back of the frame so we would know where to apply the adhesive. To secure the mirror to the frame, we used an all purpose adhesive caulk.

We could only find it in white which caused a little bit of an issue because the mirror will reflect the underside of the frame and the white caulk would be very noticeable. Our solution was to run a bead of brown acrylic latex sealant on the side of the white caulk that is closer to the inside of the frame.

The brown sealant is not a great adhesive but it does a good job concealing the white caulk that is actually holding the mirror and frame together.

Framing Bathroom Mirrors Gray House Studio
11. After the adhesive dried, we screwed a D-Ring hanger in each side of the back of the frame for easy hanging.

Framing Bathroom Mirrors Gray House Studio
12. The final step was to put two picture hanger nails in the wall to hang the frames on.

Framing Bathroom Mirrors Gray House Studio
Now we have two (like) brand new mirrors for only the cost of the two boards since we already had most of the supplies left over from our previous framing project. It is nice to have mirrors back in the guest bathroom again and just in time for our guests coming in a few weeks.

Framing Bathroom Mirrors Gray House Studio
We have a few more projects we will be working on this weekend for the guest bathroom. It is fun seeing our ideas start to become a reality in this room. I did some preliminary decor shopping last week and picked up some guest bathroom items along with a few tropical elements that I can’t wait to incorporate into the room.

Framing Bathroom Mirrors Gray House Studio
Stay tuned for more guest bathroom posts and progress photos coming soon.

Check out how to cut a large bathroom mirror into two smaller pieces.

PIN THIS PROJECT

Frame Bathroom Mirrors

How to Use a Biscuit Joiner

How to Use a Biscuit Joiner

In this tool tip tutorial we are showing you how to use a biscuit joiner.

How to Use a Biscuit Joiner

Hey! Brent here. Today I am sharing how to use a biscuit joiner to join two pieces of wood together. This is a cool woodworking tool that comes in handy for projects like building a coffee table where you need to put multiple boards together to create the table’s surface which is exactly what I am working on right now.

A current trend is using multiple pieces of reclaimed wood for the tops of tables. I have found when I would just glue or nail the boards together, the joint was not as strong and the boards had the potential to come apart in places.

Gray House Studio How to Use a Biscuit Joiner

A biscuit joiner uses a circular saw blade to cut a hole in each piece of board. By applying glue to the hole, adding the wooden biscuit in the slot and clamping the two boards together, you get a much tighter bond and makes it the perfect solution for a nice and sturdy table.

As I build the top of our coffee table, I am going to walk through my process of using the biscuit joiner.

How to Use a Biscuit Joiner

First, I think it is important to highlight the tool settings I use. Most biscuit joiners have three settings you have to consider.

three settings to consider

How to Use a Biscuit Joiner

1. Select the Biscuit Size

First, I need to set the dial on the biscuit joiner to match the size of the biscuit I intend to use. As you can see in the image on the left, for this project the size of biscuit I am using is 20.

So I made sure to set the dial to 20. The picture below shows a biscuit I am using which will have the size printed on it. The photo on the right above shows the circular blade that will make the cut.

The larger the number on the dial, the further the tool allows the blade to cut into the wood which creates a deeper slot for the biscuit.

How to Use a Biscuit Joiner

2. Adjust the Surface Angle

The next setting I need to set on the tool is to adjust the front guard to match the angle of the surface I want to join together. When cutting into the side of a board to join two boards side by side, use the 90 degree setting. This is what I used for this project.

How to Use a Biscuit Joiner

3. Center the Biscuit

On thin surfaces, like a table top, it is important to center the biscuit on the board to create the strongest joint. On the biscuit joiner you can adjust the front guard up and down with the knob on the side of the tool. In the above photo on the right, notice the red line. This line identifies where the cut will be made.

Using a Biscuit Joiner

How to Use a Biscuit Joiner
1. Now that we have the tool set up like we need it, it is time to prep the boards to be cut. First, I arranged the boards in the order I want to join them. An important step is to mark the boards in a way that will make it easy to reassemble them after you have taken them apart to cut the groves for the biscuits.

I have found that once you start gluing the boards together you don’t have a lot of time to sort through them and figure out the original order of the boards.

My favorite way to mark the boards is to draw a large “v” across the face of all the boards. This gives two points of reference on each board making it easier to assemble them in the correct position. After I draw a “v”, I add a dash everywhere I plan to join the boards with a biscuit.

Two to three biscuits per board is usually good enough. I am using three per board for this project.

How to Use a Biscuit Joiner
2. It can be hard to handle the biscuit joiner and hold the board you are cutting steady. So I have found that it is best to clamp a piece of scrap wood to my work space. I push the board I am cutting up against the scrap wood to keep it in place.

Before I begin cutting, I make sure to align the mark I made in the previous step with that red center line on the biscuit joiner.

How to Use a Biscuit Joiner
3. Then I make the cut. The photo above shows what the finished cut looks like in the side of the board. As you can see the biscuit fits perfectly in the slot that was cut out.

How to Use a Biscuit Joiner
4. With all the boards cut, it’s time to apply glue to each board. It is important to get glue in each biscuit slot. I don’t worry about being a perfectionist with the glue because when gluing five to ten boards together, time is of the essence.

Any excess glue can easily be cleaned up with a damp rag after the boards have been clamped together.

How to Use a Biscuit Joiner
5. After the glue has been applied to each board, I insert a biscuit into each slot and line the boards up so the “v” I drew earlier lines up correctly. The biscuits help compensate for any slight warping the boards may have to create an even surface from one board to the next.

How to Use a Biscuit Joiner
6. Once the boards are aligned, I place clamps around the boards and tighten the clamps until the gaps between the boards close and glue squeezes out of the seams.

The pressure of the clamps can sometimes create indentions in the boards. I have found a solution to this is to use a scrap piece of wood between the clamp and the board you are gluing together.

How to Use a Biscuit Joiner
7. I always make sure to give the glue more than enough time to dry based on the wood glue guidelines. You can see how these multiple boards now look like one solid surface.

I will erase or sand off the pencil marks. Now all these boards should have a really strong bond and make for a great table top for our new coffee table.

Step one of the coffee table is complete! As you can see I am using the coffee table below as inspiration for the one I am building for our library. Notice in the detail shot on the right that the top of the table has several individual boards next to each other, that is the look we are going for. I’ll be back soon to share the next step in the process of building our coffee table.

Gray House Studio How to Use a Biscuit Joiner

^ coffee table inspiration from West Elm

PIN THIS TUTORIAL

How to Use a Biscuit Joiner

CHOOSING THE RIGHT DRILL BIT

Choosing the Right Drill Bit

In this tool tip tutorial we are explaining why choosing the right drill bit for the project is important.

Choosing the Right Drill Bit for a DIY Project

FYI: This post contains affiliate links to drill bits we use. As an Amazon Associate Gray House Studio earns from qualifying purchases. This is at no extra cost to you. We appreciate you supporting this site. Read our privacy and disclosure policy.

One thing we have learned so far while working on home renovation projects is that having the right tools for the job is key to a successful outcome.

Today we are talking specifically about choosing the right drill bit. If you asked me a year ago I would have told you a drill bit is just a drill bit.

They are all the same, right? But the past few projects (and Brent) have taught me that is not true at all. Not all drill bits are the same and they do not all produce the same results.

Below we are highlighting three drill bits that we have used for our latest projects.

Choosing the Right Drill Bit

Choosing the Right Drill Bit
Below we are highlighting three drill bits that we have used for our latest projects.

1. Paddle Bit/Spade Drill Bit

Choosing the Right Drill Bit - Paddle Bit

What it looks like: The paddle bit bit has a long point in the middle to keep the blade from walking as it spins. The flat parts next to the tip bore a hole the size labeled on the bit.

When to use this bit: This bit is great for drilling large holes all the way through a material especially if the hole needs to be deeper than one or two inches.

Pros: The main reason to use a paddle bit over other types of bits is the price point. You can get a set of these bits for the price of one of the other bits.

Cons: They are not great for boring holes partially through a board. Another downside with this type of drill bit has to do with safety. If the drill is not kept level while drilling a hole and the bit digs into the wood unevenly or hits a knot, it can catch the work piece and whip the drill from your hand.

Real Project Use: We used a paddle bit when drilling the hole in the ceiling to run the wire for the light fixture in the reading nook. It was the only bit that could make a 6 inch deep cut. Read more about how we built our reading nook.

> shop the paddle bit set we use

2. Forstner Bit

 Choosing the Right Drill Bit - Forstner Bit

What it looks like: The forstner bit has a small point in the middle just long enough to help center the bit and two blades that span the radius. The outside of the bit has teeth to clean up the outside of the cut.

When to use this bit: This bit is great for drilling holes that need to be a specific depth.

Pros: With two blades running along the radius of the cutting surface, the bit shaves off small layers of wood at a time and allows for a very precise cut.

Cons: These bits are more on the expensive side.

Real Project Use: We used a forstner bit to drill out a hole for the hinge on our bathroom cabinet door. Read more about how we added shelves to our bathroom cabinets.

> shop the forstner bit set we use

3. Hole Cutter / Hole Saw

Choosing the Right Drill Bit - Hole Saw

What it looks like:The hole saw has a central drill bit that attaches to the drill and extends through the middle of a circular saw.

When to use this bit: The most common use for this bit is for cutting holes for door knobs. The quality of the cut does not usually matter because the plate behind the knob completely covers the hole.

Pros: The saw can be removed from the central bit allowing you to have multiple saw diameters with only one bit that connects to the drill.

Cons: There is a limit on the thickness of material that this bit can cut. The drill bit can only cut as deep as the cup of the saw.

Real Project Use: We used the hole cutter to make six holes for the wood light fixture in our master bathroom. Read more about how we built our wood light fixture.

> shop the hole saw set we use

We chose to highlight these three drill bits because they all do the same thing but with slightly different outcomes making each one better suited for certain tasks and certain projects.

If you have any questions about choosing the right drill bit for your next project, feel free to leave them below.

PIN IT FOR LATER

A helpful tool tutorial for beginners that explains why choosing the right drill bit for the project is important and how to choose the right drill bit for your project.

How to Cut a Mirror

How to Cut a Bathroom Mirror in Half

In this home DIY tutorial we will show a simple way to cut a bathroom mirror in half. If you are trying to save money, you can cut an existing large unframed bathroom mirror to the size you need.

Cut a Bathroom Mirror

Do you have a large unframed mirror in your bathroom that you find is an eyesore?

Cut a Bathroom Mirror

We did. We had one in each bathroom.

Our solution was to take our large unframed mirror that spanned the whole vanity and recycle it by cutting it in half to create two separate more narrow mirrors that we framed and hung over each sink.

We took down the large mirror and initially went on the hunt for two tall and narrow mirrors that we could hang over each sink.

After lots of window shopping we kept coming up short on finding affordable, tall and thin mirrors that would be the exact dimensions we desired.

Cut a Bathroom Mirror

We decided we would cut our existing bathroom mirror down to the two identical sizes we wanted. This was a great solution for us because it was already the height we needed and of course it saved us money because we are using what we already had.

If you think this approach might be a solution for you and your bathroom mirror dilemma, follow along and watch the video below as we show you how we cut a bathroom mirror down to the size or sizes needed.

2022 Personalized Christmas Ornaments
*** Thanks so much for supporting our small shop – Moon Rock Prints – this holiday season! ***

How to Cut a Bathroom Mirror

SUPPLIES

Shop the products we used for this project in one place.

FYI: This post contains a few affiliate links to products we used to make this project. Gray House Studio does receive commissions for sales from these links but at no extra cost to you. We appreciate you supporting this site. Read our privacy and disclosure policy. You can also easily shop our recommended products here.

TUTORIAL VIDEO

STEPS

Cut a Bathroom Mirror

1. To begin we set the mirror on a large flat surface. We took a yard stick and marked with a Sharpie the measurements of the new mirror where we would need to make our cut.

Cut a Bathroom Mirror

2. Then we took a board which acts a straight edge for scoring the mirror and lined it up with the marks we made with the Sharpie.

Cut a Bathroom Mirror

Next we used a c-clamp to hold the board and the mirror to the table to make sure that it didn’t move once we started to make our cut.

Cut a Bathroom Mirror

On the side of the board that could not be clamped, we used a paint can as a weight to hold the board down.

Cut a Bathroom Mirror

3. Once everything was in place we squirted a few drops of glass cutting oil on the mirror where the cut would begin.

Cut a Bathroom Mirror

4. We grabbed the glass cutter and prepared to make our cut.

When starting the cut it is important to apply a good amount of pressure to force the blade down to score the glass.

Once you begin scoring, continue all the way across the mirror with out stopping. It is imperative to make one continuous score.

Any overlap in scores will result in an uneven cut.

Cut a Bathroom Mirror

5. After we made our cut, we lifted the mirror up slightly and then took the other side of the glass cutter (the end with the heavy metal ball) and tapped directly under the beginning of the score.

Once you start a crack the weight of the mirror will force the crack to run the entire length of the score. The result is the mirror breaks in two pieces.

Cut a Bathroom Mirror

After the mirror is cut, be careful handling the side that was scored. It will be sharp. We used fine grit sandpaper to smooth the edge making it safer to handle when we started framing it.

Cut a Bathroom Mirror

6. Once we cut the mirror into two pieces, the sizes we needed, we framed them, stained the frames and hung them back up in our bathroom.

Cut a Bathroom Mirror

Voila! Our one large mirror is now like two brand new mirrors! And that is how we cut a bathroom mirror.

PIN IT FOR LATER

A DIY tutorial showing how to cut a bathroom mirror in half. This step by step home renovation guide includes a video tutorial.

How to create a weathered wood

Create Weathered Wood Video

A video tutorial to create weathered wood from brand new wood.

create weathered wood

Hey guys! Today we are going to show you how to create weathered wood using new wood that can be used in a wood wall liked we made for the back of our reading nook.

MATERIALS

Spruce-Pine-Fir Furring Strips (various widths)
Rust-Oleum Wood Stain, Kona

TOOLS

Hammer
Nails
Clamps
Drill
Wire Brush Drill Attachment
Table Saw

*This post contains an affiliate link. You can read our disclosure policy here.

How to Create Weathered Wood Video

To see more of our DIY project & tutorial videos, subscribe to our channel ⇾

When we started making our wood wall we tried to use old weathered wood from left over pallets but we quickly learned that wood pulled off pallets tended to be gross and broke apart really easy. So instead we bought new Spruce-Pine-Fir Furring Strip in various widths and decided to create the weathered look ourselves so that we could control the color and appearance of each board so that when we put the wood on the wall we could create a pattern that appears random yet balanced. That makes sense, right?

First we hammered two nails into the ends of the boards and then pulled the nails back out to give the appearance that the board had been ripped off of a pallet. After that we use a metal brush attached to a drill to remove the soft wood from in between the grain lines. This is the approach that we found give the most significant and realistic weathered appearance. This also evenly roughs up the surface so the stain soaks in more easily creating a darker more even finish.

The last thing we did was run the surface of the board along the edge of the table saw blade to give it the circular blade marks. When cheaper wood is milled, the surface is not finished smooth. The new wood we used was smooth so we needed to add these marks back on to give it an authentic appearance.

The final step is to stain the boards. We used an oil based stain. Even though it is messier than water based stain we have had better luck achieving a darker finish with the oil based stain. The boards that haven’t been roughed up will be lighter and the ones with the marks will be darker.

Once the stain is dry to the touch, you can start putting it up on the wall! Have any questions? Let us know in the comments below.

Check out how to install weathered wood boards on a wall like we did in our reading nook.