Uncategorized

Fireworks Photo Booth

Fireworks Photo Booth

Fireworks Photo Booth

Happy 4th of July weekend! Who is ready to see some fireworks? Speaking of fireworks, have you ever found it difficult to time the perfect photo op in front of fireworks?

Brent and I had an entertaining and silly time tonight creating an excellent and easy solution, a fireworks video photo booth! This would be a great addition to any 4th of July party. It creates a patriotic atmosphere, you never have to worry about missing that perfect pose in front of the fireworks and you don’t even have to leave your backyard!

Fireworks Photo Booth

Instead of having a static photo backdrop we created a video backdrop. We used a laptop with a fireworks video playing, a projector and a white piece of fabric. Our backyard has these huge trees so we took advantage of them and strung the white fabric between two trees and then placed the projector playing the video behind the sheet so it rear projected the laptop screen onto the fabric. We had all these items on hand so this was a very inexpensive project but we think it is unique and will bring lots of enjoyment to a party.

The fun thing about the video backdrop is you can take static photos or quick little Instagram videos with the fireworks going off behind you and nobody would ever know the difference. At the end of the night if you are too tired to leave your house to go to a fireworks show, just pull your lawn chair up and oooh and ahhh over this prerecorded fireworks display. It all pretty much looks the same anyway.

Fireworks Photo Booth
^^^ Having patriotic props on hand is a must.

Fireworks Photo Booth
Here was our set up. In order to see the projection it must be dark out which can cause the subjects posing in front of the backdrop to be only silhouettes so our solution was to add two lights in front of the fabric. We covered the lights with colored plastic so they wouldn’t be too bright and wash out everything and would also add a nice color effect. We placed cardboard on the side of the light facing towards the projection so it would block the light from shining on the fabric.

Fireworks Photo Booth

*In the effort for full disclosure, this was our first attempt at creating a photo booth with a video backdrop (at night none the less) and we needed to practice getting the set-up right. So here we are, just the two of us, on the 2nd of July in our backyard at 10:00 at night posing in front of our fake fireworks and having way too much fun with it. I’m 99.9% positive our neighbors think we are crazy.

But we are super excited to use our fireworks photo booth for real at our 4th of July party this weekend!

Dream Big With a Narrow Focus

Dream Big With a Narrow Focus

By now I am sure you have seen our reading nook, industrial library shelves and coffee bar projects that we have completed within the last year. What do all these projects have in common? They were all built in spaces of our home that got little to no use prior and they are our favorite projects to date.

One of our favorite challenges is to take spaces in our home that are blank and bare because either we had no furniture to put in them or decided against using them for their intended purpose (we’re rebels like that) and transforming them into places that not only make us happy but also function so we get the most use of them.

There are several things we consider when we start projects in empty areas of our home and we thought we would share them with you in a new series we are calling Tips for Turning Unused Spaces into Unique Settings. Over the next several weeks we will share suggestions on how to approach tackling those boring spaces in your home that get no attention and making them into an area that defines your style and makes your home one of a kind. First up we talk about dreaming big.

Turning Unused Spaces into Unique Settings: Dream Big with a Narrow Focus

Our first tip for turning unused spaces into unique settings is to dream big. The fun thing about being a homeowner is you don’t have to limit your ideas for a room or a space to what a house should have or how a house should look. The visualizing part is exciting because it can get as grand and detailed as you can imagine.

While it is important to dream big for creativity sake, we feel it is equally essential to have a narrow focus when it comes to choosing which projects to complete. What we mean by this is to choose a specific area in a room, really put thought into what would make you the most happy to see in that spot and then focus all your creative attention on just that one area for the time being. It’s not necessary to makeover the entire room all in one shot. Having a narrow focus helps to guarantee that you won’t feel as overwhelmed and that projects will get completed quicker.

Unless you have a huge budget to spend on house renovations or no budget at all, your home will be a work in progress and that is okay! If you can only do one project a month or every two months but you absolutely love the projects you have done so far and get a lot of use out of those spaces, it is worth it. Taking your time and only purchasing or building items that your truly love and fit with your overall style will pay off in the end to have a home that is truly unique to you. You will also be creating areas you adore rather than having unused spaces just filled with stuff.

Turning Unused Spaces into Unique Settings: Dream Big with a Narrow Focus

In our home we wanted to makeover our breakfast nook because it was bare and uninviting which led to the space not getting a lot of use unless we had company. An idea we had been kicking around was to add a coffee bar to our kitchen and the long blank wall in the breakfast nook was the perfect place. We started the process of dreaming big and rather than just build a standard coffee bar we ended up coming up with the idea to transform this unused little area into our own coffee shop. This idea may be a little out of the ordinary but it made us really excited.

Because we set budgets for our home renovation projects we knew we had to have a very precise scope for this project. We couldn’t afford to fully makeover the entire nook or the kitchen at one time. The floors are going to have to remain tan tile and the cabinets in the kitchen are still going to be white for a while longer.

It is going to look a bit mismatched in our kitchen area for now but as long we design our new projects with the same overall style, which in our case is a blend of industrial, rustic and eclectic, the house will slowly transform into a style that truly fits us. Having instant gratification and unlimited money would be amazing, but for most of us that doesn’t exist so for the time being we just focused all our attention on making our coffee bar wall look exactly like we wanted, like a counter you would see in an actual coffee shop.

Things to Keep in Mind:

1. Dream BIG!
2. Visualize how you would like a space in your home to look rather than settling for what “should” be in a certain room.
3. Have a precise scope and narrow focus when choosing to design unused areas.
4. You don’t have to makeover an entire room all at one time.
5. It’s okay for your home to be a work in progress.
6. Only purchase or build items that you truly love and contribute to your overall style.

Dreaming big is just one piece of the puzzle. Next we will talk about the importance of determining why a space is going unused and how to create an area that solves that problem.

Have you been dreaming big about a space in your home? We would love to hear your ideas! Share them with us in the comment section below.

Breakfast Nook Makeover Mood Board

Planning Our Breakfast Nook Makeover

Have you ever had an idea and then that idea grew and grew in scale until all of a sudden you are planning on building a small coffee shop in your breakfast nook? No? Maybe that’s just us. There were two small problems we were facing in our kitchen/eating area that led us to start brainstorming a new and interesting idea for the space. We eventually came up with a solution that we are really exited about and can’t wait to get started working on, our cozy & eclectic café inspired breakfast nook makeover.

Planning our Breakfast Nook Makeover Mood Board

Problem #1: Unused Breakfast Nook
We really love to make unique choices when it comes to unused spaces in our home. And yes I am kind of embarrassed to admit that the breakfast nook is an unused area in our home and it’s not because we eat in our dining room because we turned that room into our library. No, it is because most nights we eat on the couch. (We don’t have kids yet to have to set an example of proper table manners at home.) The only time we ever sit in this area to eat is if we have company. The space is pretty empty at the moment and the seating is uncomfortable. It’s not a place we like to spend our time.

Problem #2: Not Enough Space for Coffee Supplies in Kitchen
We realized that the small area in the kitchen that we originally designated for our coffee machine and supplies was suddenly not big enough. We have slowly acquired a cappuccino machine, more mugs and our coffee syrup inventory is getting a little out of hand. (They just make so many delicious flavors!) There are a lot of coffee bar ideas floating around out there and they are beautifully styled. We thought a separate coffee bar could be a great plan.

But then we started thinking, instead of just building an extra cabinet for our coffee supplies, let’t go bigger! Why not transform the entire breakfast nook space into our very own small private cafe, one that is cozy and eclectic and a place where we would enjoy sitting and drinking our coffee weekend mornings or having dinner dates every night together.

After many hours spent on the internet looking at photos of the interior design elements featured in coffee shops (talk about eye candy) we finally narrowed down our ideas to ones that fit our style the best and would match the overall look we are going for in our home. We are even incorporating the same style of wood planks that are on the wall in our reading nook on the coffee bar. We created the mood board above to help set the tone, display our inspiration and collect some of the potential pieces we are interested into incorporating in the space.

I can’t even express in words how pumped I am about the future of this space. It seems to be our craziest idea yet but that is what I thought about the reading nook and the library shelves and now those are my favorite place and statement piece in our home. I can’t wait to decorate with all the bottles and jars I have already been collecting that will contribute to making this space “us”.

Be sure to check back often to follow along with our progress in this room. We have several projects we will be sharing that are part of the breakfast nook makeover over the next several weeks. This one is going to be a blast.

*We created our breakfast nook mood board with photos of coffee shops, as well as products we liked from ATGStores.com and home inspiration photos from Porch.com as part of the Maker Mood Board Contest with Porch & ATGStores.com. If you would like to participate and create your own Mood Board to enter, click here to learn more. Don’t forget to share yours on Instagram and Twitter with the #MMBC!

We nominate the following bloggers to submit their own mood board: Just Judy / Designer Trapped in a Lawyer’s Body / Modish & Main / Fifty Two Weekends of DIY / Fifty Two Weekends of DIY / NewlyWoodwards.com

Sources For Images Above:
PENDANT LIGHT | COFFEE MUG | DINING ROOM | WOOD PANEL COUNTER | WOOD DISPLAY CASE | BLUE RUG | DINING TABLE | COFFEE SIGN | SILK ALOE PLANT | ECLECTIC KITCHEN | COFFEE PRINT

UPDATE: We have completed our coffee bar in our breakfast nook based on this mood board. Check out the finished project: https://grayhousestudio.com/diy-coffee-bar/.

Busted Water Pipe

The Unexpected Trials of Home Ownership

Unexpected Project: Busted Water Pipe

Today we are sharing about one of our first unexpected trials of home ownership, a busted water pipe.

When you are a home owner there are two types of home projects, the projects you choose and the projects that choose you. The former, the home renovation projects you choose to do, are the ones you plan and save for and then tackle based on your own schedule. They are the fun projects or at least worthwhile ones where you can look at the finished project and feel good about spending the money on it and have something to show for all your hard work and dedication.

The latter, the ones that choose you, those are the pain in the butt projects that happen when you least expect it, when you can least afford it, and when you have the least amount of time to tackle them. They usually demand immediate attention because something is broken, busted or damaged and they most likely affect something that is a pretty important aspect of your dwelling. They most likely require a lot of hard work and/or money but you have nothing really to show for it. “Hey! I spent all this time/effort/money to fix what was already there and working fine yesterday. Yay!” And just to show you how much of a pain in the butt they are, these projects will probably choose you at the end of the longest workweek of your life where you just worked all 7 days of the week for 55+ hours at 9:00 at night.

Unexpected Project: Busted Water Pipe
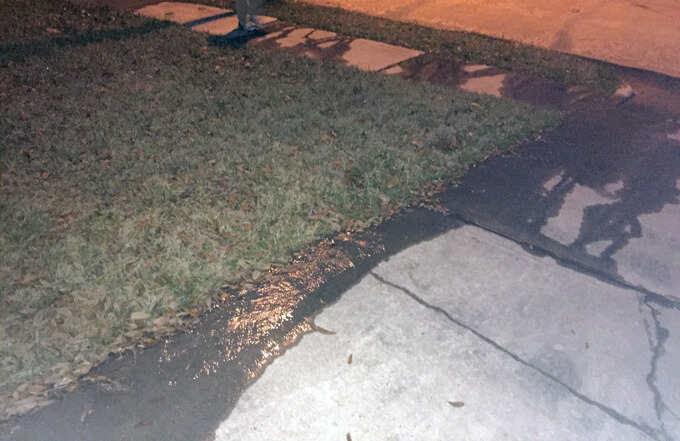
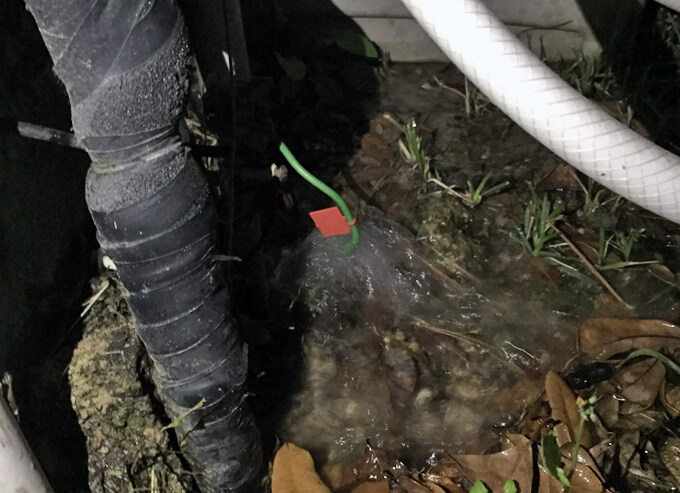
↑ Money just going down the drain. Our water bill next month should be interesting.

Sunday night Brent walked in the door from work. He told me there was a lot of water coming down the driveway. I was surprised because I had been working out in the garage a few hours earlier and had the doors open and didn’t see anything but when I went outside to look, water was gushing down our whole driveway, rushing down the street and down the drain. Thanks goodness our house sits higher than the street and all the water was going away from the house.

Unexpected Project: Busted Water Pipe
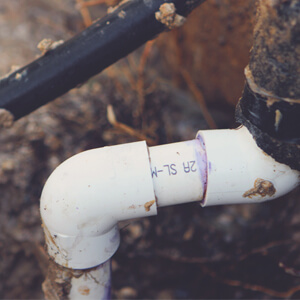
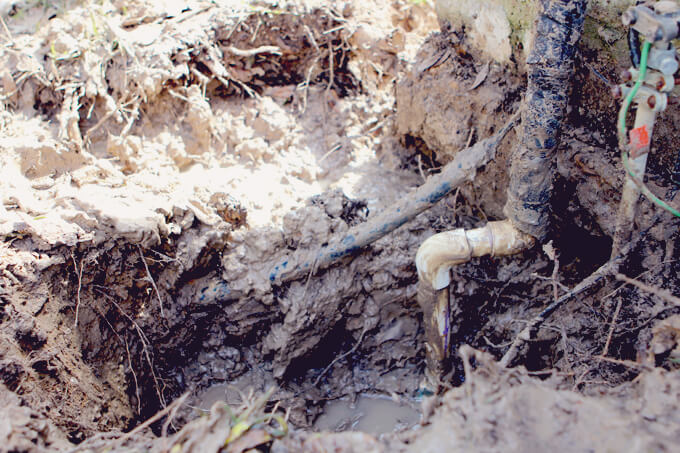
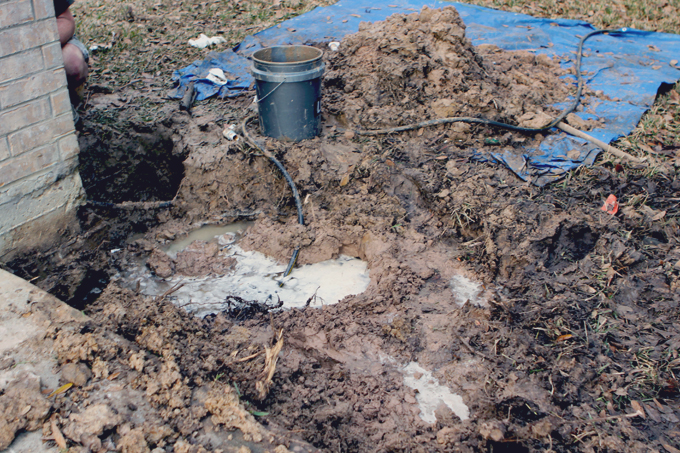
↑ I think we found our leak!

Our yard was flooded and so was the valve box where we needed to turn the water off. It was deep and filled to the brim with water. So much so that Brent couldn’t find the valve to turn the water off in the dark. We initially called our utility company because at that point we weren’t sure where the water was coming from. We roamed around the squishy yard in the dark with our phone flashlights trying to look for the source. We finally found the source and the cause. We had a busted water pipe close to the house and we were pretty sure the crape myrtle right next to it was the culprit. There was not much we could do that night except let the nice man from the utility company who came late on Sunday night and scooped all the water out of the valve box turn our water off.

You know you never realize how much you use your water until you can no longer use your water. Luckily this just so happened to be a time that our water cooler actually had a full jug in it. We always forget to replace them but thank goodness we did this this week. We washed our faces and brushed our teeth with bowls of very clean drinking water that we filled up from our cooler and planned our trips to the bathroom sparingly. It would be another 24 hours before we would have our water turned back on again.

Unexpected Project: Busted Water Pipe
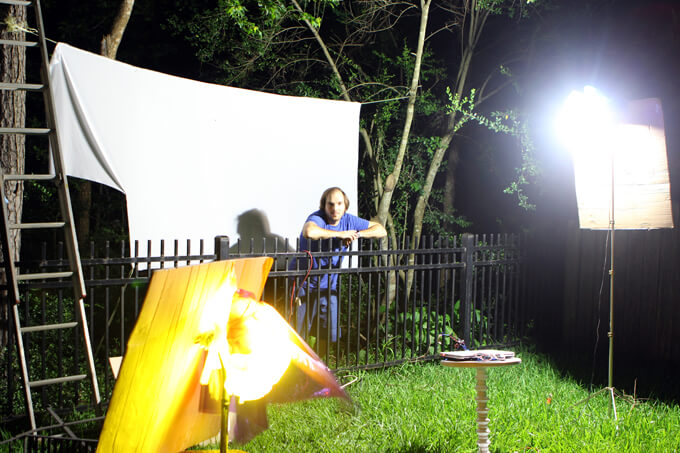
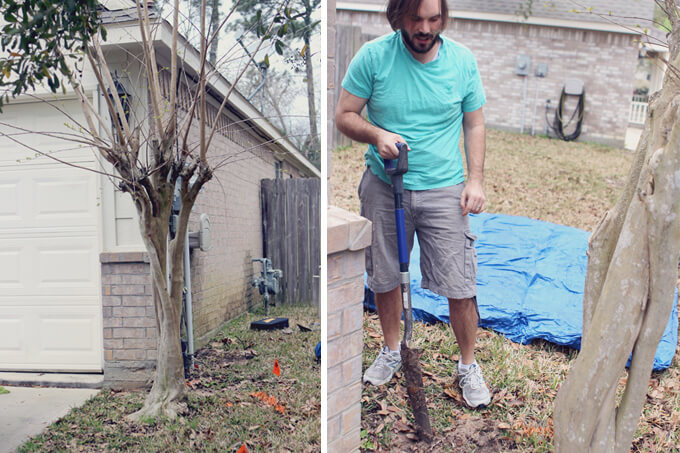
↑ We knew this tree was going to be trouble when we moved into the house.

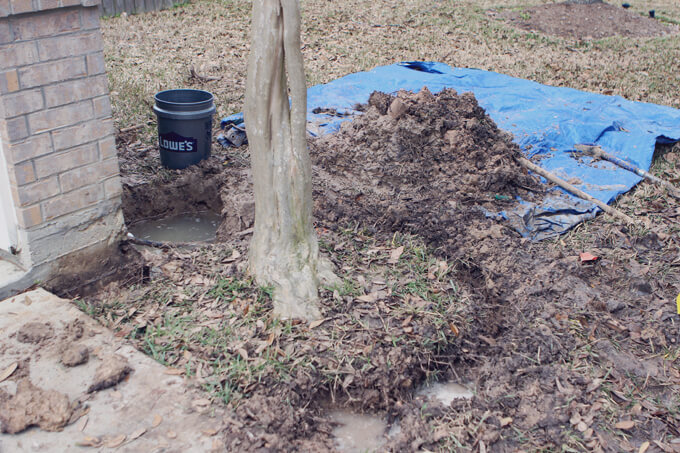
Brent worked half a day on Monday and then came home to fix the problem. Everyone told us that hiring a plumber was a waste of money because it was an easy task and inexpensive if we did it ourselves. I am sure they are right. If they had to dig around all the stuff Brent had to dig around it probably would have cost us a fortune!

Obviously neither of us are plumbers but Brent is not afraid to get his hands dirty (literally he spent the majority of this project covered head to toe in mud) to figure out how to get the job done and with the help of our family and neighbors and a lot of humor we managed to get through this heck of a project and even got to accomplish a side project in the yard that we have been wanting to do since we moved into the house over a year ago.

This is not a typical project post but we thought we would share what we have been up to the past few days. This unfortunate and unexpected project took away time from our planned project that we were going to share this past weekend. Sadly, all of our projects can’t be exciting here at Gray House. Sometimes they just include being knee-deep digging in mud to fix a busted pipe.

Here are a few highlights of this dirty project:

Unexpected Project: Busted Water Pipe
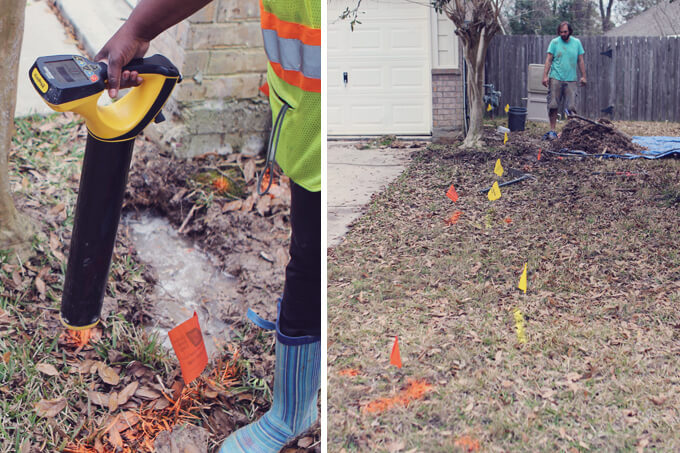
↑ We called the city to have all of our providers come mark where all the lines were underground so we didn’t hit any while we were digging. After they all came, our yard resembled some sort of art piece with all the bright color little flags stuck everywhere and spray painted lines in the grass.

Unexpected Project: Busted Water Pipe
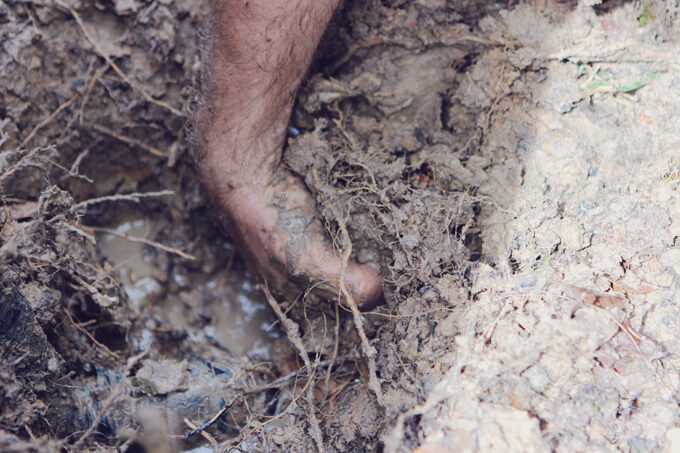
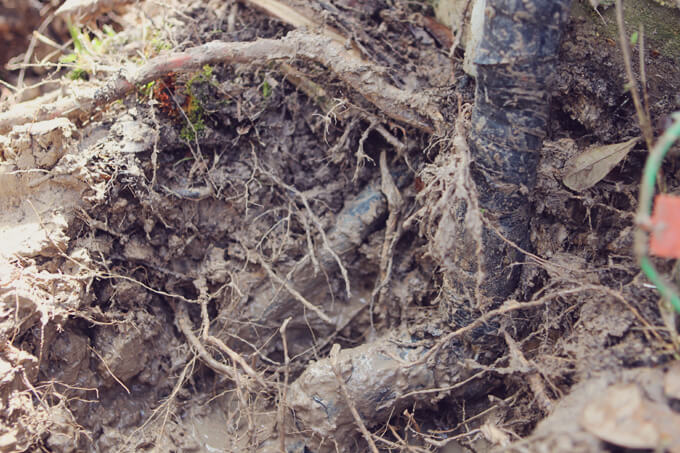
↑ After lots of digging, Brent found the pipe and the “root” of the problem. Pun totally intended because the root of the busted pipe problem was roots! We are guessing there was already a leak and then all those crazy roots from the crape myrtle wrapped all around the pipe causing enough pressure to make it burst.

Unexpected Project: Busted Water Pipe
↑ The majority of Brent’s time was spent digging and then scooping out the water that was still in the ground that would continually fill the hole back up. It was a slow and painful process. I had to resist every urge to jump and splash in the mud, just for fun. I had to keep reminding myself that would not be a productive use of my time on this project.

Unexpected Project: Busted Water Pipe
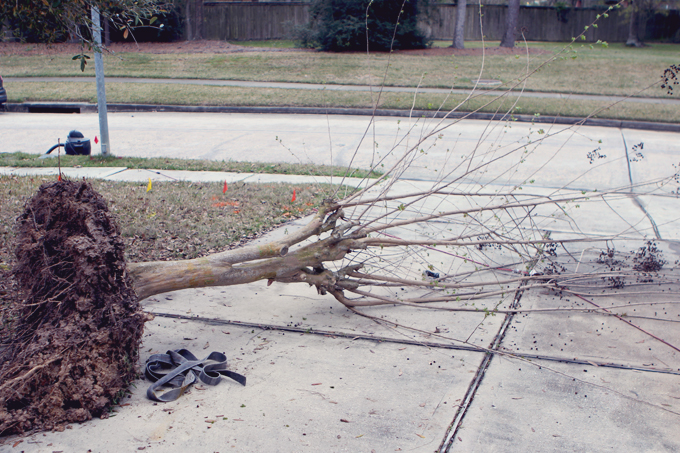
↑ Brent dug a moat around the crape myrtle to prepare it to be ripped from the ground.


↑ Our next door neighbor was so nice and used his truck to help us pull the tree out. We don’t have any vehicles capable of that kind of task but his truck made it look easy. We did a celebratory dance once it had been removed.

Unexpected Project: Busted Water Pipe
↑ Sorry crape myrtle, you know what they say about payback. It was a nice tree just planted in a not very nice spot. We are perplexed why the builder would plant a tree that close to the garage, another tree and where all the lines go into the house. It had to be removed from that spot so we didn’t have this issue again. We have been wanting to remove this tree for awhile now so at least something good came out of this whole mess.

Unexpected Project: Busted Water Pipe
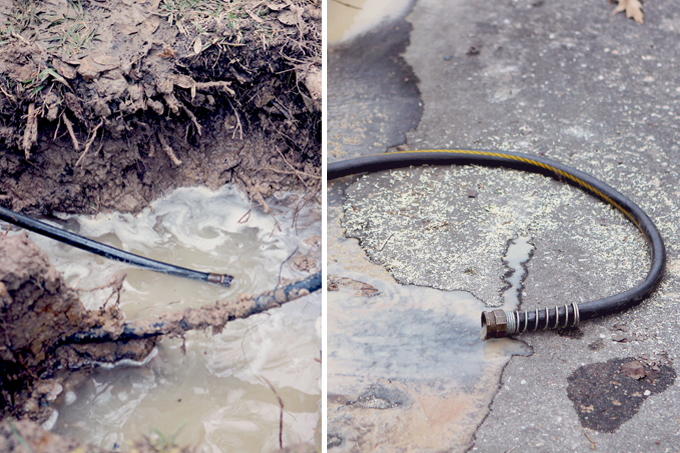
↑ Brent came up with a great solution to get the water out of the hole. He started building dams to block off the areas he was working and then put one end of the hose in the hole and the other end in the street next to the drain. He used a Shop-Vac to start the process of siphoning the water out of the hole and down the yard into the drain.

Unexpected Project: Busted Water Pipe
↑ Yes, the mud hole got five times larger, but I promise this was progress. Finally, we got to the point where we could actually fix the pipe. My dad was nice enough to come over and bring some PVC pipe pieces so he and Brent could rebuild the portion that had the leak. They finished just in time before it got dark. We had to let it sit for a few hours but we did get to turn our water back on that night!

Unexpected Project: Busted Water Pipe
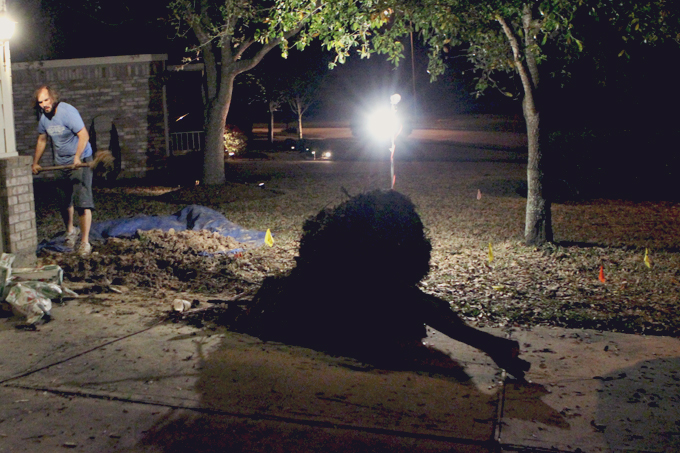
↑ The following night we went and got several bags of sand to fill in the hole. Brent worked well after dark scooping the sand and dirt back in the hole to make sure it was level. Several of our neighbors stopped to ask what he was doing. I guess it looks suspicious to be digging in the dark at 11:00 at night. We were in a time crunch to finish because the forecast called for rain the next couple of days and the last thing we wanted was for our mud sink hole to get any larger.

We still have to replace the grass in that area but the pipe is fixed, the hole is filled in and we have water so project completed. Please house, we’re begging you to let us choose the next project. I promise it will be more fun that way.

Stay tuned because this weekend we will be sharing the project we had planned to share earlier in the week, how we built frames for our bathroom mirrors.

Have you guys had any daunting or dirty home projects that chose you? We would love to hear them!

Planning Our Home Library

Planning Our Home Library

Gray House Studio Wood Barn Door Plans

At the front of our house we have your typical formal dining room and formal living room but we don’t have much use for a formal dining room and our vision for our house is anything but typical so we decided to think outside of the box with what to do with the space that would allow us to get the most use out of it and fit our needs the best and a formal dining room just isn’t what we need or really want. We are both book nerds and love reading so we decided to instead take the formal dining room and turn it into our home library.

This room sat empty for quite awhile and then temporarily housed our treadmill and gym equipment. After that we stored Brent’s musical instruments in it for a bit. It has been full of mismatched stuff and doesn’t really give the best first impression when guests walk in our front door. This month we are finally ready to start our transformation from a blank catch all room to a cozy home library and I couldn’t be more excited about it!

First things first we our planning our home library and what items we want to incorporate into our home library. So far we have put a fresh coat of paint, Mindful Gray from Sherwin Williams, on the walls and that has already made a huge difference but we are really pumped to add some furniture in this room so it finally feels like it has a purpose.

Shelves | Built by Us
After we painted the library, the first project we worked on was building our large bookshelf that spans the entire length of one of the walls in the room and includes seven large shelves that go almost all the way to the ceiling. This project has taken us several weekends to work on but we love the results. The shelves will be the focal point of the room as they will display our books and collectibles so we wanted to custom build the shelves to fit the exact dimensions of the wall. We will be sharing a whole post dedicated to how we put together the shelves soon.

Pendant Lighting | Rose City 6in. Classic Schoolhouse Pendant from Rejuvenation
How cool is the bronze pendant light? We are wanting to replace our elaborate and ornate light fixture that is currently in this space with something more sleek and simple and I think the Rose City Schoolhouse Pendant light really fits with the style we are going for in our library. We want something unique that adds character to the room without being overly industrial or distracting. We love how this pendant light is simple with a vintage vibe. This one has definitely been added to our wish list.

Coffee Table | Library Coffee Table from West Elm
This coffee table from West Elm is awesome and it is even named the library coffee table, so it seems as if it is meant to be! Honestly, Brent will actually be building our coffee table because we want it to match with the craft cabinet he will also be building in the room next door so it all ties together nicely but I am quite fond of the idea of using this piece as inspiration. I like the simple design, worn look giving the impression our library has been around for a long time and gotten lots of good use and the storage options.

Art | Created by Brent
Brent created this piece for an art show while he was in graduate school a few years ago and it is one of my favorite pieces he has made to date. I think it fits with the style of this room perfectly and I am so excited to incorporate it into our library.

Sofa | Charcoal Gray Nolee Folding Sofa Bed from World Market
We have been back and forth on trying to decide if having a sofa, chairs or a sofa and chairs would look the best and be the most functional in this room. Finally, we decided that having just a sofa would be the most comfortable and fit the space the best as to not overcrowd the room. When I found this folding sofa bed at World Market, it went to the top of our list as the sofa I would like to have in this room because it is modern, a great color and it folds out to be a sofa bed which is always handy to have when you have extra guests come to stay. I wouldn’t mind if we got this sofa sooner rather than later!

Wire Baskets | Wire Baskets from HomeGoods
I bought the wire baskets a week ago and consider them a MAJOR score. Brent has a pretty good sized record collection but the records won’t fit on our shelves so I suggested getting some baskets to store the records in that would fit under the shelves. I browsed the internet for a long time but it wasn’t until a spontaneous trip to HomeGoods that I found these wood/wire baskets that match our shelves perfectly. They are the exact right size to fix under the shelves and hold the records. Plus, they were only $16 a piece which was a lot cheaper than any of the other baskets I had been looking at online were.

Floor Lamp | Warren Pulley Task Floor Lamp from Pottery Barn
Every time we go into Pottery Barn we drool over this floor lamp and we think it would be a perfect addition to our library to add some extra reading light and provide some character. I am hoping this can be the one item we splurge on for the library.

Tree | Blue Ridge Fir Executive Japanese Maple Tree from Wayfair
I would love to have a live large plant in this room to add a some life and color to the fairly monochromatic and neutral decor we are planning in this room but the truth is we don’t get a lot of light in the one free corner where the tree would go and I am horrible at keeping plants alive. So, this realistic Japanese Maple Tree would be a good alternative to add a little warmth to the room.

Rolling Ladder | Antique Original American Library Ladder from 1stdibs
Ah, the rolling ladder, what library wouldn’t be complete without one of these cool things propped up against the shelves to access those out of reach books on the top shelf? This Antique American Library Ladder is pretty awesome. Unfortunately, I don’t think our budget allows for spending $1,200 on just a ladder. So we are using this one as inspiration to build our own. Having a rolling ladder will really complete the look and and feel of our library.

Another large project that we want to do is to replace the carpet with hardwood floors. That will transform the look of the room from blank and bland to cozy and interesting. However, we have tile throughout the entire house that we want to replace so it is kind of an all or nothing type of project that needs to take place at one time when we are ready and can afford to rip all our floors up. Hopefully that time is coming up soon.

I love window shopping and planning out how a room will come together. These are a few of the key pieces that we like and will make our library feel like it belongs in our home. It will be a place we want to host guests when they over and visit or just relax and read. We will continue to work on this room and share updates on the space as our projects progress.

Do any of you use a room in your home for a library? What are some of your favorite pieces that you have incorporated into that space? We would love to hear them!

Photo Sources:
Shelves (Gray House Studio) | Sofa | Coffee Table | Art (Gray House Studio) | Sofa | Wire Baskets (Gray House Studio) | Floor Lamp | Tree | Rolling Ladder

Wood Barn Door Plans | Gray House Studio

Wood Barn Door Plans

Gray House Studio Wood Barn Door Plans

We have been receiving a lot positive feedback from one of our very first home renovation projects: our wood barn door Brent made from scratch that is in our master bedroom. Thanks for all the kind words! This project was a favorite of ours and was one of our lower expense projects that came together fairly easy. In case you missed it, you can read more about our wood barn door and see the finished product here.

Before Brent started building the door, he designed and created wood barn door plans in SolidWorks to reference once he got into the shop.

Gray House Studio Wood Barn Door Plans

Today we are sharing the wood barn door plans he created. If you are interested in building a DIY wood barn door but not quite sure how to go about it, you can download our wood barn door plans below to get started. We chose a dark stain and dark hardware to match our bedroom furniture but how you customize your wood barn door is completely up to you! As always feel free to leave any questions you may have below.

Download our Wood Barn Door Plans (PDF)

Our First Podcast Interview

Brent + Courtney of Gray House Studio - DIY April Podcast Interview

On another note, a few weeks ago we were approached to be interviewed for the DIY April podcast. Of course we said yes! It was such a fun opportunity to chat with the lovely April last week. We discussed why home renovation was a natural choice for us and how we came to start the Gray House Studio blog. We also highlighted two of our favorite projects so far and talked about how we came up with the idea to incorporate the wood barn door and reading nook into our home and our process of putting them together. Plus, we share a few fun facts you might not know about us.

Many thanks to April for having us as guests on her podcast. We had a blast!

You can listen to our DIY April interview here.