Check how this quick home DIY tutorial for adding shelves in bathroom cabinets. This simple update creates more storage space to organize all your bathroom essentials.

This morning Brent and I worked on a quick little organization project that really made me happy! Our project was adding shelves in the bathroom cabinets.
I don’t have a ton of beauty products but I do have the typical necessities and not a lot of places to store them. Don’t most bathroom cabinets seem to have so much wasted space at the top?
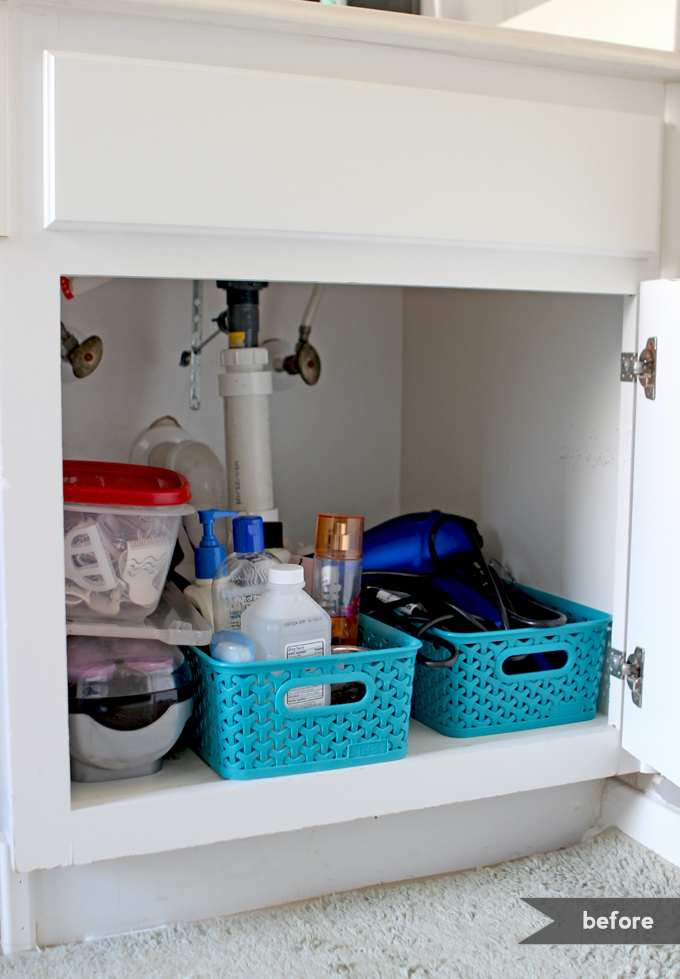
All of my stuff was just stacked on top of each other in one big pile on the bottom and if stuff got pushed to the back of the cabinet…well…it might as well have been lost forever as far as I was concerned.
I’ve tried to organize this area multiple times but I have found that without the proper set up, such as a designated space for each item, it doesn’t matter how many times you organize it, it quickly turns into a big messy pile again.
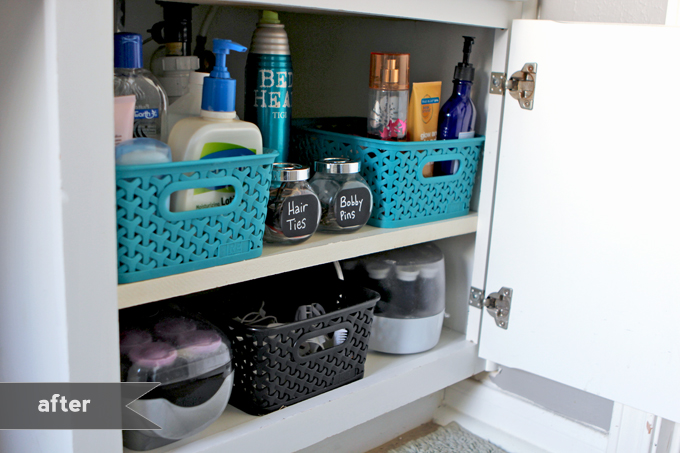
I am kind of embarrassed to be sharing this photo but for the sake of showing the drastic difference I feel like the shelves made, I’ll do it. Below is the disorganized mess it looked like before.
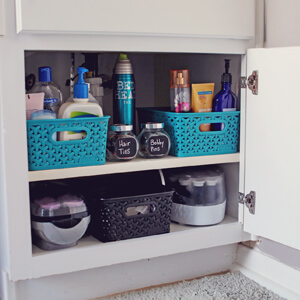
Brent built me two shelves in my cabinet using stuff we already had in our garage. Score! He built me one on the bottom and one at the top.
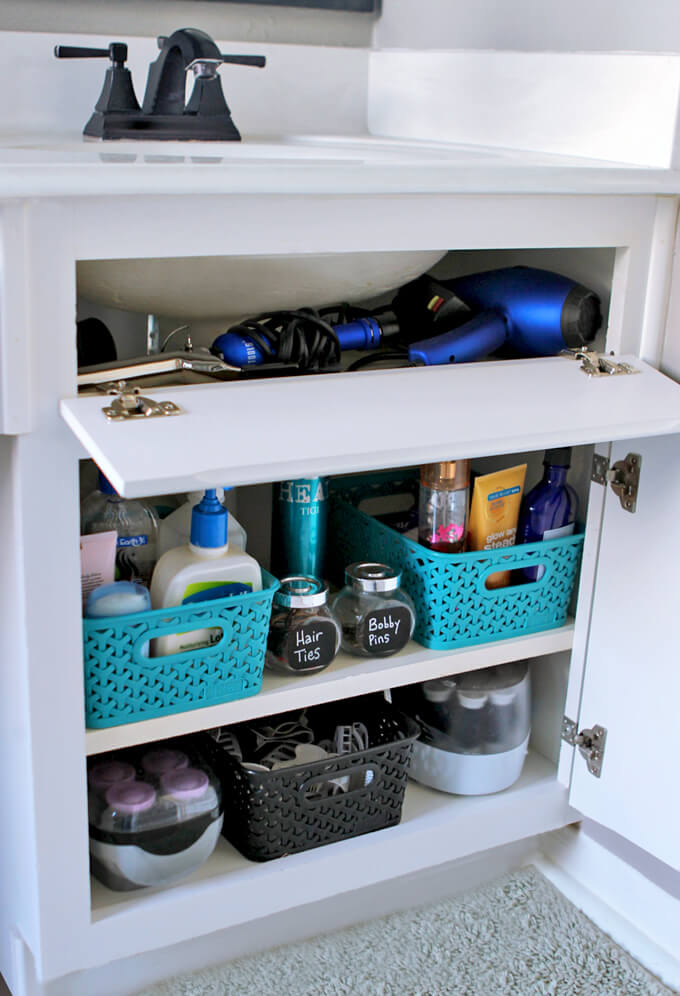
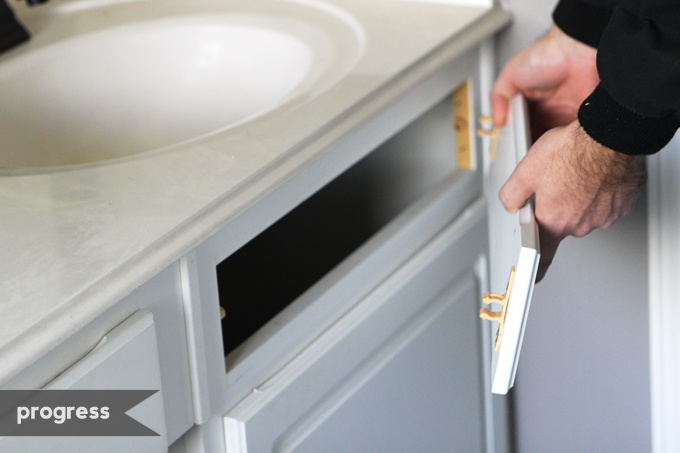
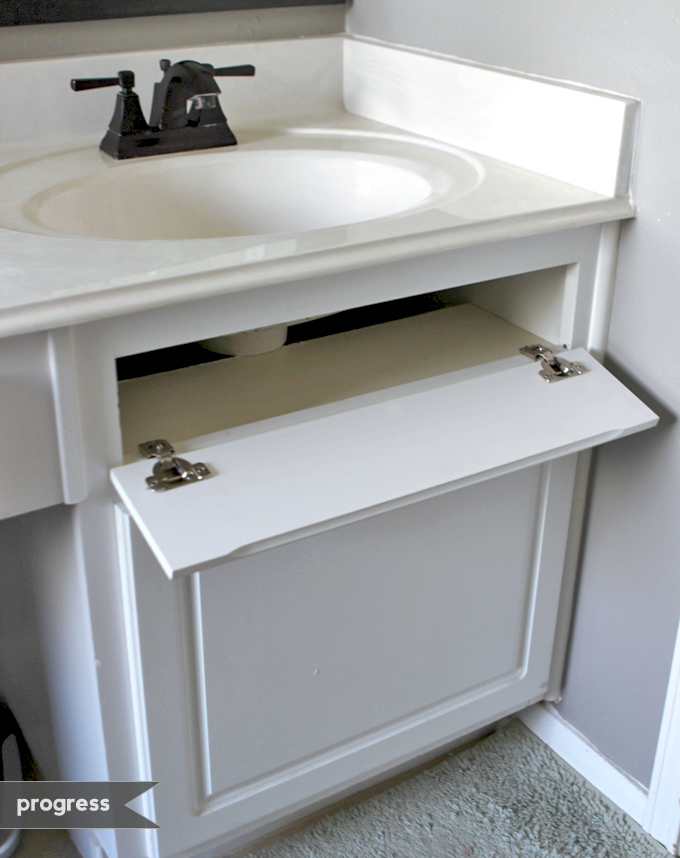
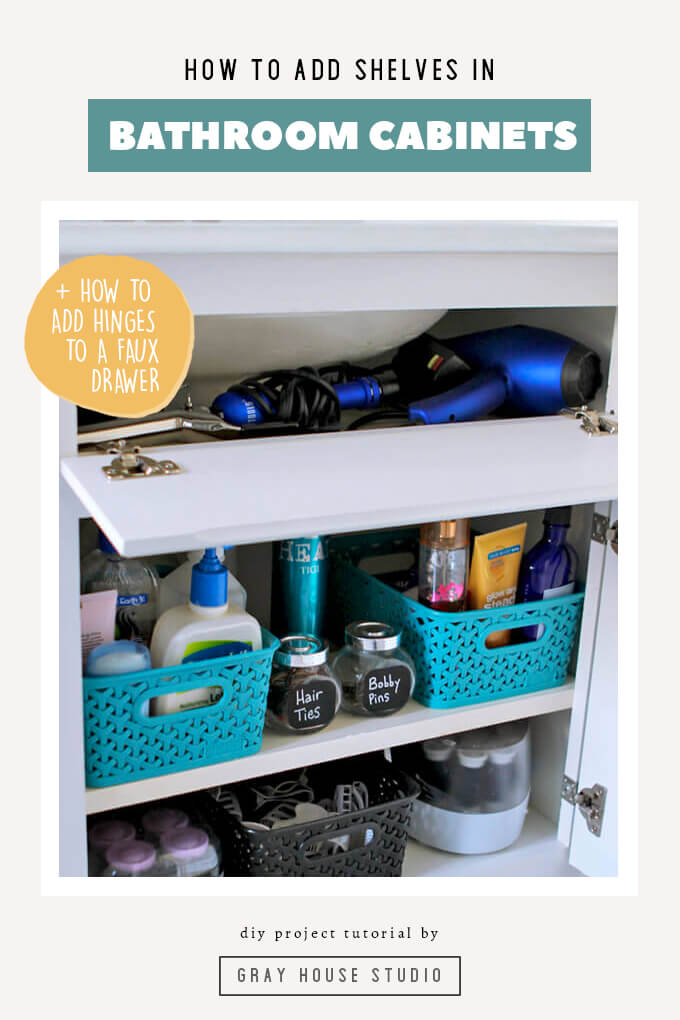
We decided to take the faux drawer above the cabinet door and add hinges to it so it could open up to a shelf we would install behind it where I could store my hair dryer and curling iron.
We have seen a few photos of this floating around on the internet but wanted to attempt to figure out our own Gray House style of making it happen.
Adding Shelves in Bathroom Cabinets
STEP BY STEP GUIDE
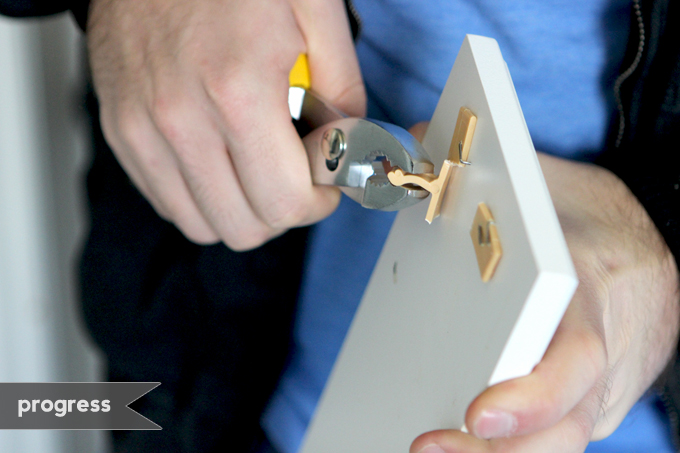
1. First we popped off the faux drawer. It came off really easy.
2. Then using pliers we removed the brackets and staples from the drawer face and the cabinet.
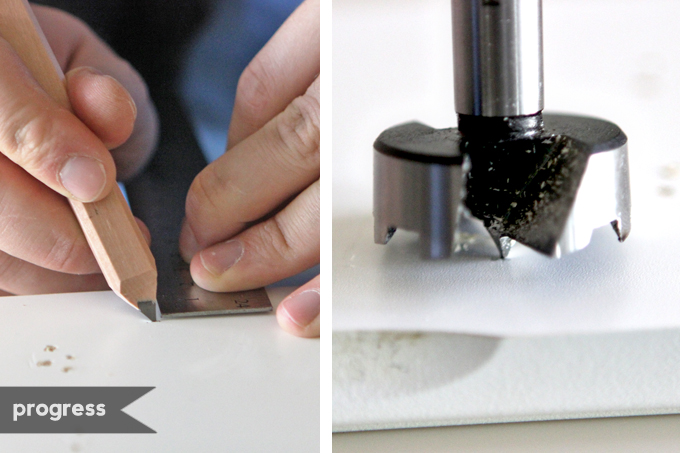
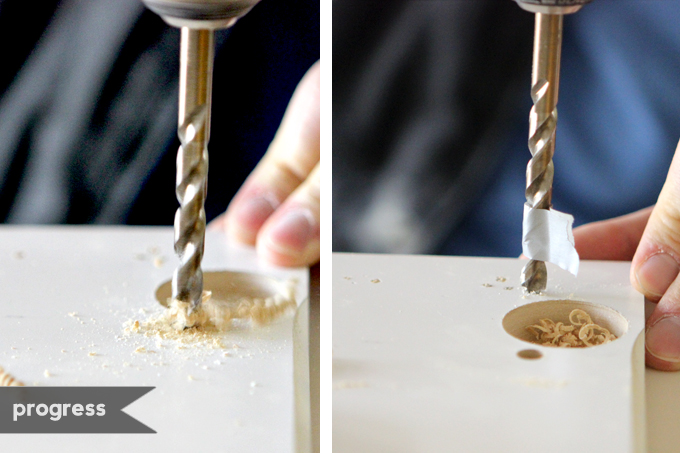
3. The 5/8″ cabinet hinges we bought came with instructions saying that the center of the hole should be 2 centimeters from the edge of the board and the diameter of the hole should be 35 millimeters.
So Brent measured where he needed to drill and then used this forstner bit and drill to drill the holes for the hinges.
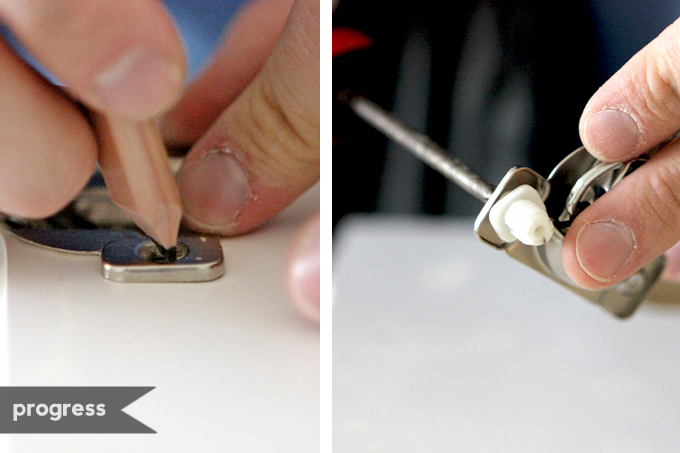
4. Brent marked a hole for the plastic screw anchor.
5. Then he used a piece of tape to mark the depth of the cut so he would know when to stop drilling.
This would prevent the drill bit from going all the way through the drawer face.
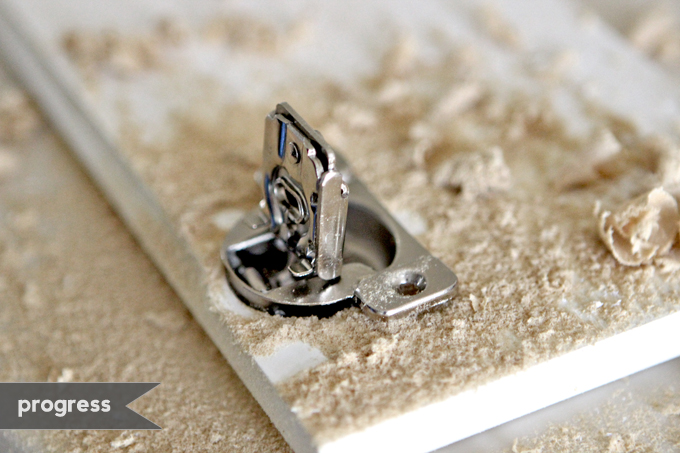
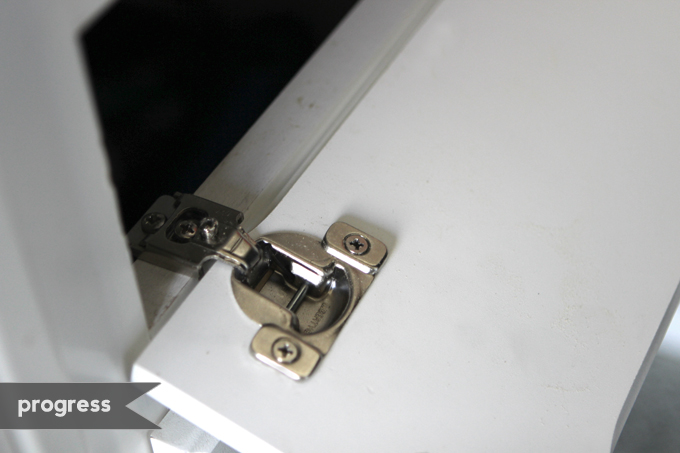
6. With a soft faced mallet, Brent hammered in the plastic screw anchors and then attached the hinge to the drawer face with the screws.
7. After centering the drawer face on the cabinet, he attached the other side of the hinge to the cabinet frame to make it a functioning door.
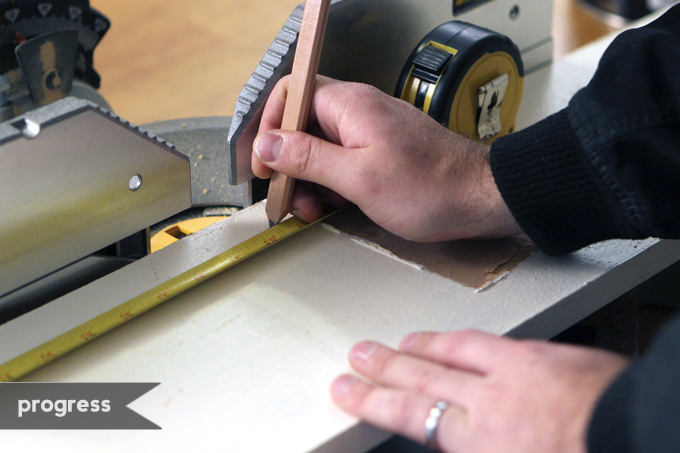
8. Then Brent started building the shallow shelf that would sit behind the hinged door.
He used a piece of scrap wood that came from a shelf we tore down in our garage. We found this white laminate shelf that you could use that is very similar.
Bonus: it was already painted white! That was a huge time saver. He measured the width the shelf needed to be to fit in the cabinet in front of the sink.
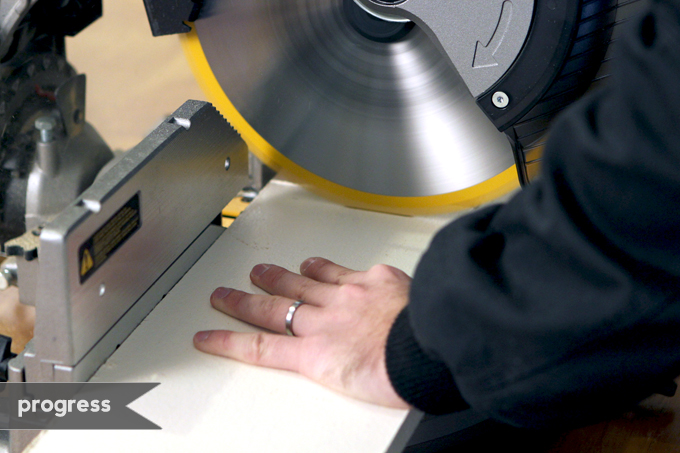
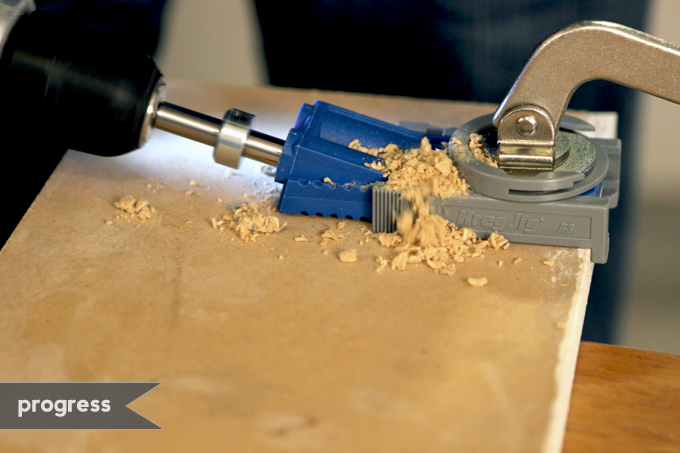
9. Next, he cut the shelf to size using a miter saw.
10. He flipped the shelf over and clamped a Pocket-Hole Kreg Jig to the board and then used it to drill a pocket-hole on the bottom of the board.
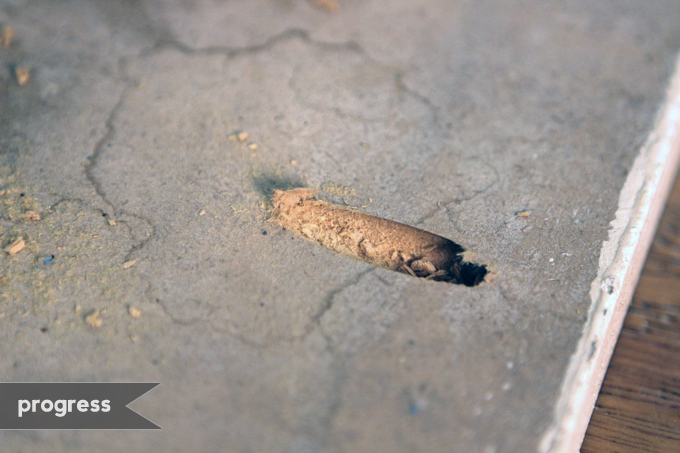
A close up of what the pocket-hole looks like.
11. Finally, he installed the top shelf behind the hinged door. He used the same steps above for the bottom shelf as well.
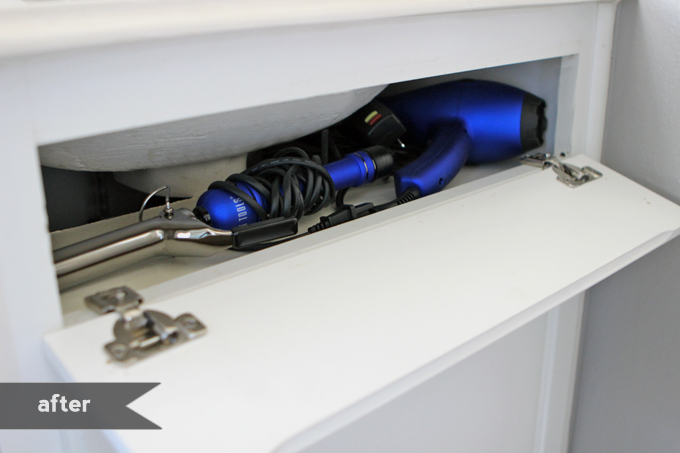
I am now storing my hair dryer and curling iron behind this secret little door. I like having these items up higher and within reach so they don’t fall towards the back of the cabinet.
After Brent installed the bottom shelf, I finally got to organize this area like I have always wanted! I was able to add another inexpensive baskets now that I had two shelves.
As you may be able to see, I found another use for my chalkboard tape!
I found these little glass containers left over from our wedding and added some chalkboard tape labels to them and am now using them to store all my hair ties and bobby pins that were laying all over the place.
Hopefully by adding shelves in bathroom cabinets and having a place to store these things will keep them from getting lost and me having to buy new ones all the time.
It was a small project with a transformation that has a huge impact on that space. I am so happy with the results of adding shelves in bathroom cabinets and grateful Brent took the time to work on this with me. I love that each item has a designated spot to be put back and that all the space in the cabinet is now being utilized to it’s max capacity.
If you have any questions about adding shelves in bathroom cabinets, feel free to leave them in the comment section below.
PIN IT FOR LATER
As 2014 comes to a close and 2015 begins, we thought we would put together a list of the home renovation projects we would like to tackle in the upcoming year. We finished quite a few cool home renovation projects in 2014 that really made our house start to feel like “our home”. 2015 marks the beginning of our second year in the home and we are hoping to take on a few larger home renovation projects and more woodworking and furniture building projects. It’s time to step up our game.
The Five Home Renovation Projects on our Project Wish List:
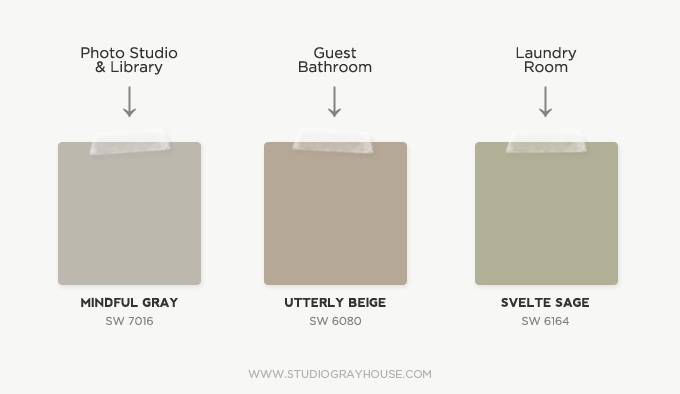
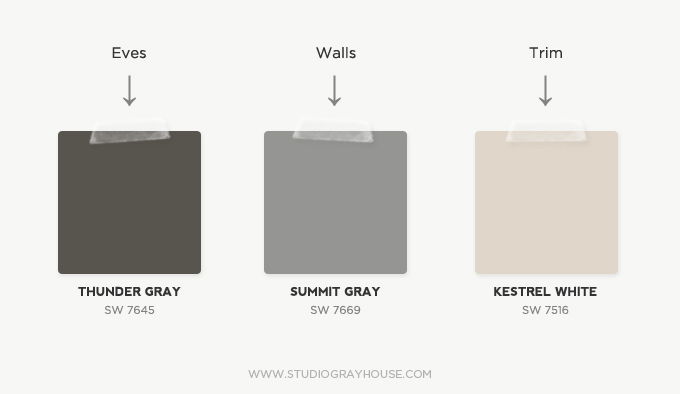
1. FINISH PAINTING THE INSIDE OF THE HOUSE – We are close to having all the rooms inside our house painted. It is our goal to finish the last few rooms in 2015. The front entry way and front rooms will be painted gray (of course). We also need to paint our front hall, guest bathroom laundry room and garage and then we will be done! If our house has no more off white walls by the time 2016 rolls around, we’ll call 2015 a success! Below are the paint colors we plan on using from Sherwin-Williams.
2. FIX UP THE GARAGE – Speaking of the garage, 2015 will be the year the garage sees a little attention. Last year it was used more as a storage room (and not one of those organized kind). Since we plan on doing a lot more woodworking and furniture building projects this year, we will need the garage to be our workshop. We managed to get it cleaned out, now we just need to clean it up! Our plans include painting the walls, staining the floor, building a workbench and cabinets – we’re talking about a complete makeover here! Brent is especially excited to get this remodeling project started.
3. PAINT THE OUTSIDE OF THE HOUSE – Another home renovation project we would like to get done this year is to paint the outside of our house. Currently, is an off white color that is boring and plain so we want to paint it a welcoming gray color (are you seeing a trend here?). The house is 12 years old so the original paint is chipping in places Adding a fresh paint of coat and replacing some of the trim will really bring the outside of the house back to life and add to the curb appeal. We had to submit our colors to our HOA to be approved and they finally gave us the okay! So now it is a matter of actually getting out there and painting. We are dragging our feet on this one because it will be a lot of work but the results will be awesome. We’ll take on this challenge in the spring or fall.
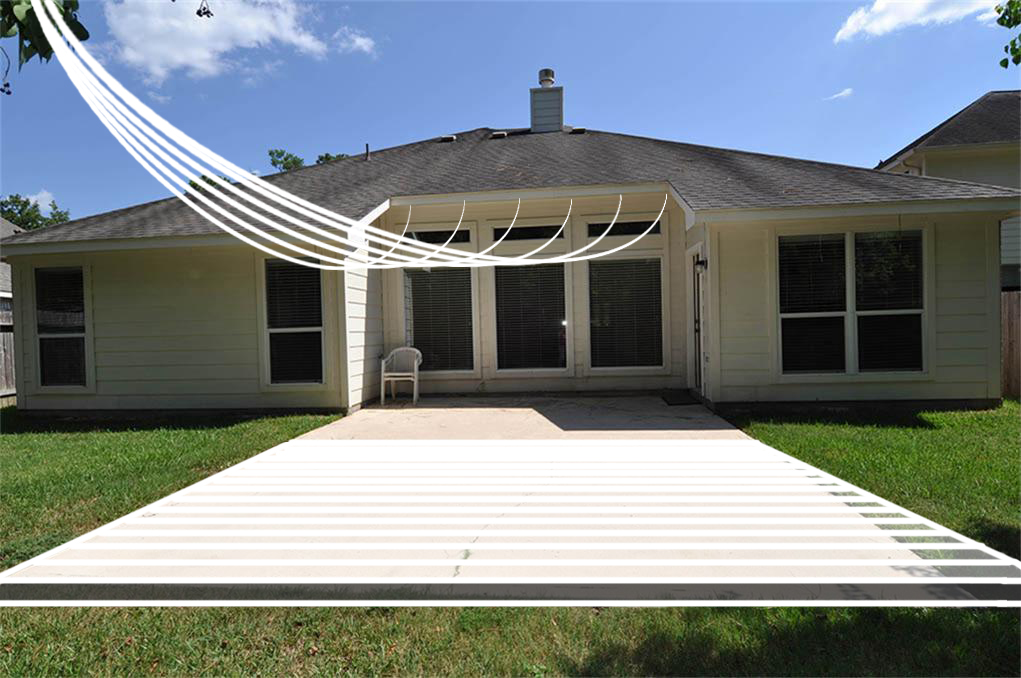
4. REMODEL THE BACK PATIO – Our backyard is such a cool spot and one of the reasons we like this house so much. It is small but backs up to a greenbelt with lots of trees. We have two slabs of concrete back there but not very many places to sit for entertaining. So we would love to make this space a more inviting. Our plan is to eventually remodel the back patio to have a wood deck with custom built seating. The front yard got all the love last year so we hope to give a little more attention to the backyard in 2015. We are looking forward to taking advantage of the great space outside.
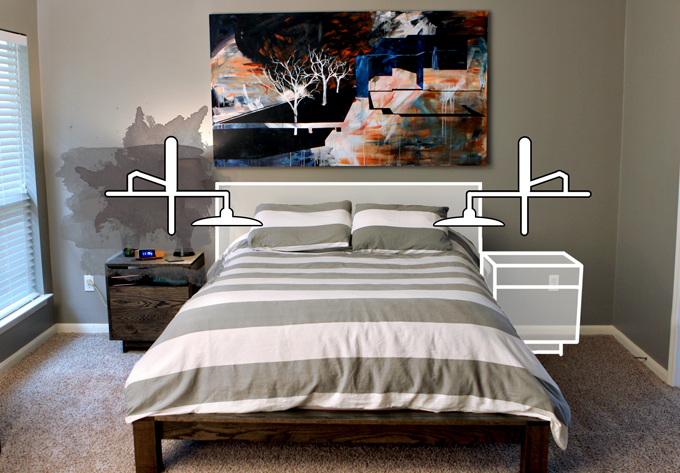
5. FINISH UP THE MASTER SUITE – We would love to finish the last few renovation projects in our master bedroom and master bathroom so we can call those rooms good and have two rooms updated and under our belt. There are still quite a few big and small projects that we would like to work on in these rooms including building a headboard and second nightstand in the master bedroom and putting in a new slate title floor and cabinets in the master bathroom.
So if things go according to plan, this time next year we should be able to report back on the blog that we were able to cross all these tasks off of our home renovation wish list. I’m sure several other projects will pop up that will be a blast to work on, like that awesome craft cabinet! But these are our five shoot for the moon home renovation and interior design projects that will pack a big punch on the look and feel of our home this year. We’re ready to get started right away if only the budget allowed it. After we re-coup a little from Christmas, we’ll get started right away!
Hope you have a Happy New Year 2015! What are your home renovation plans for the coming year? We would love to hear them!
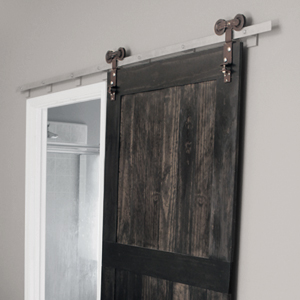
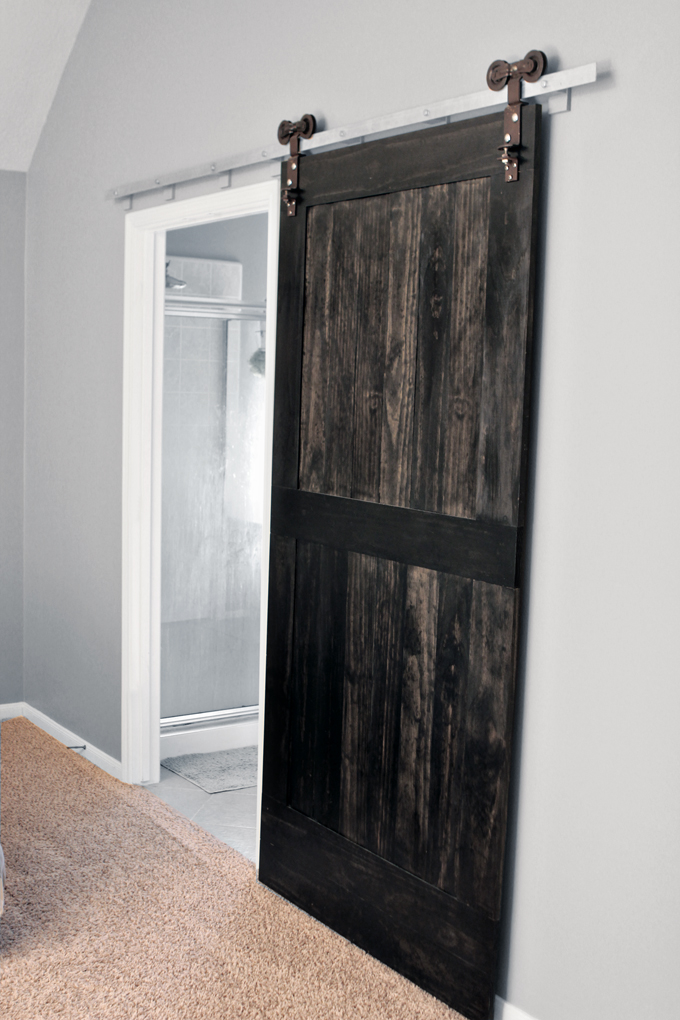
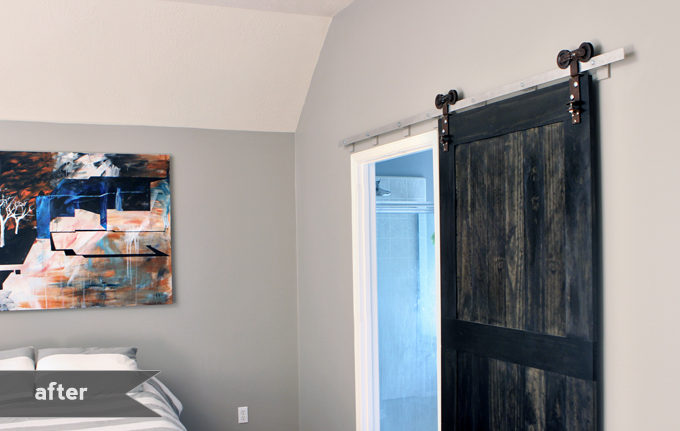
We built a custom sized wood barn door to separate our bedroom and bathroom.
Today we are sharing a project that made a huge difference in the look and feel of our master bedroom. We took off the chunky double doors with the hideous gold doorknobs to the master bathroom and replaced it with a large, custom made wood barn door. We bought a set of old/worn/heavy barn door rollers from eBay that came from an actual barn door and from there started to build our wood barn door.
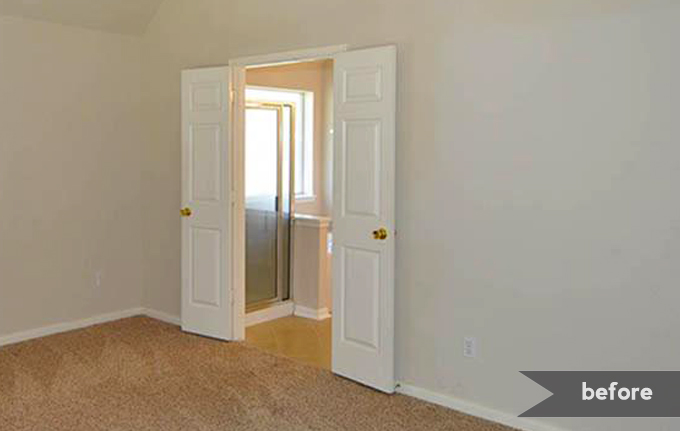
Here is what the wall and door in our master bedroom looked liked when we moved in. The whole house had those gold door knobs. They were the first thing to go.
This project didn’t come without it’s challenges. A large problem we encountered right off the bat was we lost one of the metal rollers. We took one with us to as inspiration and a guide as we were shopping for the various supplies we needed for the wood barn door and wouldn’t you know we got home and realized that we only had one roller. Panic may or may not have set in.
Yes, in our eagerness and excitement to start the project, we left the roller in the shopping cart in the middle of the parking lot. So we had to drive all the way back to the home improvement store. We drove all around the parking lot looking for our abandoned cart that had this priceless (to us) yet probably unrecognizable (to whomever may have found it) hunk of metal in the front of a cart in the cart return. We couldn’t find our (or any cart) in the parking lot. Dang shopping cart wranglers doing their job.
We finally went inside to the customer service desk as a last resort and tried to describe the item we had lost. Thank goodness a nice shopper dropped off our roller and it was returned to our possession. If not that could have been the end of our wood barn door project.
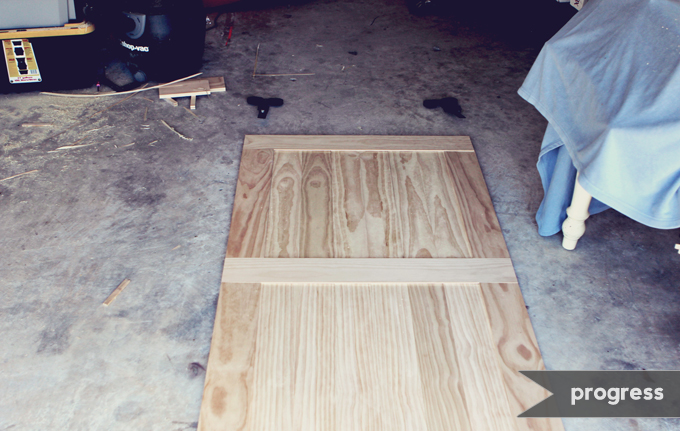
Our wood door before it was a door was just wood.
In just a little over a week, Brent came up with a plan for the construction and we built a functional wood barn door complete with a metal track and rollers. Doing it ourselves saved us a lot of money and allowed us to customize the look to exactly what we wanted for our master bedroom.
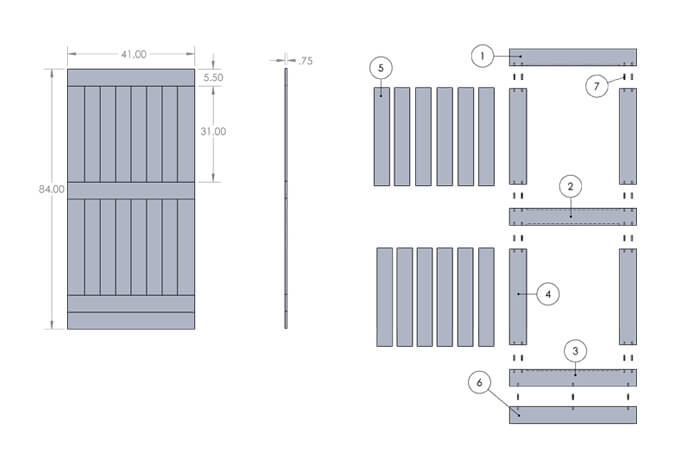
How We Built Our Wood Barn Door
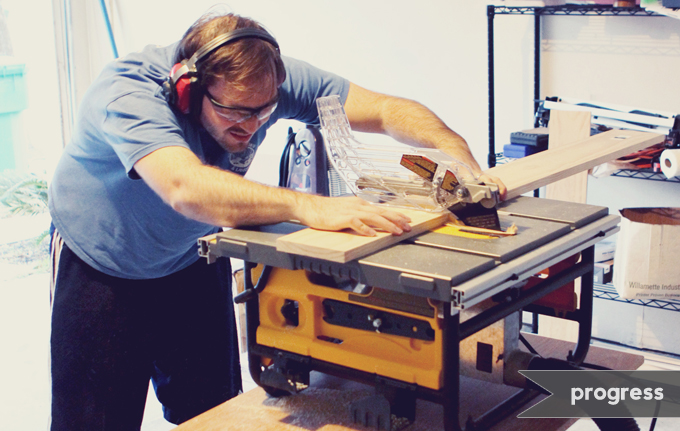
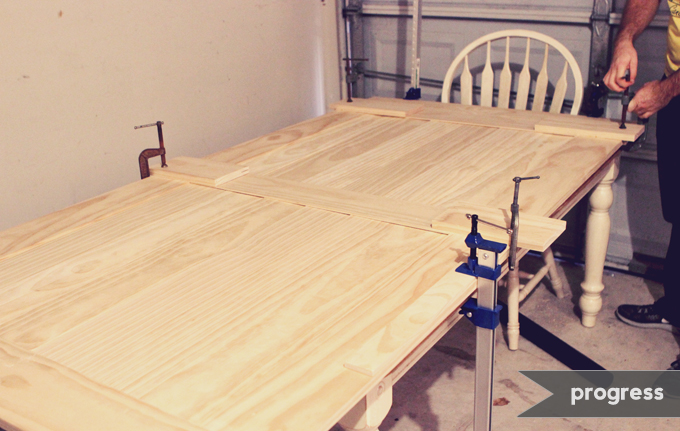
1. Brent began by cutting the boards to length to frame the door.
2. Once all the boards were cut, we laid them out to make sure they all fit together.
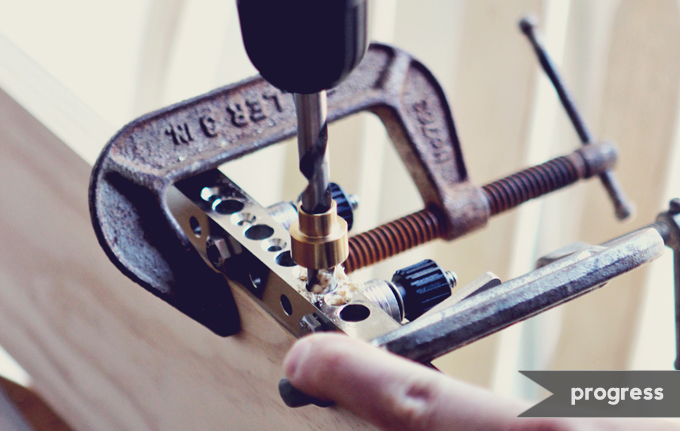
3. Brent used the Joint Genie to drill holes for dowel rods to make a stronger glued joint.
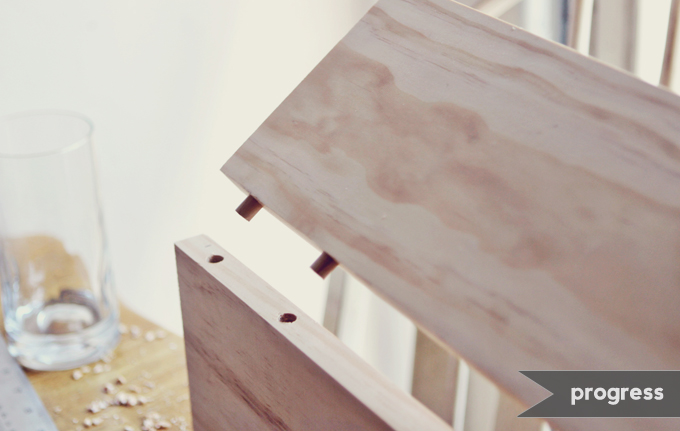
4. Then he joined the boards with glue and dowel rods.
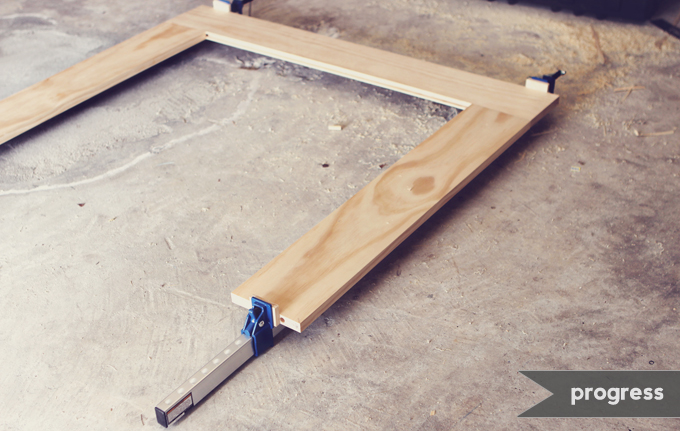
5. Next, we clamped the boards. we used wooden blocks to keep the clamps from scarring the surface of the door.
6. With all the slats situated in their groves, the door could be glued and clamped together.
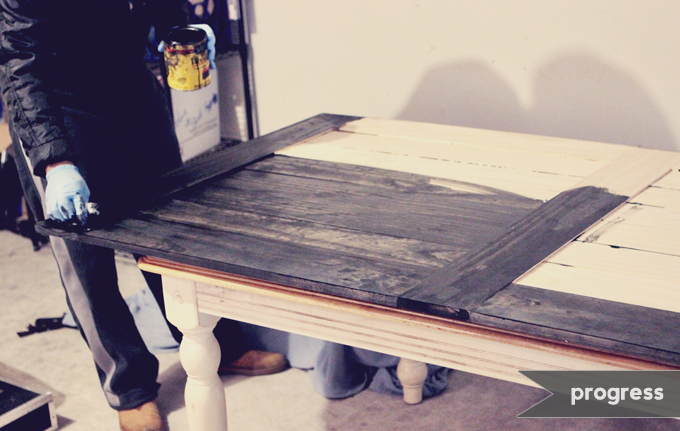
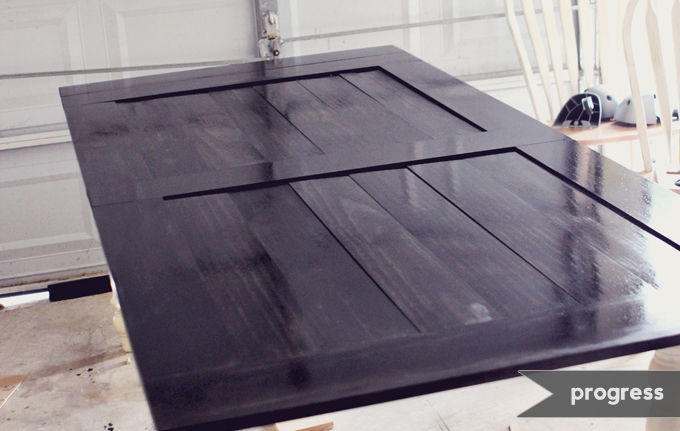
7. After a day of drying, the door was ready to be stained. We chose Minwax Ebony so it would match our bedroom furniture. Although oil based stain can be annoying and messy, we found they are better at achieving a dark stain on pine.
8. The door was stained and had to sit and dry for a couple days.
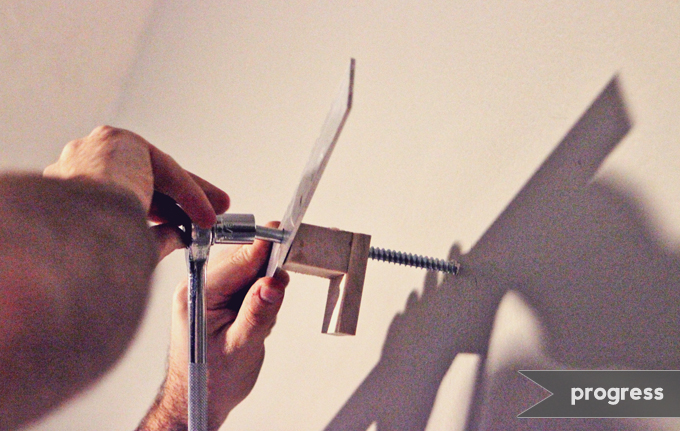
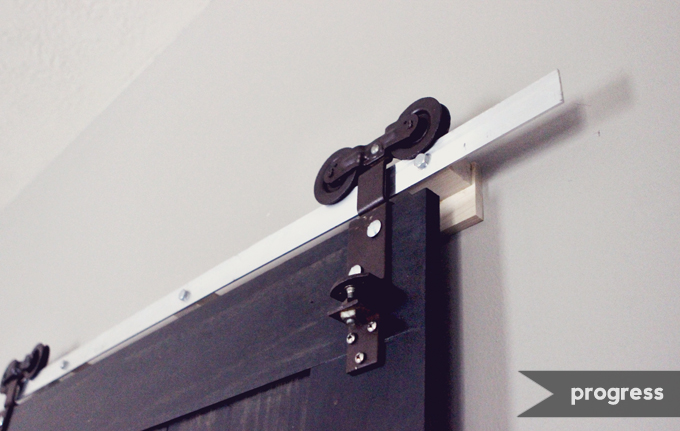
9. For the rail we used a piece of aluminum and cut wooden blocks spacers to extend the rail away from the wall. The tab at the bottom of the spacer is to add extra support as the door pulls down on the rail. If not for the tab, the block would eventually dig in to the dry wall.
10. Although it was tempting to use spare bolts and screws to attach the rollers, we made a special trip to the hardware store and picked up the appropriate sized screws and bolts so everything was uniform.
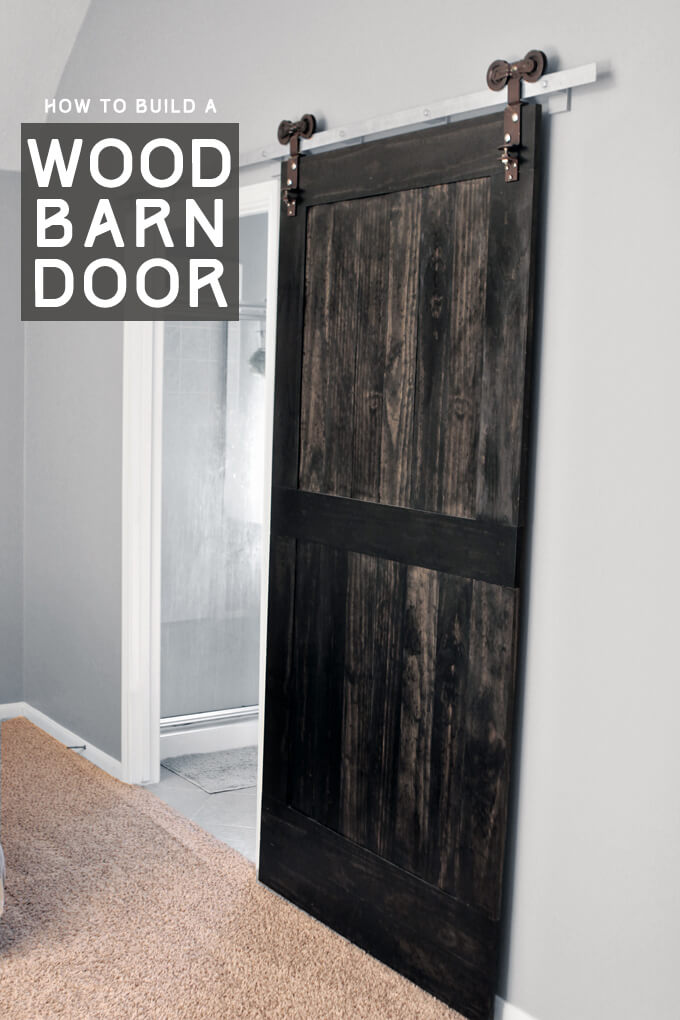
So there you have it, our fully functional wood barn door made from scratch. We love how the large door fills up the wall in our master bedroom and pops against our new wall color (Functional Gray from Sherwin-Williams).
Don’t forget you can get FREE plans to build your own custom wood barn door and check out our DIY tutorial for installing a barn door!
PIN THIS PROJECT
Linked up at Remodelaholic.
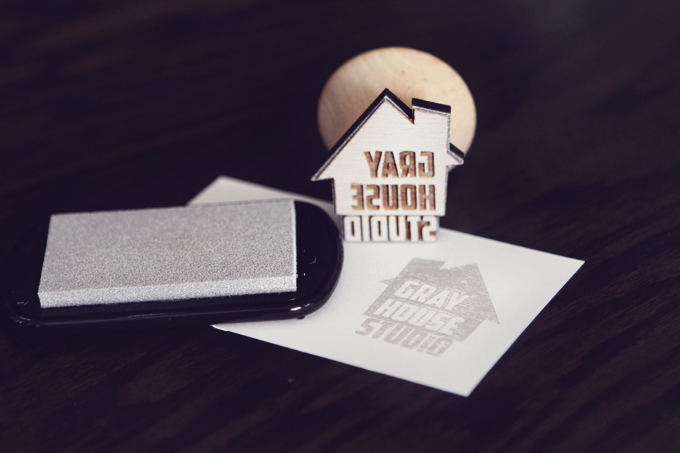
Today is the day Brent and I (Courtney) begin our new adventure together. Our very own blogging adventure, Gray House Studio. And because we are creators by nature, we are kicking off our very first post by sharing this wood stamp Brent made with our new logo. Maybe it’s just me and maybe I am just a stamp nerd, but I love the grainy texture the wood adds to the stamp.
So about this blog…
Our home renovation journey began a year ago when we purchased our first home. Since then we began updating our home one weekend project at a time. We have enjoyed the process so far so much that we thought it would be fun to document our adventure in home owning on this blog, Gray House Studio. In our first year we have made great progress towards having the home of our dreams but we still have a long way to go and we thought it would be fun to share our projects, our ideas, our struggles and our inspiration right here with you.
You can read our full story over here but we are so glad you are here and hope you check back often to see what projects we are in the works and hopefully you can even take away a few ideas for your home.
Follow along with us on Bloglovin