
Check out the before and after of our pantry makeover. We cleaned, organized, and gave our pantry a fresh coat of paint to spruce up the space.

Pantry Makeover

DIY Dark Shiplap Wall – Easy Install
We have begun our master bedroom closet makeover. Our first project was to make and install a DIY dark shiplap wall.
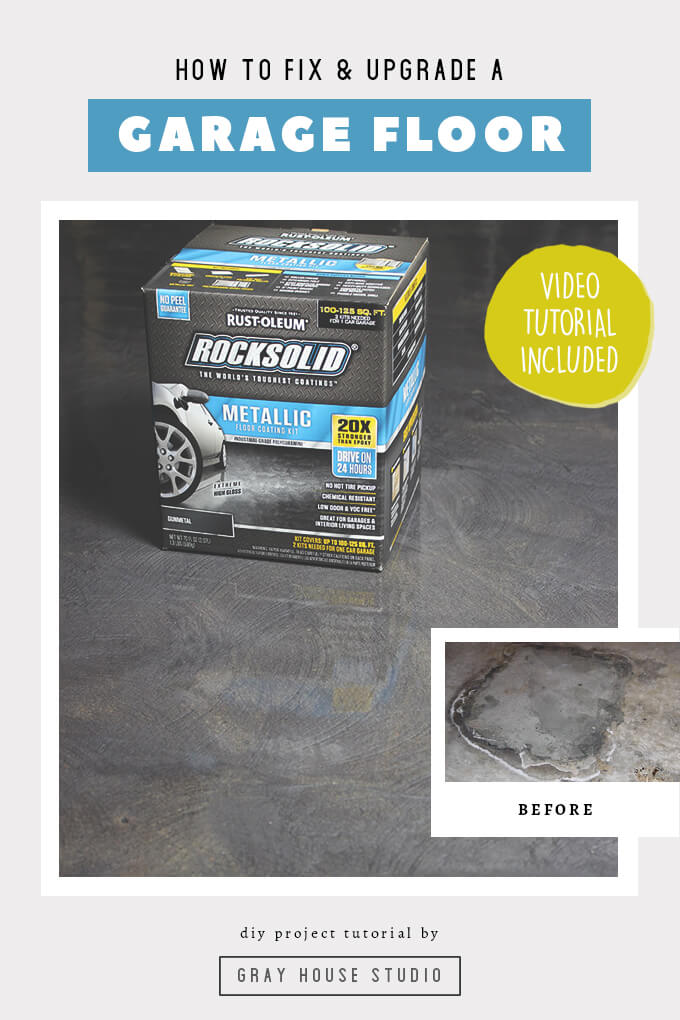
Garage Floor Coating with Rust-Oleum ROCKSOLID
The floor in our garage was a disaster when we purchased our house but with Rust-Oleum’s RockSolid products, we were able to repair and apply a beautiful garage floor coating.
Where is the last place you would want to prance around barefoot in your home? Probably the garage, right? If your garage floor is anything like ours was, it’s just plain gross. It was dirty and there was sawdust everywhere because of all woodworking projects.
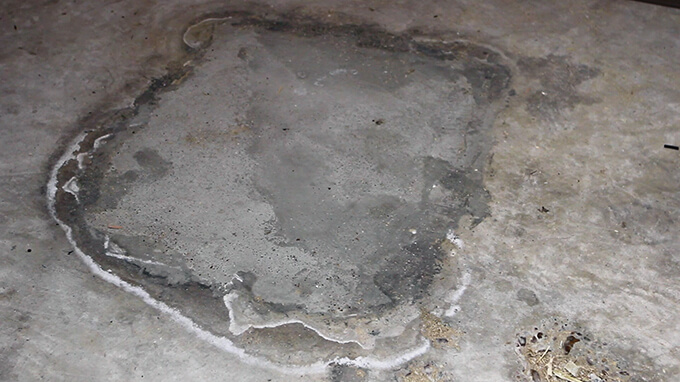
It was a beast to clean because we had these huge craters in the middle of the garage due to past foundation work on our home. The large holes collected debris and threatened a sprained ankle. It was a mess.
We spend quite a bit of time in our garage using it as a shop for our DIY projects so we really want to transform the space into a place that is inviting and inspiring and a snazzy garage floor coating was just what we needed to revive our old nasty concrete floor.
Rust-Oleum was nice enough to send over their RockSolid garage floor coating kit for us to try out. After repairing the concrete floor (see ya later crater) and applying the concrete floor coating, we were impressed and happy with the results! If your floor is as bad as ours, it will be time consuming and require labor but the products make the process easy and uncomplicated.
The metallic finish is mesmerizing and worth the work because not only does the garage floor coating make the garage look beautiful it makes it ridiculously easy to keep clean. Now I feel 100% comfortable dancing around on this beautiful floor barefoot.
How to Prep a Garage Floor and Apply Epoxy
SUPPLIES
- Cement Patcher
- Rust-Oleum RockSolid Moisture Stop
- Rust-Oleum RockSolid Fast Patch
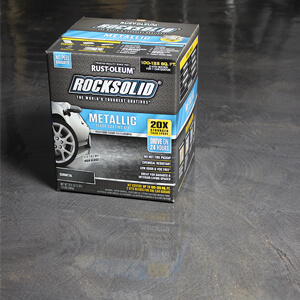
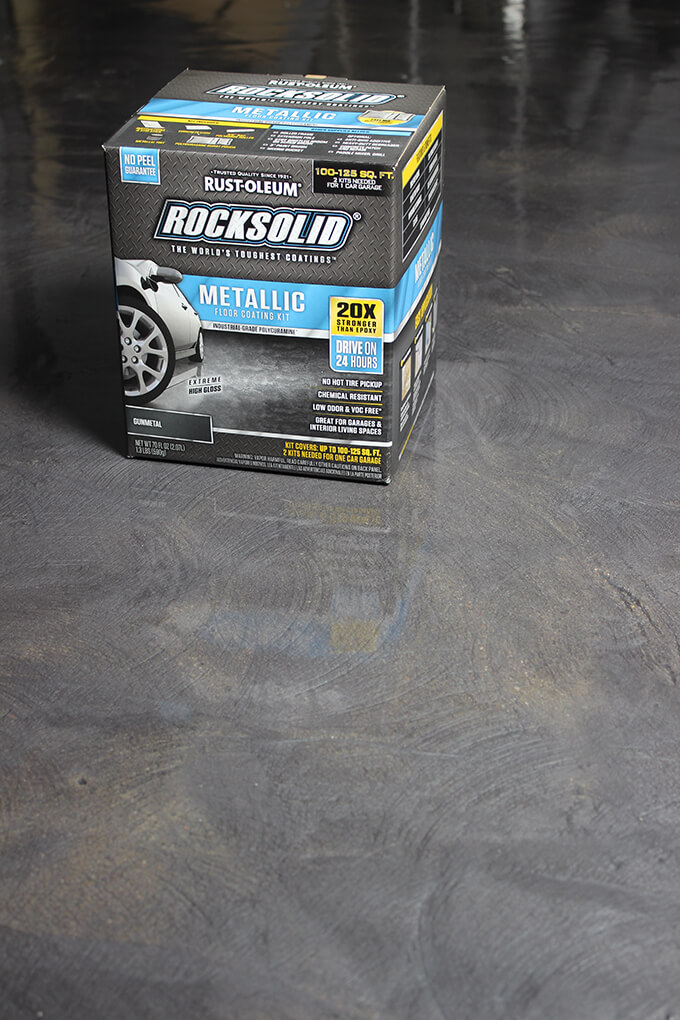
- Rust-Oleum RockSolid Gunmetal Metallic Garage Floor Kit
- Painters Tape
- Mallet
- Cold Chisel
- Shop-Vac
- Bucket
- Spray Bottle
- Finishing Trowel
- Concrete Grinder
- Backpack Sprayer
- Squeegee
- Putty Knife
- Drill
- Paddle Mixer Bit
- Paint Roller w/ Handle Extension
- Paint Brush
- Gloves
- 220 Grit Sand Paper
FYI: This post contains a few affiliate links to products we used to make this project. Gray House Studio does receive commissions for sales from these links but at no extra cost to you. We appreciate you supporting this site. Read our privacy and disclosure policy. You can also easily shop our recommended products here.
TUTORIAL VIDEO
[yotuwp type=”videos” id=”tDS2QVGkDxE” title=”off” description=”off” player=”width=590&modestbranding=0&showinfo=0″]
Subscribe to our YouTube Channel
Like our video? Subscribe and help us reach our goal of 100k subscribers.
I’ll hand it over to Brent now to explain the floor coating process because I got out of all the work on this project. I had my own labor intensive project – taking care of a newborn! Since it was a two person job my dad was nice enough to sub in for me and give Brent a helping hand. Yes, the other person in the video is my dad, not me. Pregnancy changed my body but not THAT much.
STEPS
Part 1: Repairing the Concrete Slab
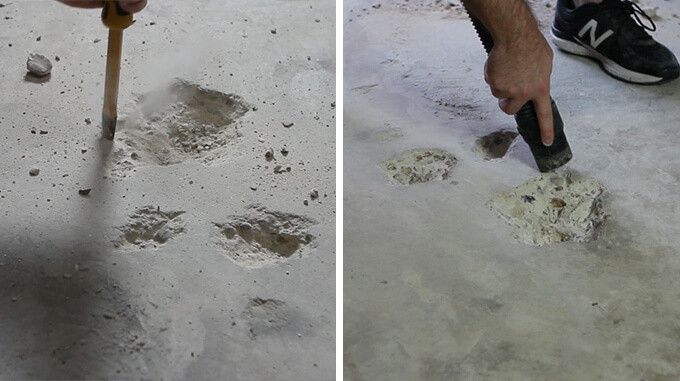
1. Before applying any of the garage floor coating products there were a few large craters that needed to be filled with concrete.
We used a mallet and cold chisel to square the edges of the craters to be 1/2″ deep. This allowed the edges of the cement patcher to be applied thick and avoid chipping.
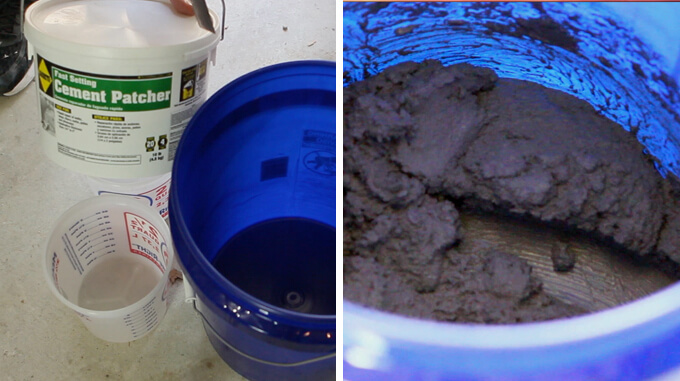
2. We followed the instructions on the cement patcher product.
To mix it up we added water to the powder mix. The concrete mixed to a thicker consistency than I expected.
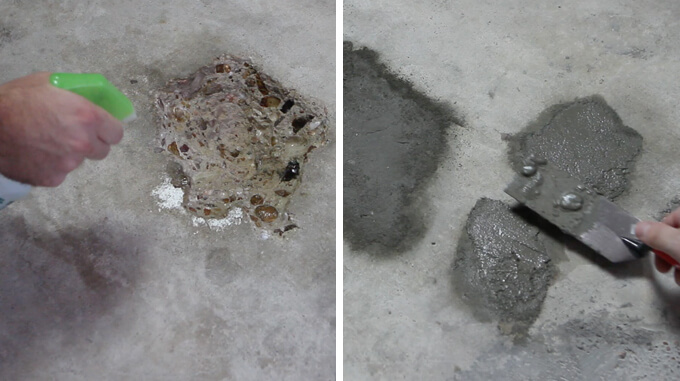
3. Using a spray bottle, we wet each crater so the cement patcher would adhere to it.
After filling each hole, we used a finishing trowel to smooth the surface.
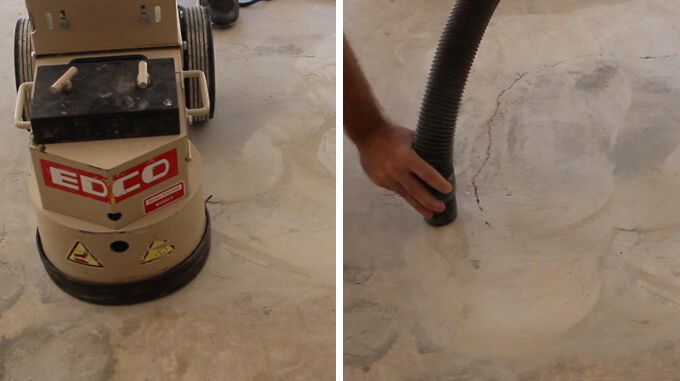
4. To level the slab, we rented a concrete grinder from a home improvement store.
We started grinding down all the high spots. This also revealed the cracks around the foundation repair that needed to be patched before applying the concrete floor coating.
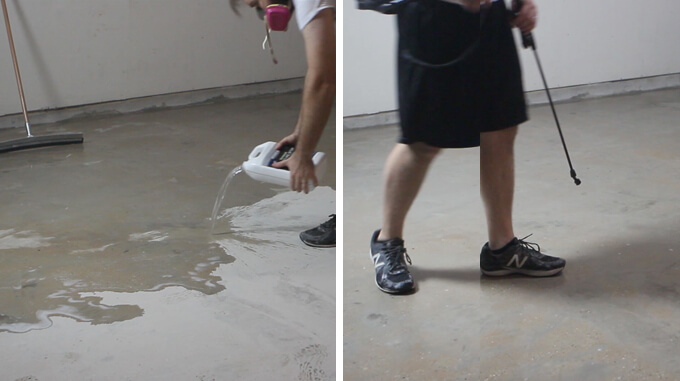
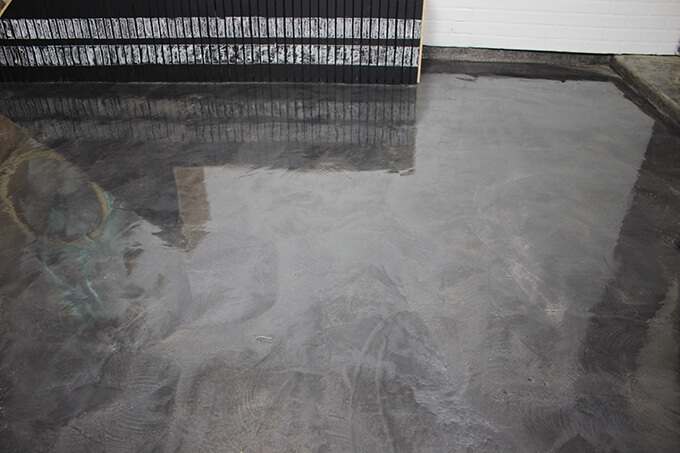
5. After leveling the entire floor surface, we sealed the floor with Rust-Oleum’s RockSolid Moisture Stop.
The moisture stop product created a barrier within the concrete by filling the pours within the slab.
Once the entire slab was saturated, I misted the surface with water to keep it wet for 45 minutes. After the floor dried, I rinsed it with water and scrubbed it to remove any efflorescence from the surface.
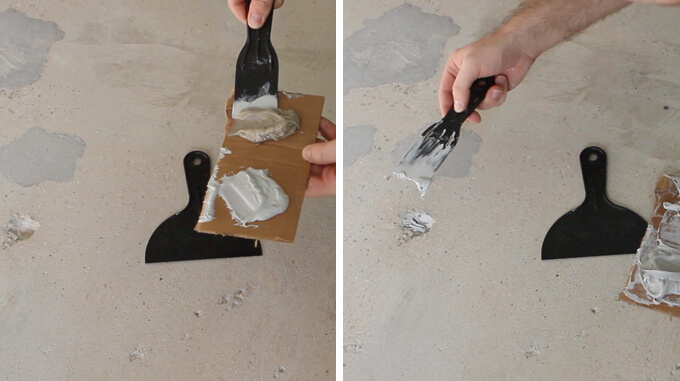
6. The floor took about two days to dry out before we repaired any of the cracks and small divots with Rust-Oleum’s Fast Patch product.
We mixed equal parts A and B of the fast patch mix and spread it over the surface with a puddy knife.
The divots deeper than 1/2″ took 2 applications.
Part 2: Applying Rust-Oleum RockSolid Floor Coating
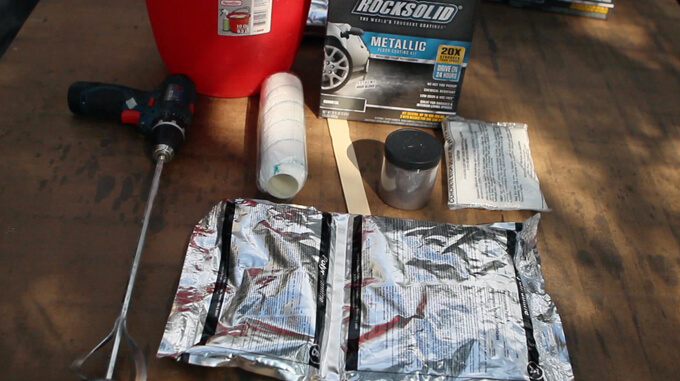
Almost everything comes in the box to apply the RockSolid floor coating.
The only additional supplies needed was the:
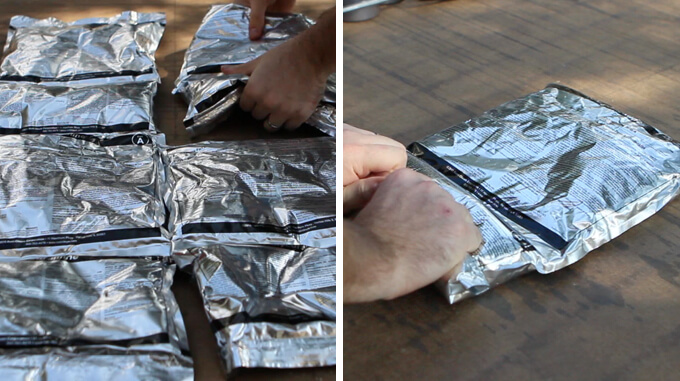
7. After setting out all the bags of coating we checked that that there were no clumps and then started by mixing one bag.
The two part product mixed in the bag by rolling side B into side A breaking the seam in the middle. We really like this feature because it allows the product to mix without introducing air. This allowed for a slightly longer working time.
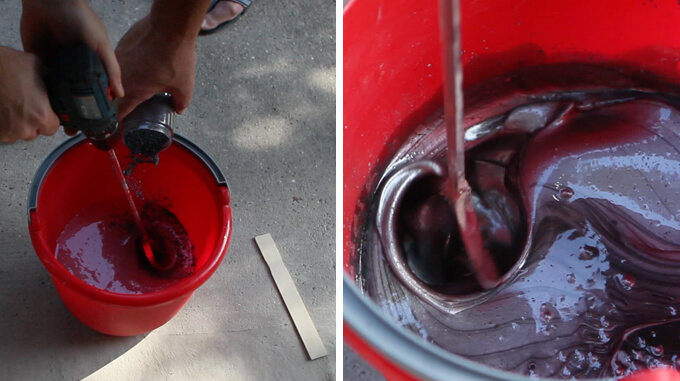
8. We shook/mixed the product in the bag for three minutes before cutting it open and pouring it into a bucket. Then, we used a paddle mixer and drill to mix the metallic tint into the clear coating.
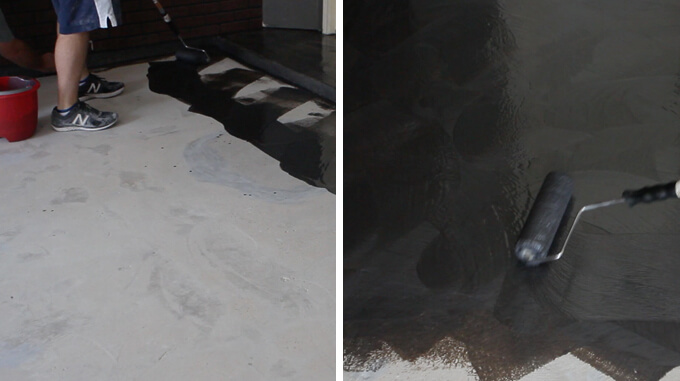
9. We used a paintbrush to apply the coating along the wall and rolled everything else.
The application is definitely a two person job. Luckily, Courtney’s dad came over to help since Courtney was tied up with our two week old son.
After spreading the product evenly using a M and W roll pattern, I came back with the a href=”https://amzn.to/32xucHt” target=”_blank”>roller and swirled the coating. We continued across the garage floor section by section mixing each kit as needed.
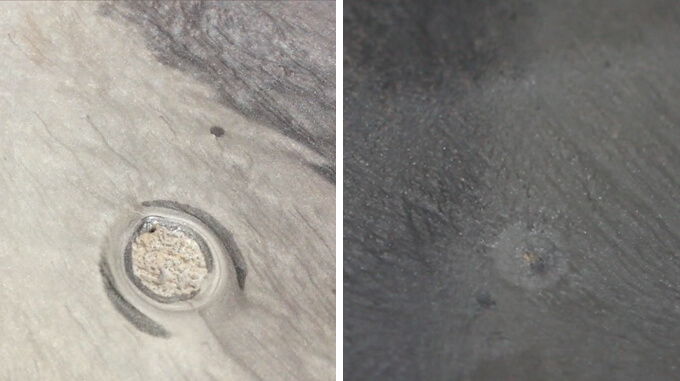
10. Grinding the floor did open some large pin holes in the floor that created a few bubbles during the application process.
We took a gamble and popped the bubbles. Luckily, all of the bubbles we popped leveled out and dried smooth.
I am really impressed with the work Brent and my dad did on the garage floor. Once it had all dried and the garage was empty, I happily danced around barefoot to show my approval of a job well done. I know it isn’t safe to work in the garage without shoes, but at least I could if I wanted to now and not end up with layers of dirt stuck to my feet.
Thanks to the new garage floor coating and the dust collector Brent modified, our garage floor has never looked and felt so nice. You wouldn’t even know we create tons of messes in this space because now it is a breeze to clean and we actually want to keep it clean.
[adinserter block=”7″]
PIN FOR LATER
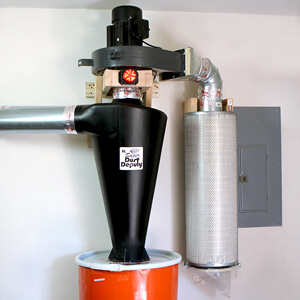
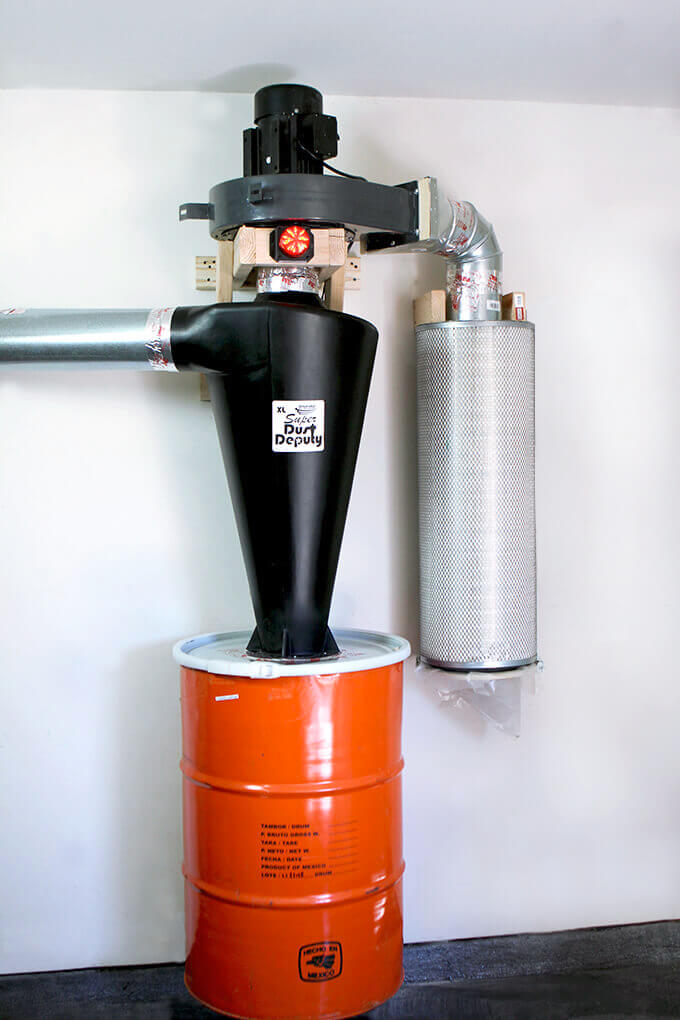
Harbor Freight Dust Collector Mod
In this tutorial we will show how we upgraded a Harbor Freight Dust Collector with the Super Dust Deputy XL from Oneida Air Systems.
My latest undertaking helped our garage look and function more like a woodworking shop.
There comes a time when you work on enough DIY woodworking projects that a shop vacuum just won’t cut it anymore.
I was finding it was inconvenient because I was constantly having to unhook it from my table saw and then wheel it across the room to hook it up to my miter saw and then unhook it from my miter saw and wheel it back across the garage to the table saw.
It was also fairly ineffective because quite often the filter on the shop vacuum got clogged because the bin filled up so fast.
Well, that might be on me because I never cleaned it out, but when you are in the middle of a project, who wants to stop the fun part to clean out a vacuum after every few cuts? Obviously not me. So much sawdust would end up on the ground that Courtney joked she could make sawdust angels.
I would procrastinate cleaning the floor until I started a new project which meant if I ran out into the garage to get something, I most likely definitely tracked in a good amount of sawdust on my socks.
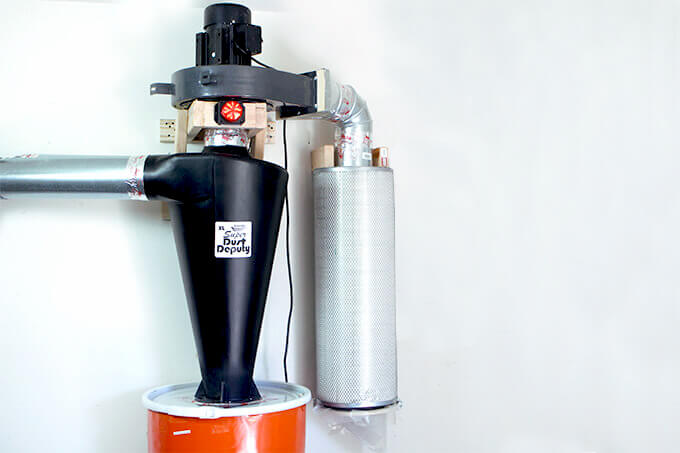
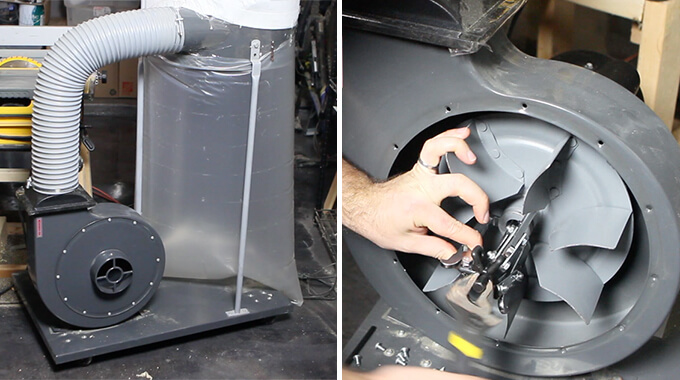
It became clear to me that I needed to build a dust collector so I finally built one for the Gray House Studio shop by taking a Harbor Freight dust collector and upgrading it to a 2 stage cyclone dust collector.
I did this with the Super Dust Deputy XL Cyclone Separator. Oneida Air Systems was kind enough to send us one to use and it made a huge impact.
My goal for my dust collector was to have it service multiple tools at the same time. Since the tools are separated by 10 to 20 feet I needed more power than the Harbor Freight dust collector could provide. It just wasn’t cutting it so I modified it with a larger impeller so that I could use a six inch duct.
Also, the filter bag that came with the Harbor Freight dust collector didn’t filter out the tiniest particles. What I really like about the Super Dust Deputy XL Cyclone Separator is it separates the wood chips and the dust so only air and very fine particles pass through the blower to the filter. This prevents any microscopic particles from entering back into the air in the shop.
Alright, enough talk, here is how I upgraded my Harbor Freight Dust Collector.
How We Upgraded a Harbor Freight Dust Collector
SUPPLIES
Shop the products we used for this project in one place.
- 2 HP Dust Collector
- Oneida Super Dust Deputy¨ XL
- ONEIDA Dust Sentry Level Sensor
- Rikon 60-200 Impeller
- Clark Filter P#1565938 (Similar – Cartridge Dust Collector Filter)
- 55 Gallon Barrel
- 2 – 6″ Duct Collar
- 6″ Duct Transition
- Liquid Nails
- Foil Tape
- 6″ Elbow
- 2 – Latch
- 1 – 2″x4″ Pine Board
- 3″ Deck Screws
- 1/2″ Sheet Metal Screws
- Drill
- Rivet Gun with 40-Piece Rivets
- Jigsaw
- Puller
- Mallet
- Stud Finder
FYI: This post contains a few affiliate links to products we used to make this project. Gray House Studio does receive commissions for sales from these links but at no extra cost to you. We appreciate you supporting this site. Read our privacy and disclosure policy. You can also easily shop our recommended products here.
TUTORIAL VIDEO

Get a FREE digital file of our hand painted Summer Bucket List print over at our print shop website: MoonRockPrints.com
STEPS
1. The dust collector build started with a stock 2hp single phase Harbor Freight dust collector.
To seamlessly connect to the Super Dust Deputy XL I’m going to upgrade the impeller. The stock blower can’t push enough air to support a 6″ opening. I removed the impeller using a puller tool.
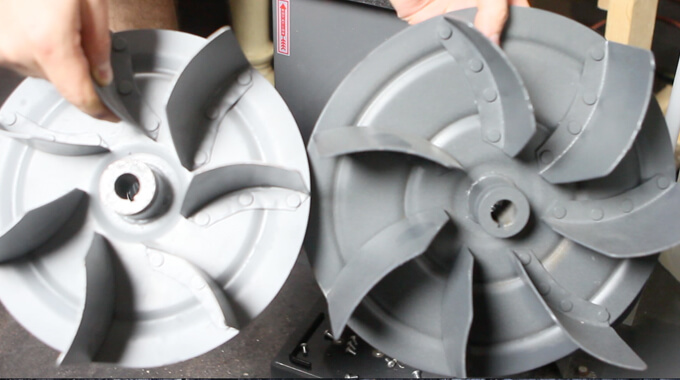
2. The stock harbor freight blower has a 10″ impeller so the new 12″ impeller should boost performance significantly.
Plus, the stock Harbor Freight impeller as a forward-inclined fans whereas the larger Rikon impeller has a backward inclined.
Forward inclines provide more flow but lose power when pressure increases. The backward incline provides more consistent performance as the pressure increases.
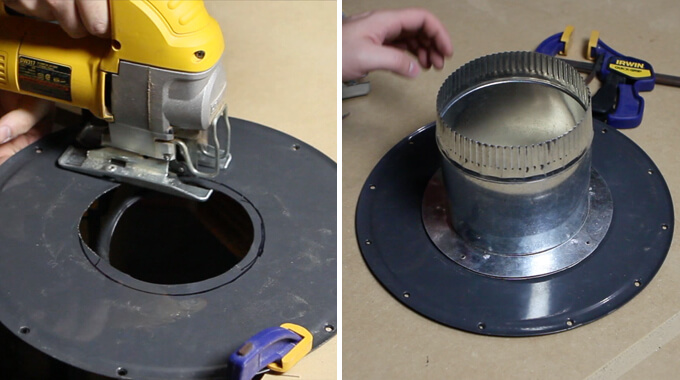
3. Using a jigsaw and sheet metal blade the intake port was widened from 5″ to 6″.
A 6″ duct collar was then attached to the intake faceplate with rivets.
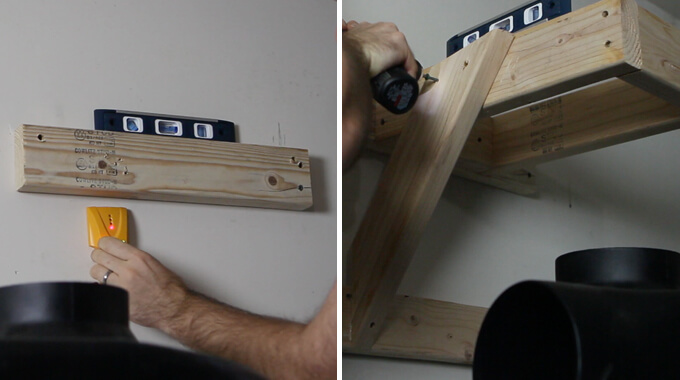
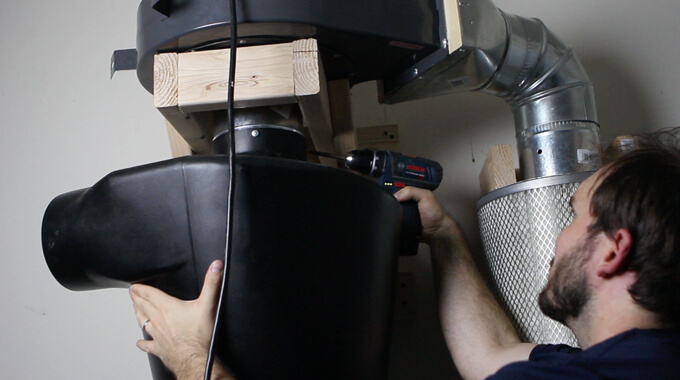
4. To hold the blower to the wall we made a mounting bracket with 2x4s anchored to the wall studs.
5. After mounting the blower on the 2×4 bracket the outlet port was converted to a 6″ outlet by attaching a duct transition with 1/2″ sheet metal screws
and liquid nails.
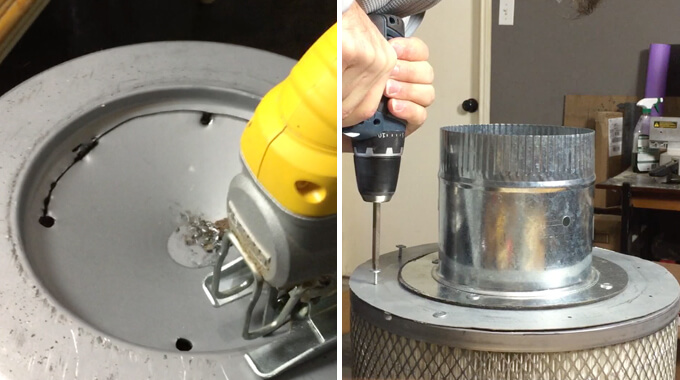
6. Before mounting the filter to the blower I used a jigsaw to open the closed side of the filter.
Then, cut a donut shaped mounting plate out of sheet metal to mount the 6″ collar and secured the mounting plate to the filter with 1/2″ sheet metal screws.
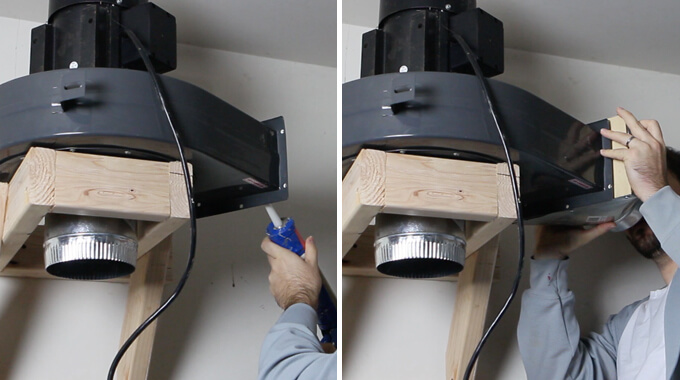
7. I made a U bracket out of 2x4s to hold the filter in place against the wall. The filter attached to the bracket with screws from the top.
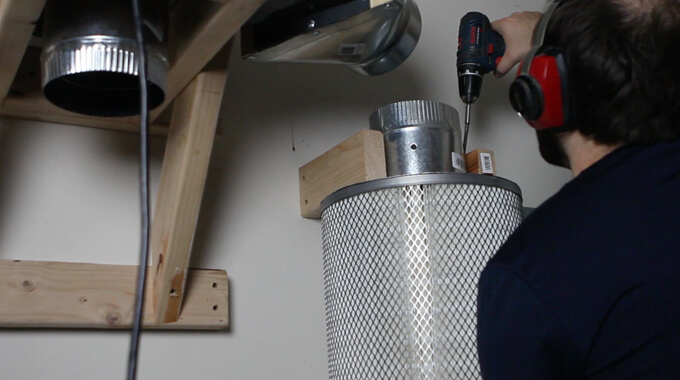
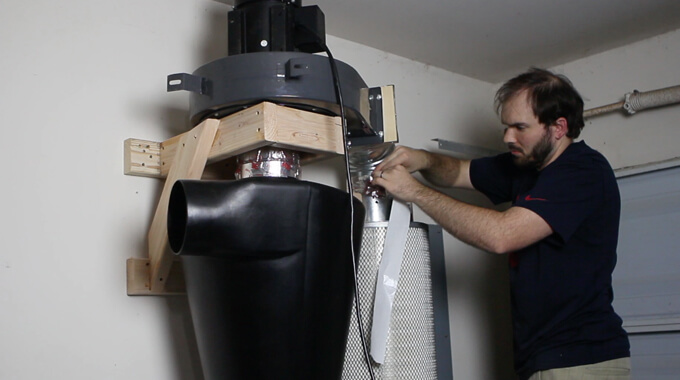
8. The Super Dust Deputy XL cyclone is designed to mount directly to the lid of the barrel.
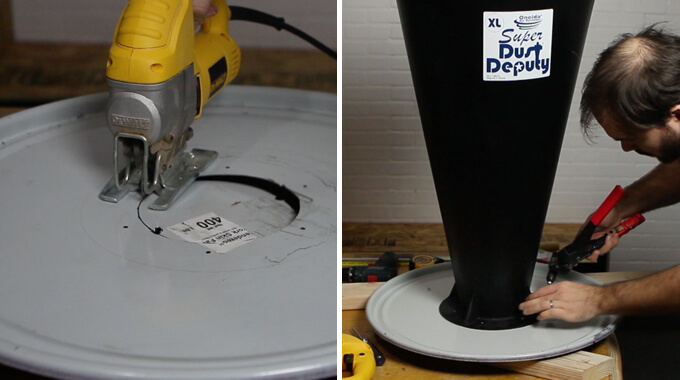
The opening at the bottom of the cyclone is roughly 6″, so I cut out another 6″ hole with a jigsaw in the top of the barrel lid.
The cyclone comes with hardware to mount the cyclone and a gasket. Since I misplaced the hardware I used construction adhesive and large rivets.
9. Once connected to the barrel lid the cyclone was attached to the inlet of the blower with 1/2″ screws.
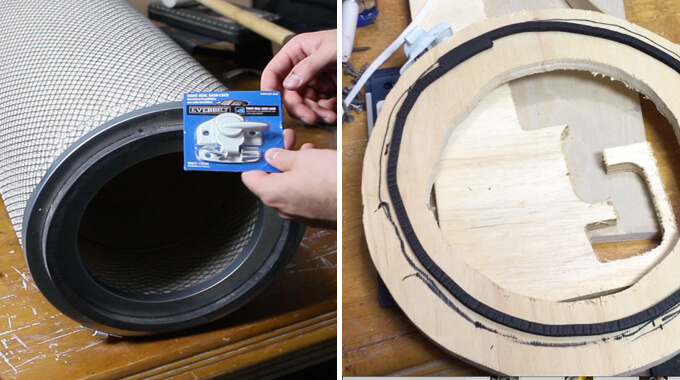
10. To seal the bottom of the filter I attached two latches to the filter allowing me to secure and remove a plywood donut and plastic bag.

11. The bag will catch any particles that makes it though the blower to the filter. Once particles accumulate they can be easily cleaned by emptying the bag.
12. Before turning on the dust collector I taped all the joints with foil duct tape.
I tested it out and it was nice to have it work just how I wanted and not be near as loud as my old shop vacuum.
I am looking forward to the connivence and having a cleaner shop.
The Cyclone Separator made a huge difference in taking my dust collector to the next level and making it more powerful and effective. I was also excited to attach the ONEIDA Dust Sentry Level Sensor.
I can’t wait to work on my first woodworking project with my new upgraded dust collector.
[adinserter block=”3″]
PIN FOR LATER

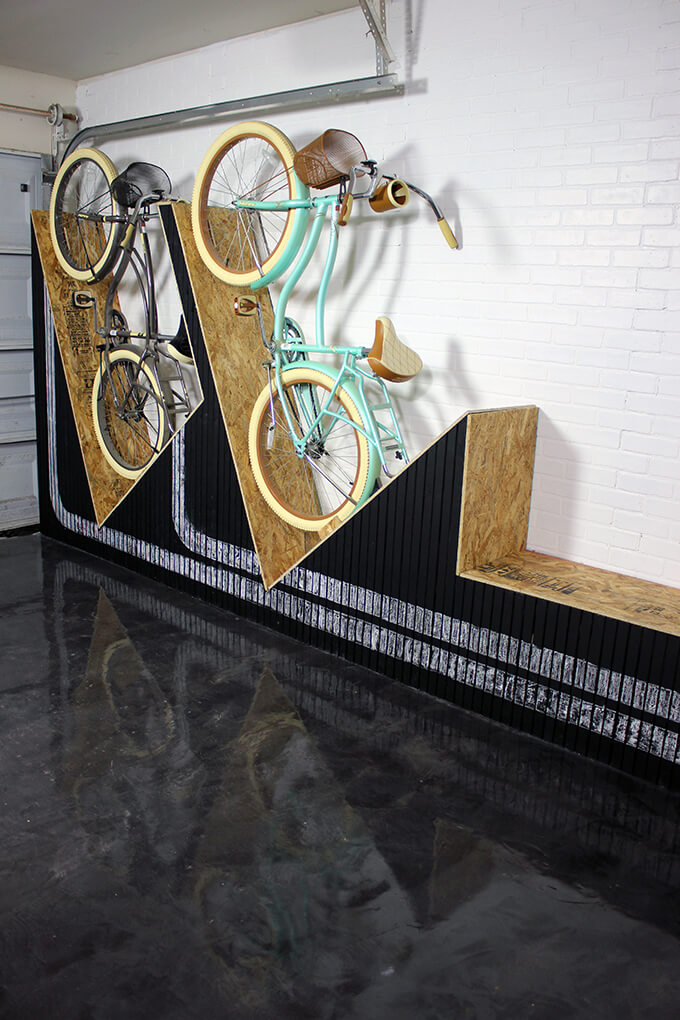
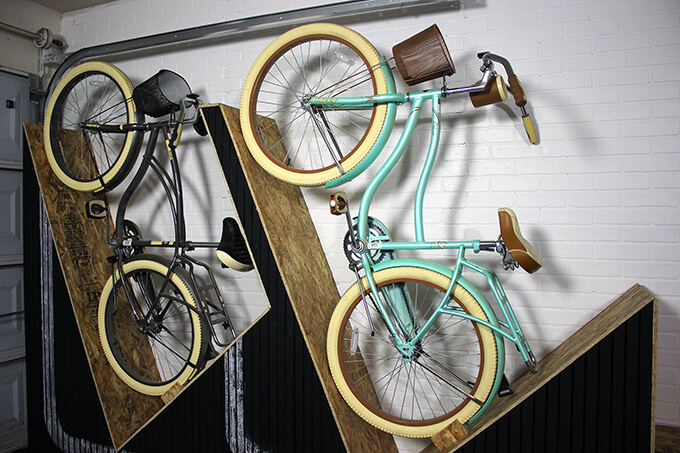
Wall-Mounted Bike Rack with Bench
Our latest DIY storage project was to build a wall-mounted bike rack with a bench in our garage to store our bikes.

Operation organize garage/shop is currently underway. We completed making over one wall in the garage with a large DIY storage project so we are making progress.
We covered one of the large walls in the garage with more of the faux brick panels. (Like we did in our home gym)
This time we painted the faux brick panels white. We are painting the other walls with Sherwin-Williams Gauntlet Gray.
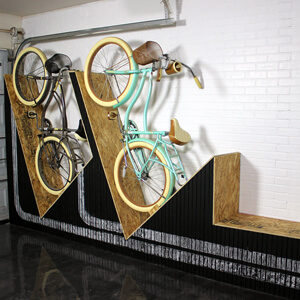
We also finished our wall-mounted bike rack DIY project! We are excited to give you the scoop on how this project came together.
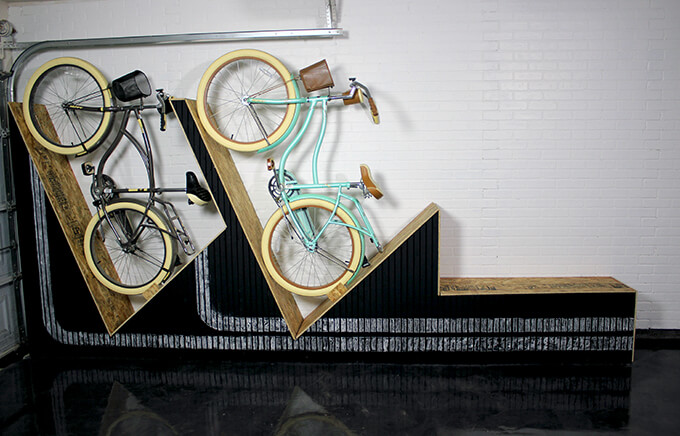
Last year we got bikes for Christmas which have been really fun to ride around our neighborhood and to the park but we didn’t have a great place to store them in the garage.
When planning the design of our bike rack storage project we had the following criteria:
1. The bikes needed to be easy to access
2. The bike rack needed to accommodate two bikes
3. The bike rack needed to take up as little space as possible depth wise
4. The bike rack needed to have a fun design and match the rest of the garage
5. BONUS: The bike rack could have additional functionality of an attached bench
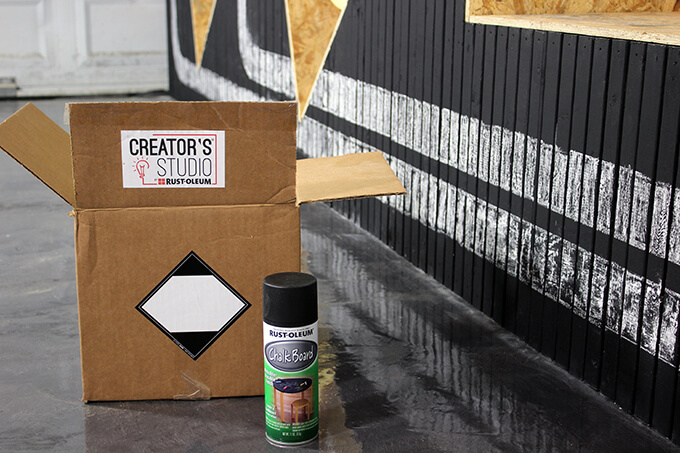
We entered our DIY bike rack project in the Rust-Oleum Creator’s Studio Blogger Challenge. They sent us a box of different types of spray paint and stains and we choose this chalk board paint to use on our project.
Since this was one our “make it up as we go because we don’t have anything to reference” projects, it took a little while to find our groove and some trial and error experimenting.
These types of projects are always frustrating when you are in the middle of problem solving but are always the most rewarding when you see it completed.
Below is our process for building our wall-mounted bike rack with a bench.

How To Build a Wall-Mounted Bike Rack
SUPPLIES
- Chalk Board Spray Paint
- 1″x2″ Pine Boards
- 2″x4″ Pine Boards
- OSB Plywood
- 1 1/2″ Brad Nails
- 2 1/2″ Decking Screws
- Wood Glue
- Circular Saw
- Kreg Jig
- Miter Saw
- Drill
- Jig Saw
- Brad Nailer
FYI: This post contains a few affiliate links to products we used to make this project. Gray House Studio does receive commissions for sales from these links but at no extra cost to you. We appreciate you supporting this site. Read our privacy and disclosure policy. You can also easily shop our recommended products here.
TUTORIAL VIDEO
[yotuwp type=”videos” id=”pFlQ-8jqajQ” title=”off” description=”off” player=”width=590&modestbranding=0&showinfo=0″]
Subscribe to our YouTube Channel
Like our video? Subscribe and help us reach our goal of 100k subscribers.
STEPS
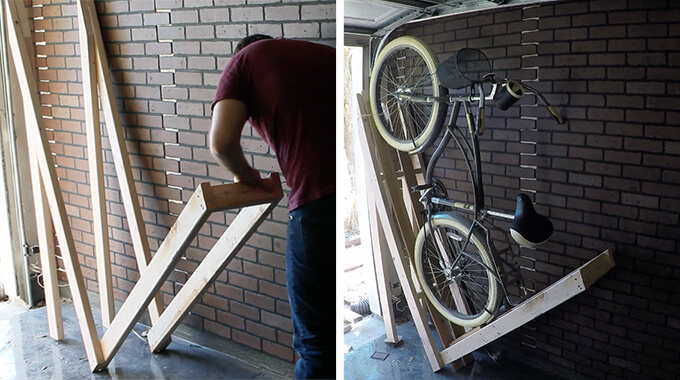
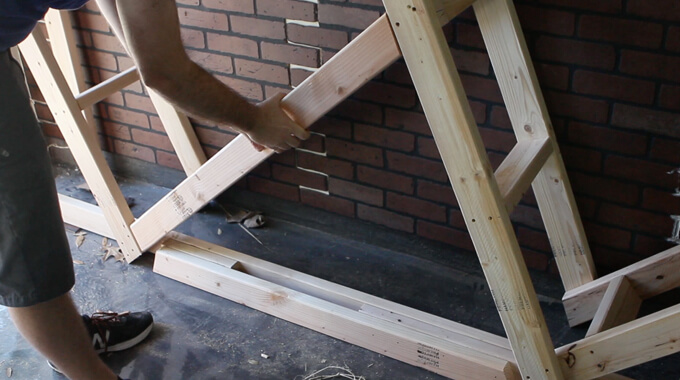
1. To build the bike rack we started by cutting our boards on our miter saw and making two V shapes at a 70 degree angle with 2″x4’s.
Then we connected the V shapes with horizontal braces. This made the structure 16″ wide. After adding vertical 2×4’s to stabilize the V structure, we loaded a bike to check the fit.
2. Once the bike fit, we created another V shaped structure and used our drill and screws to screw it into the end making a large W shape.
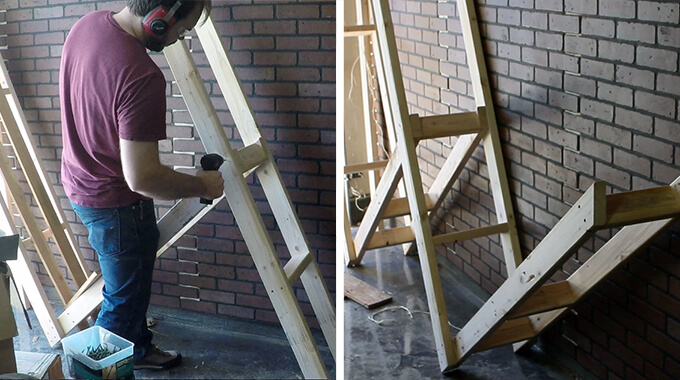
3. We wanted to incorporate a bench on the end of the bike rack so we built a box out of 2″x4″s.
We built the box to be 18″ high and attached it to the end of the W shape with screws.
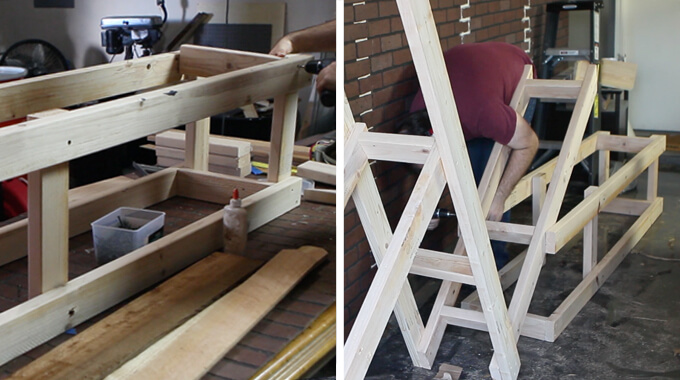
4. Before lining the outside of the bike rack with wooden slats, we attached 2″x4″s to any of the recessed sections of the braces to make one consistent and level surface.
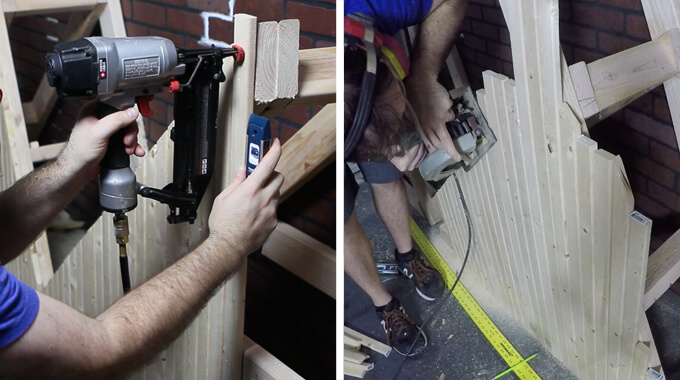
5. We used cheap 1″x2″ pine boards for the slats and cut them to be just longer than the bike rack is tall.
After leveling and attaching each slat with our brad nailer and brad nails, all the boards were cut to the correct height with a circular saw.
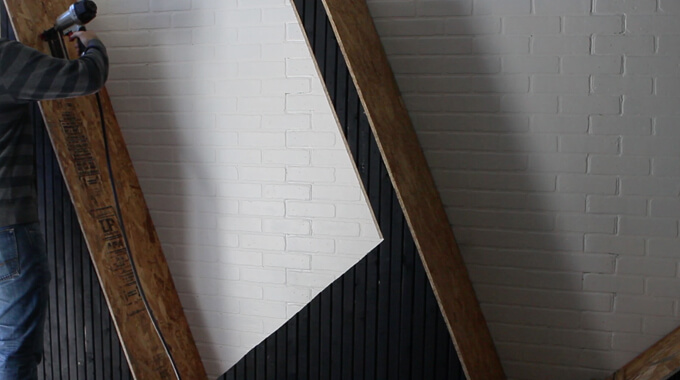
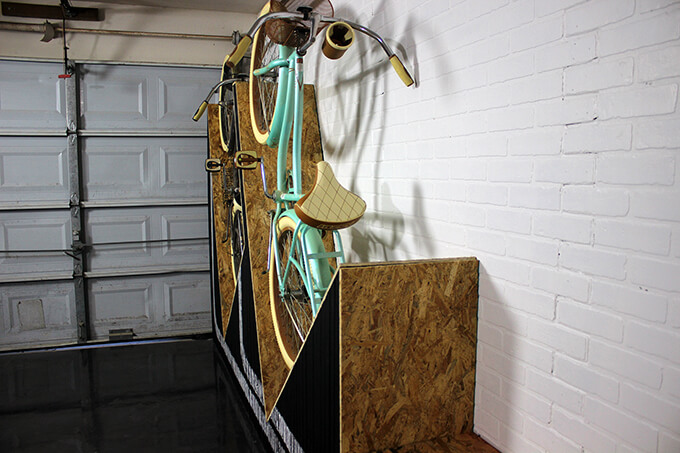
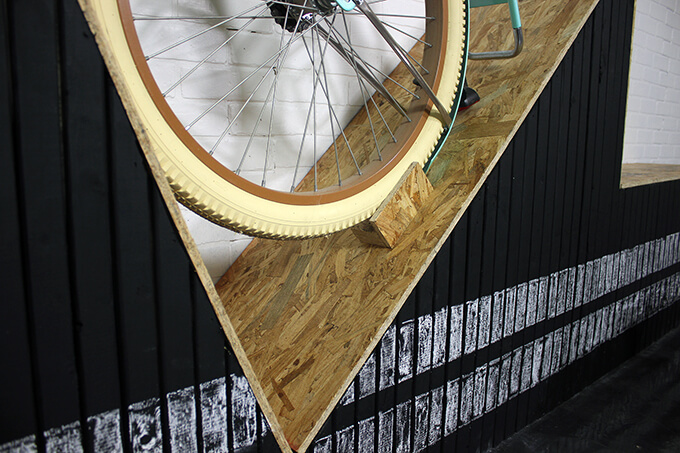
6. We lined the top of the bike rack with OSB sheets. It took three sheets to cover the entire rack and provided a significant cost savings over plywood.
Plus, it creates a unique industrial aesthetic that we were going for with the design.
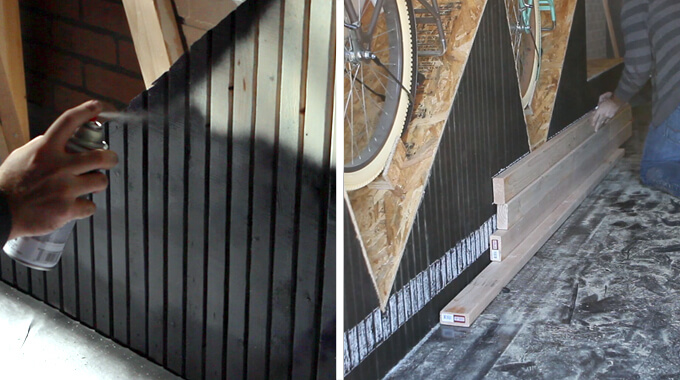
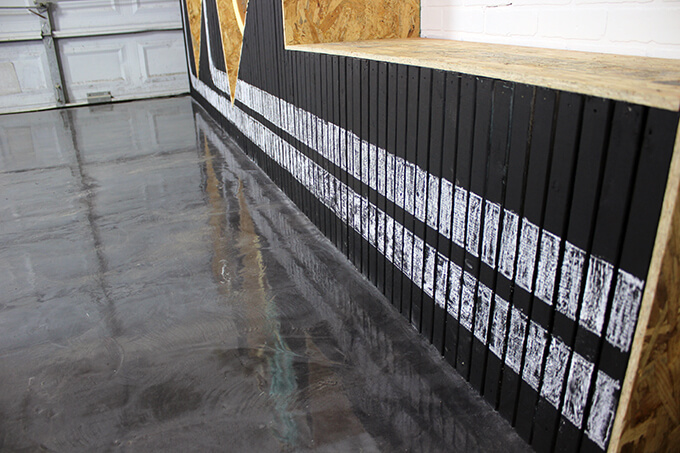
7. Finally, we painted the slats with chalkboard spray paint.
Typically we would roll large surfaces with paint but due to all the gaps between the slats we opted for spray paint and were impressed that it only took two cans.
To complete the design, we added two decorative stripes with chalk. Extra 2x4s made for a great straight edge for the lines.
We decided to paint the slats with a chalkboard paint so we can switch up the chalk design and it will go much better with what we have planned for the garage.
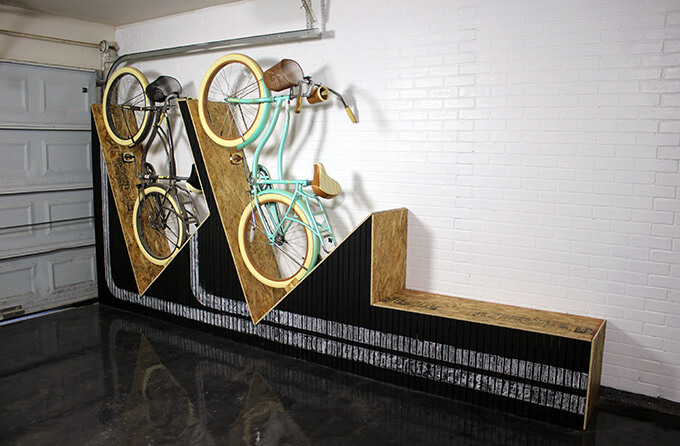
We are happy with the results of our DIY wall-mounted bike rack. We were able to check off all of our must-haves for the project and included the bonus bench too!
I am happy to finally have some seating in the garage and like that it is built in rather than just having a random old chair stuck in the corner!
PIN FOR LATER

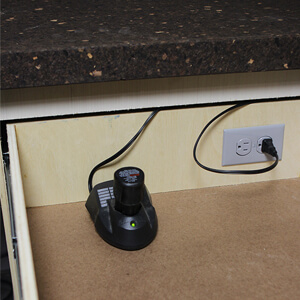
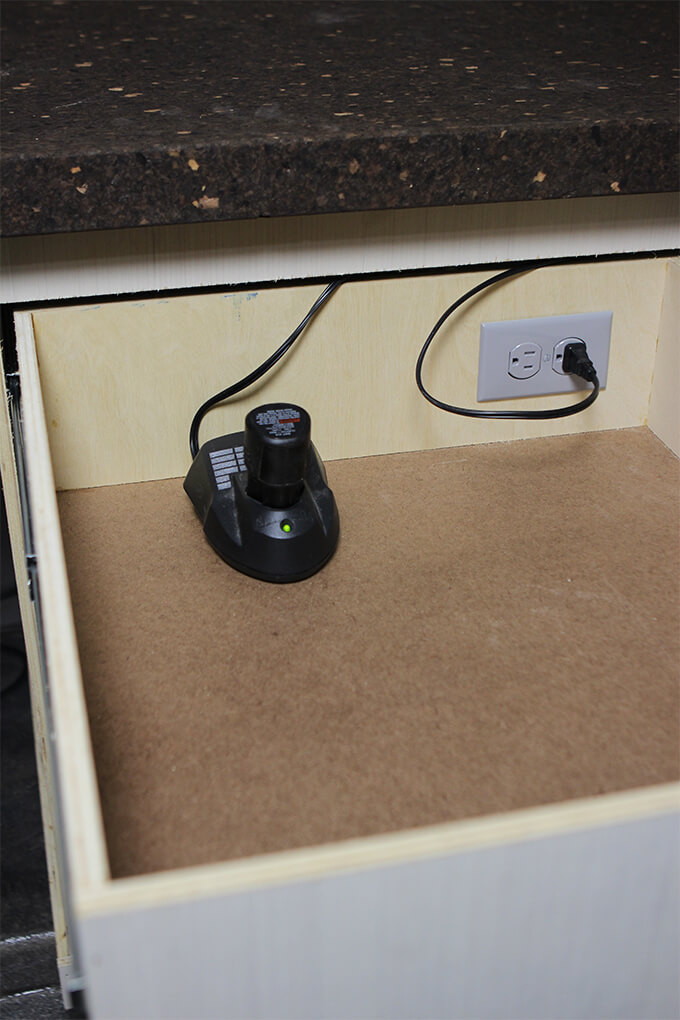
Electrical Outlet Install: Tool Charging Drawer
In this electrical outlet install tutorial, we demonstrate how we added an additional outlet in our garage and installed an electrical outlet inside a drawer to charge tool batteries.
This week we are excited to bring you our first project to kick off our garage makeover, adding electrical outlets. An electrical outlet install might seem like a small project, but having only one outlet in the entire garage/shop is inconvenient.
Currently, our solution for only having one outlet is to run an extension cord from inside the house which allows us to plug in one 15amp tool and a vacuum for dust collection. This is far from an ideal situation so an electrical outlet install was on the top of our to-do list for the garage.
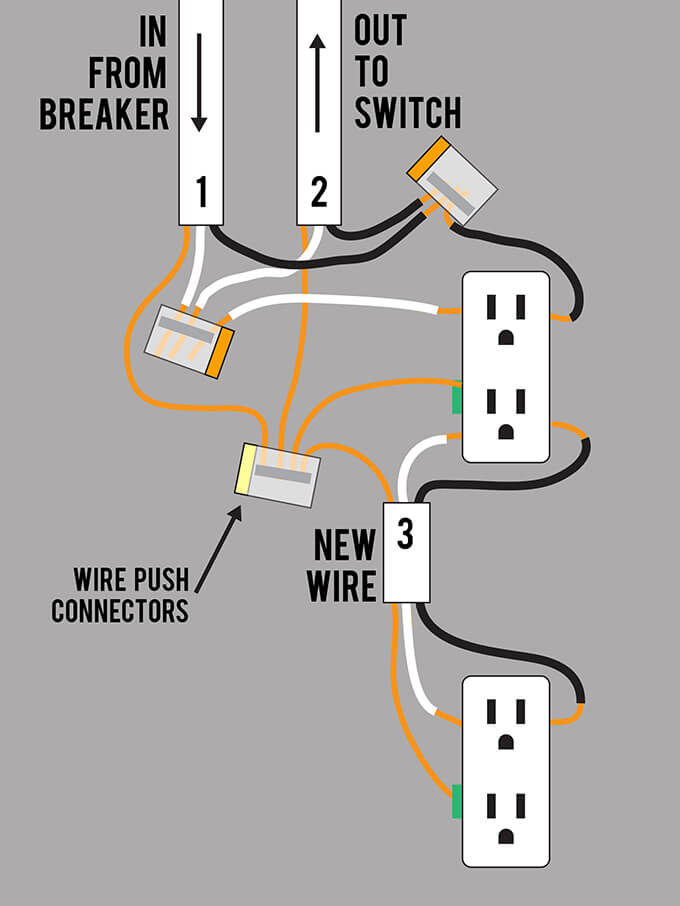
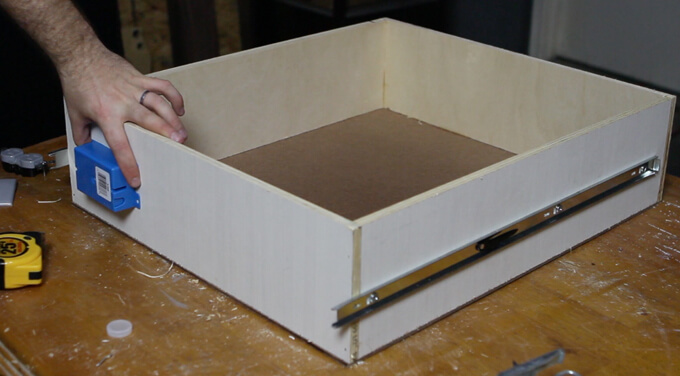
The outlets in this tutorial are ran from the existing outlet but soon we will also be adding outlets from new breakers. Plus, while we are at it, we decided to add an outlet inside a drawer of one of our new cabinets to charge tool batteries so it keeps the counter clutter free.
Important: Use caution when working with exposed wires! Exposed wires can shock you. All tips below are based on our experience and if you use any of the techniques shown below, you are doing so at your own risk.
VIDEO TUTORIAL
To see new DIY videos on Sundays, be sure to subscribe to our channel ⇾
SUPPLIES
MATERIALS
TOOLS
*This post contains a few affiliate links. You can read our disclosure policy here.
ELECTRICAL OUTLET INSTALL: TOOL CHARGING DRAWER
Add new wire to existing outlet
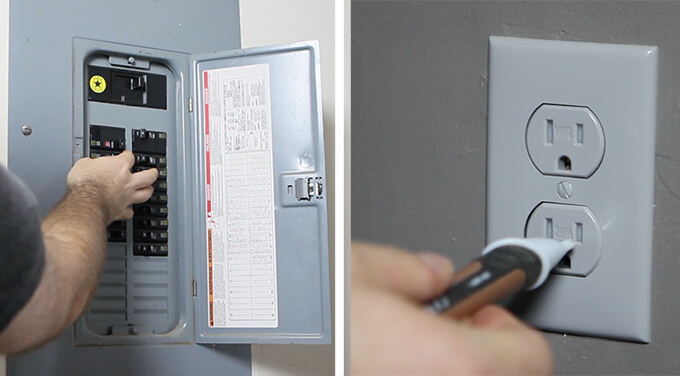
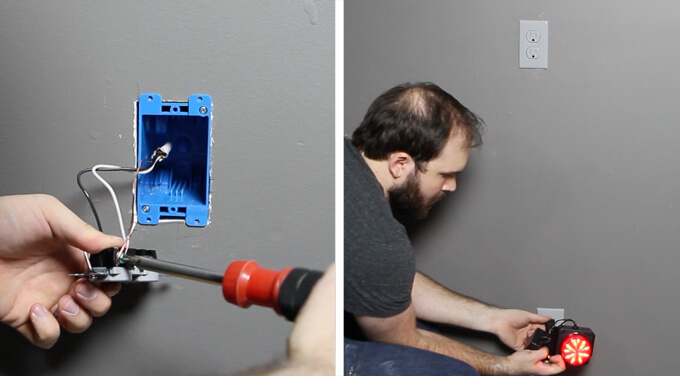
1. Before starting a project involving electrical outlets, I turn off the breaker that supplies power to the outlet. I double checked the power was off by using a voltage detector. The voltage detector beeps and turns on a light when it senses electrical current.
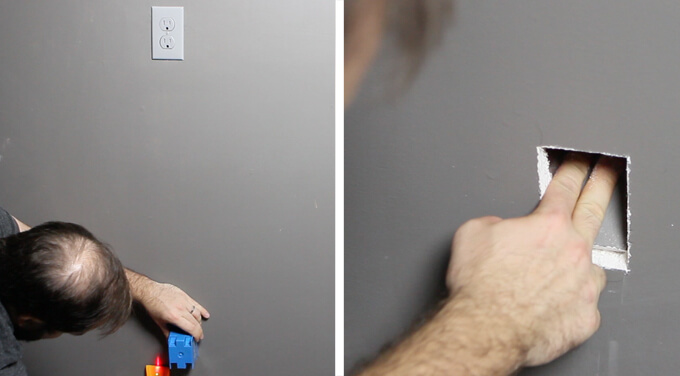
2. I used a stud finder to locate the wall stud and marked where to cut the hole in the wall with a pencil. I used a jab saw to cut the hole for the new outlet.
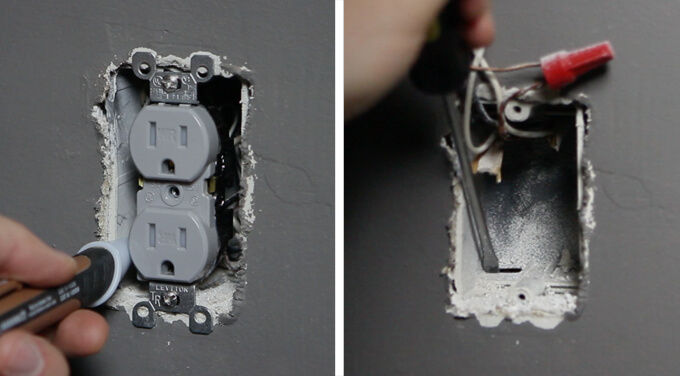
3. After removing the face plate, I double checked one more time that the power was off and removed the plug by unscrewing the top and bottom screws. Using a flat head screw driver and a mallet, I popped out the bottom tab in the existing electrical outlet.
4. To run the new romex cable for the bottom plug, I pushed a fish tape down through the hole in the bottom of the existing electrical box.
Once the end was pulled out of the hole cut in step 2, I taped the romex wire to the end of the fish tape and pulled the wire up through the top electrical box.

5. To strip the wire it is only necessary to cut the end of the cable 1/2″. The white plastic tears away from the inside wires. To remove all of the wires inserted in the back of the plug, I used a small flat head screwdriver and released the wire by pressing a tab next to each wire.
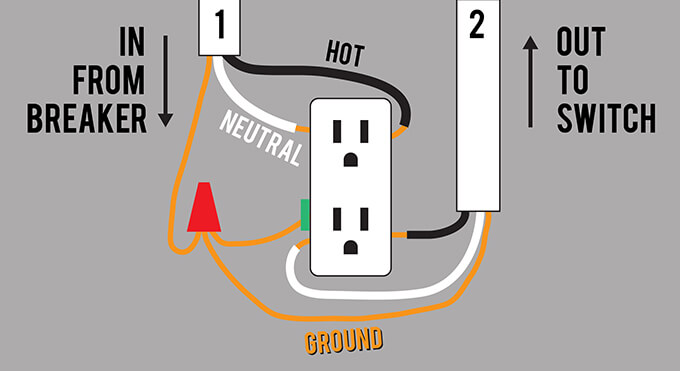
There are only two places to connect wires to the electrical outlet. The existing outlet already had two sets of wires connected so we couldn’t connect the third wire.
The diagram above illustrated how we used push connectors to combine the wires.
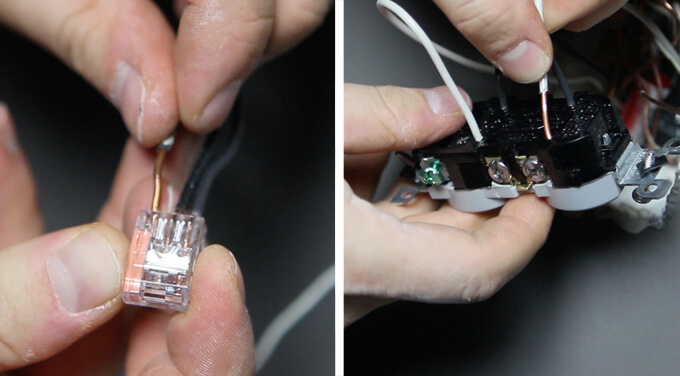
6. Using a wire push connector, I combined the two existing sets of wires making room for the new wire.
Install new electrical outlet
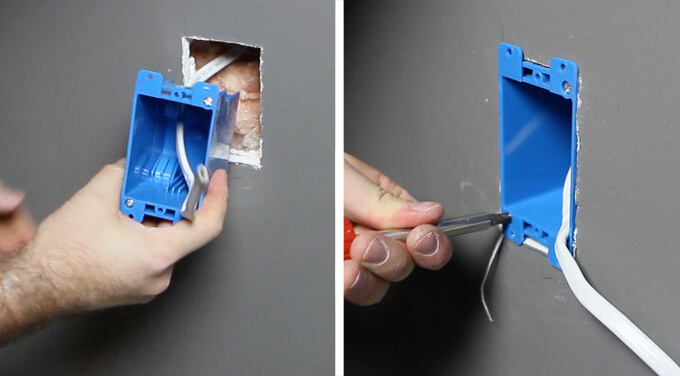
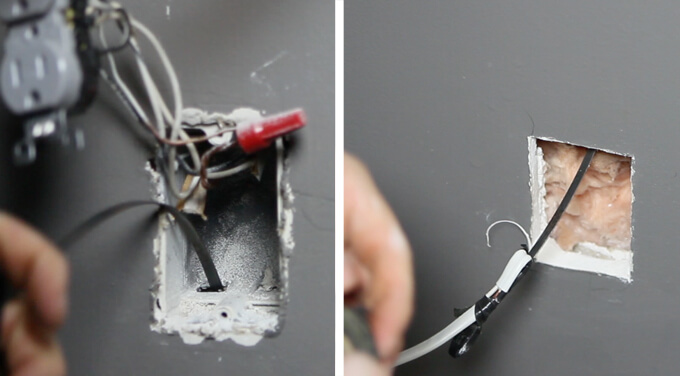
7. Before installing the bottom outlet, I cut the romex about a foot from the wall and fed it through the back of the box. The box attaches to the wall with tabs that clamp the drywall between the tab and box when each screw is tightened.
8. The bottom plug was installed by stripping each of the wires 1/2″ on the end, inserting the white and black wire into the back of the outlet, and securing the bare wire under the ground screw.
I turned the breaker back on and tested each plug with a light.
Install drawer electrical outlet
9. To allow us to charge our tools in a drawer and keep the work surfaces clutter free, we removed a drawer and marked where the outlet would go by tracing the outline of an electrical box.

10. I cut a hole for the electrical box by drilling holes in each corner and then cut the straight lines with a jigsaw.
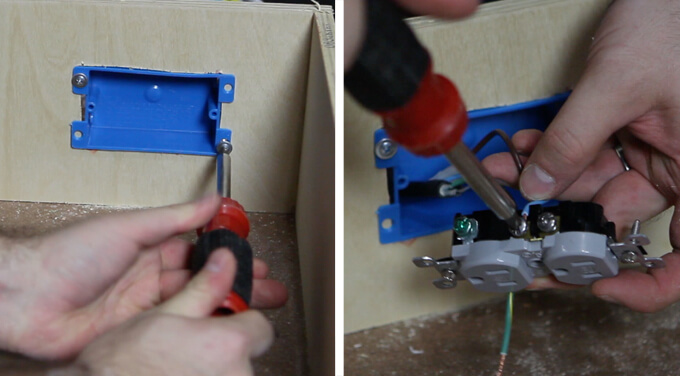
11. Unlike the electrical box in the previous steps, this electrical box screwed through the front. The cable I used is recycled from an old computer. Since the wires are stranded I hooked up the outlet using the screws located on the side of the plug.
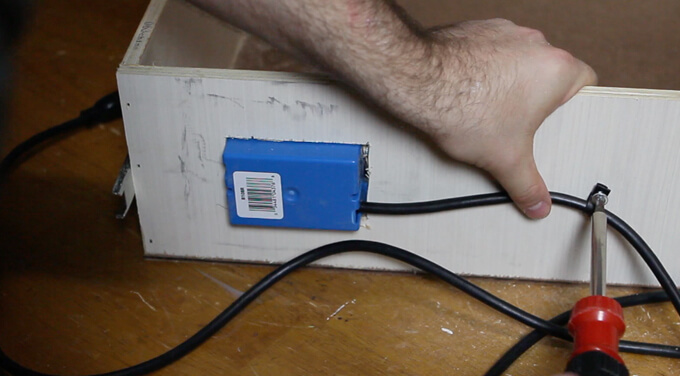
12. To prevent the cable from pulling away from the back of the electrical box, I used a plastic cable clamp to keep the cable in place.
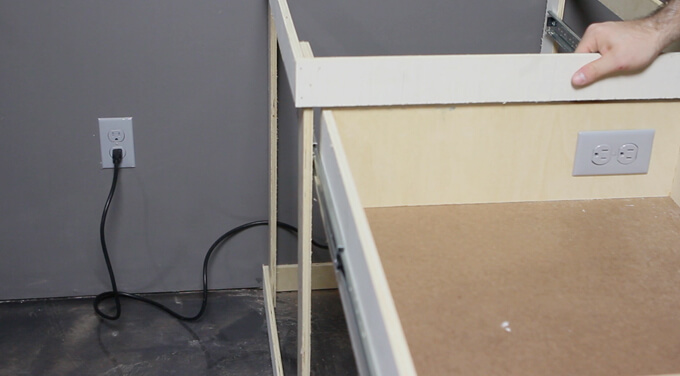
13. Finally, I plugged in the drawer outlet. Now I could plug my battery chargers in the drawer and they are hidden out of the way.
Installing electrical outlets is oddly satisfying. It is a messy process but once all the faceplates are screwed back on, the results are really nice.
Let us know if you have any questions about our process.