DIY LOG SIDE TABLE

Tree Stump Side Table DIY

Our latest nursery project was to make an inexpensive DIY log side table that looks similar to the tree stump side table sold at West Elm.

DIY Stump Side Table

One Saturday morning several weeks ago Brent and I jumped in the car and made our way across Houston looking for the perfect log. What makes for a perfect log you might ask? One that is large enough to make a side table out of and one that is of course FREE.

Brent saw on good ol’ Craigslist that someone was giving away free logs but when we arrived to the location we were quickly disappointed because the pieces were tiny. The picture online was very misleading making them look way bigger than they actually were. Go figure.

But then just as we were leaving it was as if a glorious spotlight shone down from above on the perfect log sitting off by itself next to the tree that was being cut down. It was super heavy which was probably why it hadn’t made it to the other pile. But Brent was a beast and carried that thing all the way to the Jeep while I cheered him on and filmed from the air conditioned car.

DIY Version of the West Elm Tree Stump Side Table

We snagged the PERFECT log to make our DIY log side table!

DIY Log Side Table

One of the must have items on our list for our outdoor modern nursery was a log side table but holy cow the prices of those pieces were costly at the stores. Since we have so many projects for this nursery and couldn’t afford to drop a few hundred bucks on just one tiny table, Brent convinced me we could make one ourselves.

We were able to get the same tree stump side table look for a fraction of the cost by doing it ourselves and it only cost us a little bit of blood, a lot of sweat, (did we mention it is HOT in Houston in the summer?) and the cost of the varnish to seal the log.

We are so happy with the results and actually like it better than the ones sold in stores and we customized the height to be the perfect height to go next to our rocking chair.

Make A DIY Version of the West Elm Tree Stump Side Table

SUPPLIES

FYI: This post contains a few affiliate links to products we used to make this project. Gray House Studio does receive commissions for sales from these links but at no extra cost to you. We appreciate you supporting this site. Read our privacy and disclosure policy. You can also easily shop our recommended products here.

TUTORIAL VIDEO

[yotuwp type=”videos” id=”9PUDwrhuqqA” title=”off” description=”off” player=”width=590&modestbranding=0&showinfo=0″]

Subscribe to our YouTube Channel

Like our video? Subscribe and help us reach our goal of 100k subscribers.

Tree Stump Side Table STEPS

We let the log sit for several weeks in our garage to dry out before we started working on it.

DIY Log Side Table

1. To turn the log into a side table we first needed to remove the bark using a sharp chisel and mallet.

DIY Log Side Table

We could see that there was a slight color variation between the bark and the solid wood.

Brent used the chisel to go along the line where the color changed and the bark peeled easily off the trunk.

DIY Log Side Table

2. Once all the bark was removed, Brent used a yard stick and a little bit of white paint to mark a line around the base of the trunk to mark where to cut the stump to make it stand straight.

DIY Log Side Table

3. Next, he used a chainsaw to cut through the log along the white line he marked in the previous step.

He had to make several passes because the oak was so dense.

DIY Log Side Table

4. He used a hand planer to flatten the top of the log.

DIY Log Side Table

5. Then he used an electric sander and sanded all the surfaces of the stump with 80 grit sanding disc.

DIY Log Side Table

6. He followed up with a 120 grit sanding disc to make it nice and smooth.

DIY Log Side Table

7. We really loved the light color of the wood and did not want to change the appearance in any way. We didn’t want the sealer we used to turn the log yellow.

We found the key to avoiding a yellow finish is to not use an oil based sealer. Instead we brushed on a few coats of a waterborne polyurethane varnish in satin clear with a paintbrush which sealed the stump nicely and left it looking true to the original color.

DIY Log Side Table

I have to give major props to Brent for working his butt off on this project. While it didn’t cost us much in terms of money, this project did require a lot of manual labor. He spent hours on his feet chiseling the bark away in 100 degree weather.

His hands were blistered and tired and he never complained. Every project he completes I am always amazed at his mad woodworking skills, his determination and how his completed work always turns out exactly how we intended.

DIY Log Side Table

We were so excited to put our tree stump side table in the nursery. It really covers the modern and outdoor theme perfectly. We loved the unique knots and grains this piece of wood has and I am sure it will be a favorite piece of ours for years to come.

PIN FOR LATER

A DIY tutorial showing how to make a much cheaper version of the West Elm Stump Side table. This tutorial also includes a video step by step guide to show you how to get an expensive looking DIY log side table without the high price tag. This stump side table makes for an adorable addition to a woodland themed nursery.

Nursery Floor

Nursery Flooring | Selection + Installation

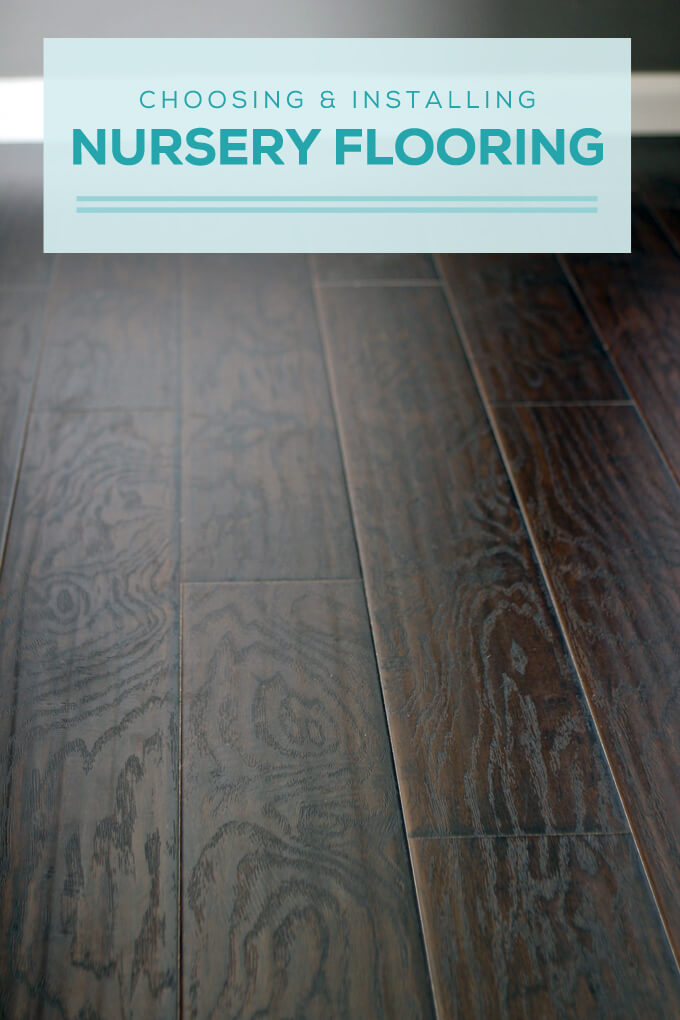
Check out how we chose and installed our new nursery flooring and follow along as we share how we pulled up gross old carpet and replaced it with nice laminate flooring.

Nursery Flooring

Just a heads up, be prepared for tons of nursery project posts coming up soon as we furiously work to finish all the projects on our list for our nursery before the end of September.

It seemed like we had plenty of time to get the nursery together and now as I am entering into my eighth month of being pregnant, it feels as if time is speeding up and things are starting to get real. Our little Gray House intern will be here before we know it and we still have quite a few projects to get done.

Every time someone asks Brent if we are ready he always smiles and says, “Well, we have a crib and we will just pick up a few diapers on the way home from the hospital.” The typical reaction is one of panic for us which he gets great enjoyment out of teasing them and seeing their concerned faces.

While it is true, we don’t have any diapers yet and very few other baby supplies (don’t worry, we will get there soon I promise), our nursery does have brand new floors that turned out awesome so that is progress! Priorities, right?!

Nursery Flooring Video

In the video below we show how we removed the carpet, leveled the concrete slab, pulled up the baseboards and laid down the new laminate flooring to transform our nursery flooring.

To see new DIY videos on Thursdays, be sure to subscribe to our channel ⇾


Nursery Floor Transformation

Nursery Flooring

We started our first project of replacing the nursery floors the first week of July but it was quite time consuming and labor intensive so it took about three weeks to complete which meant no other nursery projects could really take place during that time.

We have been wanting to replace the tan carpet and tan tile in our house FOR FOREVER. But due to the large amount of work or large amount of money it would take to pay someone else to do the work, we are waiting to go down that road at a later time.

However, I did not want to have old carpet in the nursery for cleanliness and design reasons so we decided that the nursery would be our test room for laying down new floors. In a perfect house we would just pull up the carpet and lay down the new flooring, easy peasy, right? Not in our house.

Nursery Flooring

The slab in our house is far from perfect so we had a few obstacles to get through along the way. This is one of those projects where you wish you could just snap your fingers and it be done immediately but all the hard work paid off because the nursery flooring turned out great and these new floors will make a huge difference in how the room turns out.

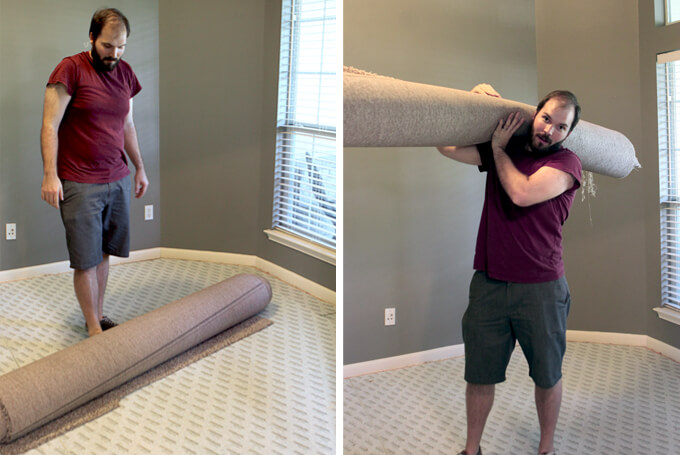
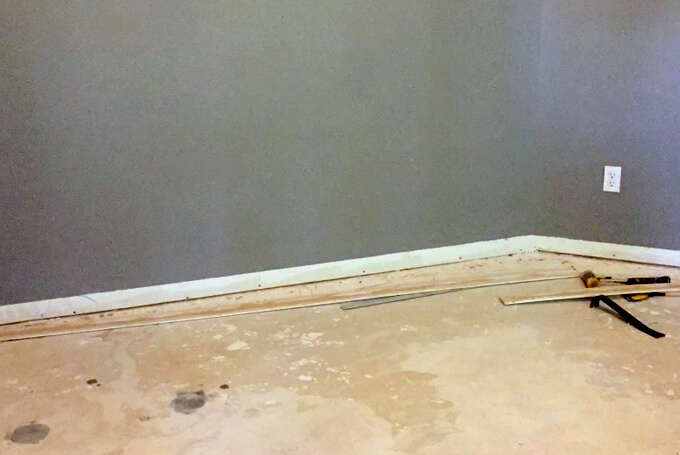
STEP 1: PULL UP OLD CARPET

Nursery Flooring
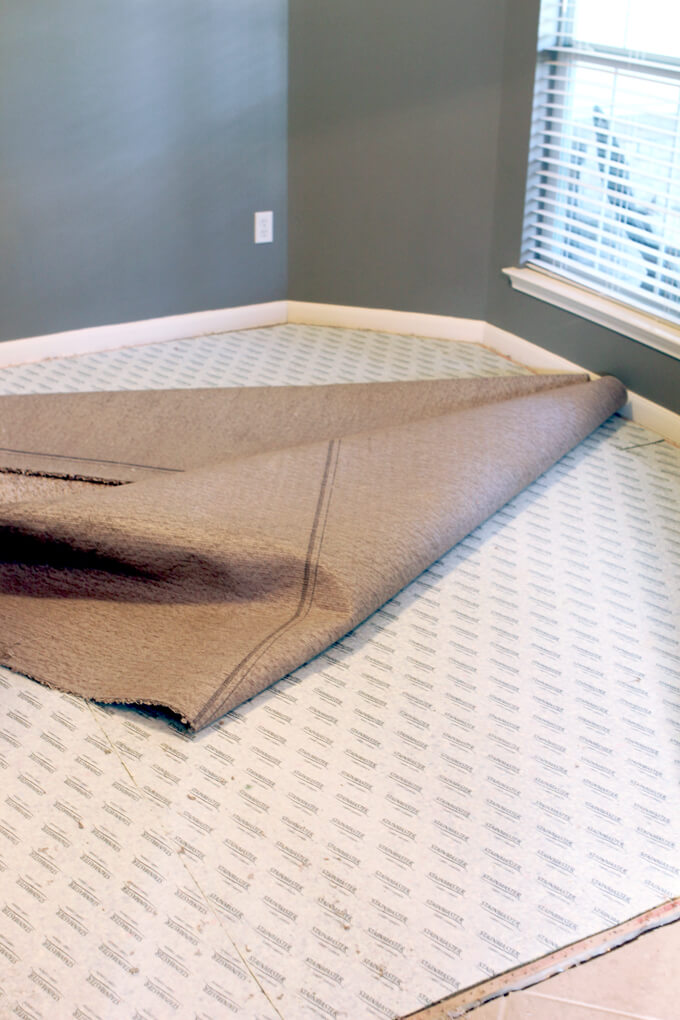
First things first we needed to pull up the old carpet. I’m not sure why but I get super nervous when it comes to pulling up the carpet because there is not turning back even though we had already purchased the laminate flooring so we had technically already committed.

Nursery Flooring
It’s always a nice gross surprise to find old stains that you have no idea what they are from because they were there before you moved in. Just another reason why we were super glad to say goodbye to the carpet in this room.

Nursery Flooring
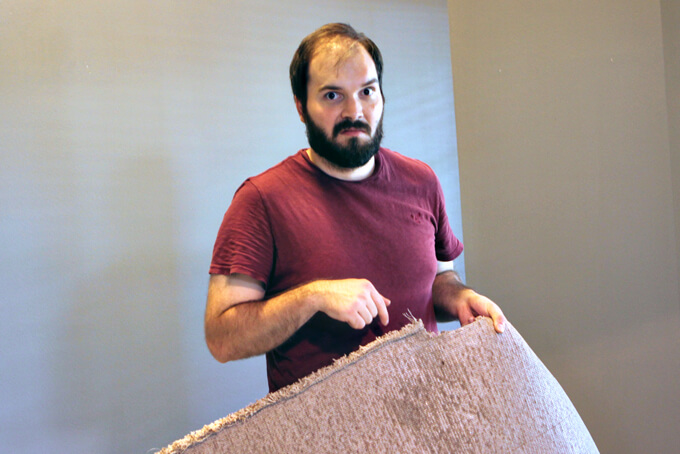
Out with the old! Brent cut the carpet down the middle to create two rolls that would be easier to move out of the room. We timed it with trash day so the old carpet would be out of our way immediately. It was so nice to say goodbye to that old tan carpet. See ya never!

Nursery Flooring
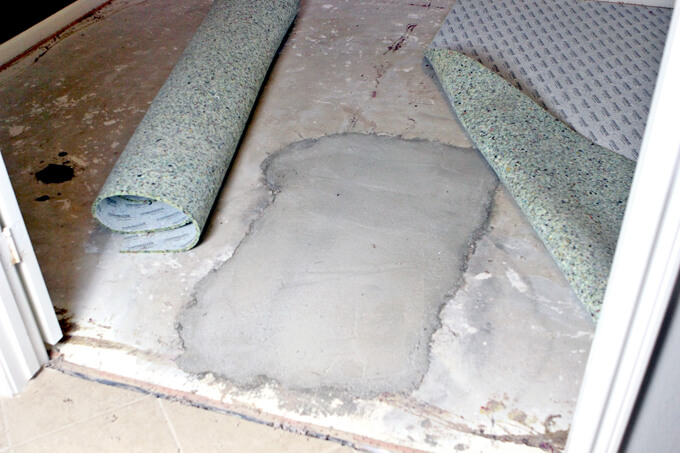
We knew that the slab under the carpet was going to be uneven because we could feel a dip when we walked in the door but we had no idea exactly what was waiting for us under the carpet. After we pulled it up we were greeted by this monstrosity that would have to be leveled before we could lay the floors.

Nursery Flooring
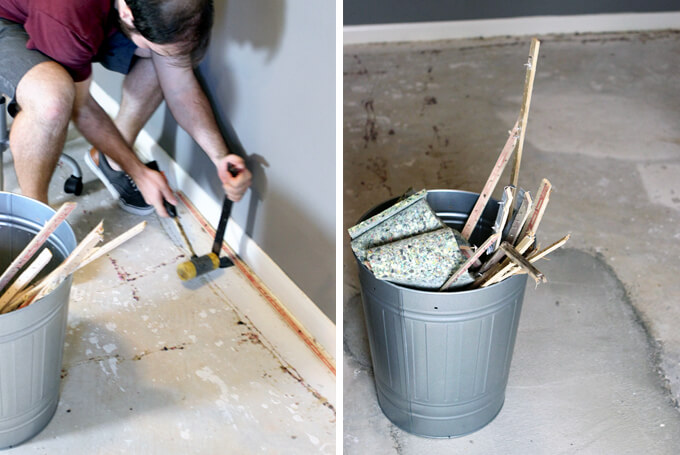
The final step was to pull up all of the carpet tack strips which is time consuming, boring, and probably Brent’s least favorite aspect of working on the floor. We also swept the floor to get rid of remaining debris.

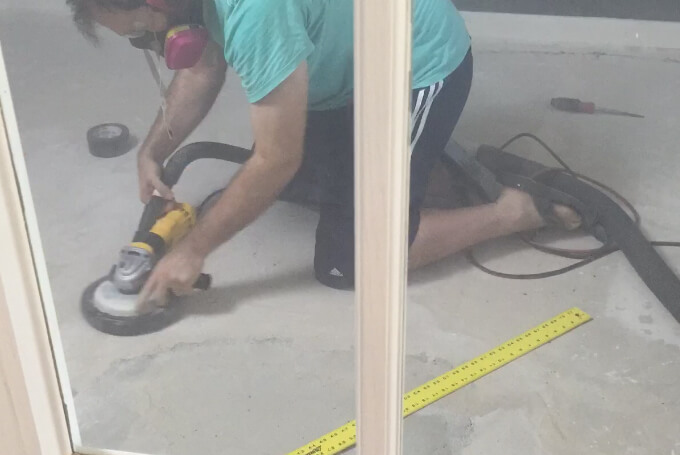
STEP 2: GRIND THE CONCRETE SLAB

Nursery Flooring
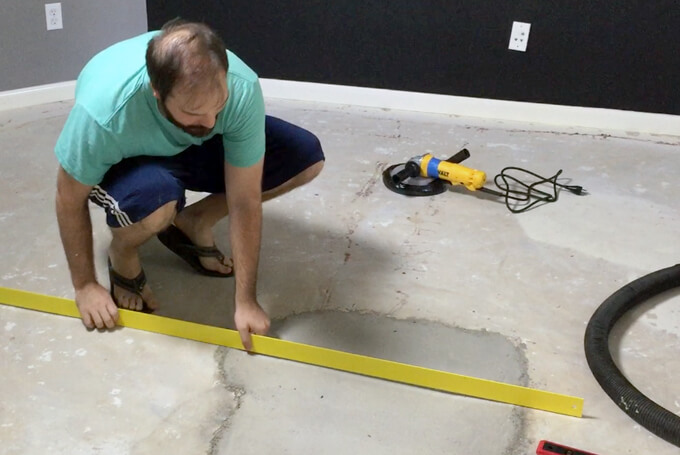
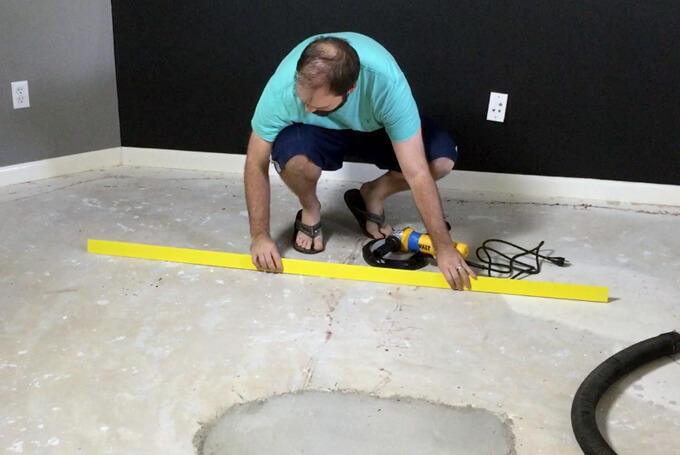
Once the carpet was out and gone, it was time to deal with the concrete slab underneath. The flooring in this room was far from level due to foundation work that was done before we moved into the house.

They didn’t exactly do a top notch job of making sure the concrete was level before they put the new flooring back down.

Which left a mess for us to try and repair because we wanted it to be as level as possible to make sure the new flooring we put down was as flat and would not feel like it was moving under your feet.

Nursery Flooring
The large, obvious spot in the front of the room was too low.

Nursery Flooring
There was also an area in the back of the room that was too high.

Nursery Flooring
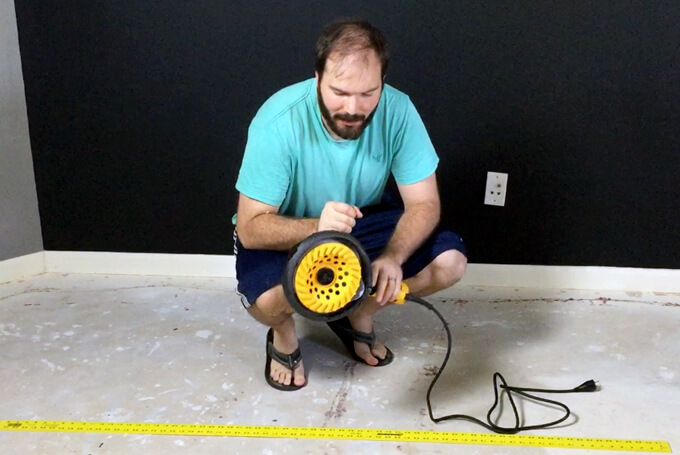
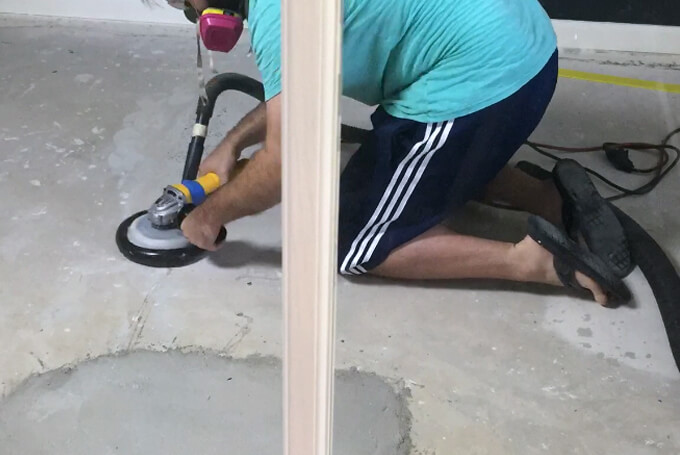
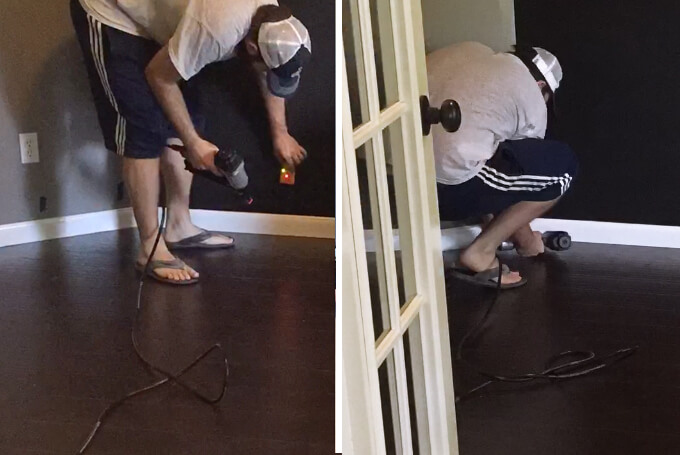
Brent needed to grind down the concrete in the high spots. To do this he used an angle grinder with a diamond blade.

To try and keep the concrete dust to a minimum, he created his own DIY grinder vacuum attachment for under $5. Check out the video below to see how he made it.

Make a DIY Grinder Vacuum Attachment for Concrete Grinding

To see new DIY videos on Thursdays, be sure to subscribe to our channel ⇾


Nursery Flooring
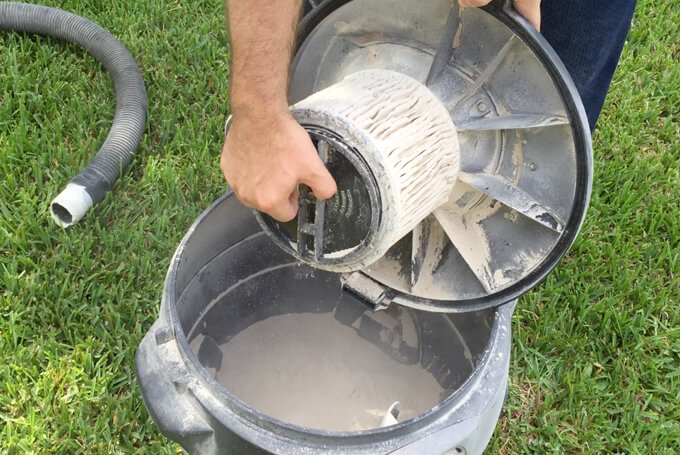
As Brent went to work grinding the high spots of the concrete, his DIY grinder vacuum attachment worked perfectly. It suctioned to the ground eliminating the amount of dust floating around.

Nursery Flooring
However, while I watched him work through the doors I noticed that the room was getting foggier and foggier which meant the concrete dust was escaping.

Nursery Flooring
When he was done the room looked like this, exactly what we DIDN’T want to happen. Oops.

Nursery Flooring
It turns out that his DIY grinder vacuum attachment worked just fine. The problem was with the shop vacuum.

The filter got clogged which lead to all the dust getting stuck in the hose which meant everything that got sucked up was coming right back out once he lifted the grinder.

We learned to stop mid way and clean out the vacuum. Even though this step didn’t go as smoothly as hoped, Brent still did collect a large majority of the concrete dust. DIY-ing is all about trial and error.

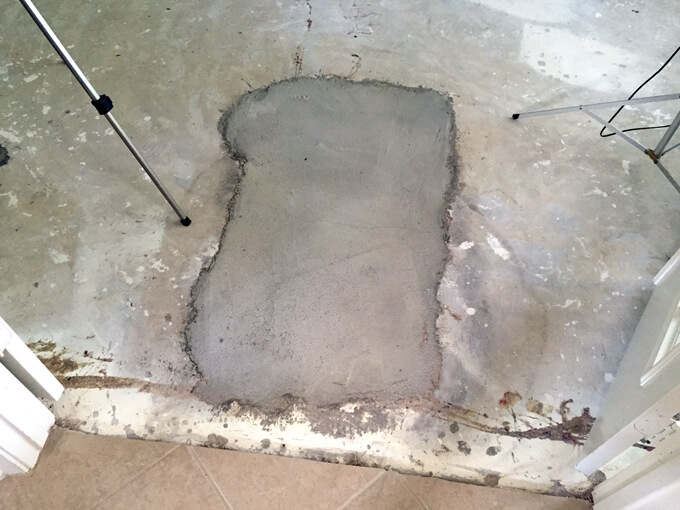
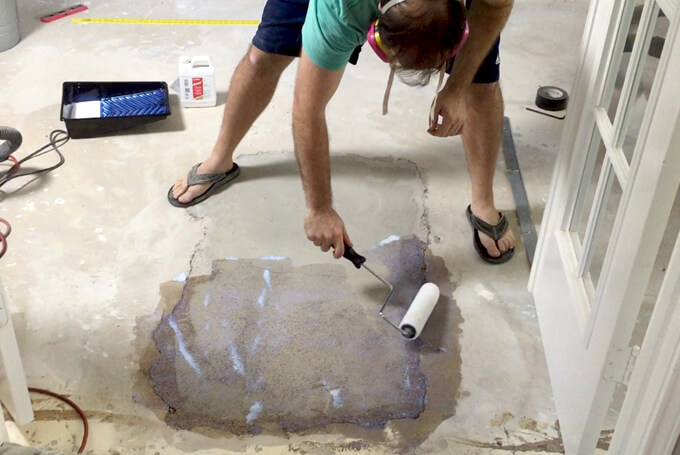
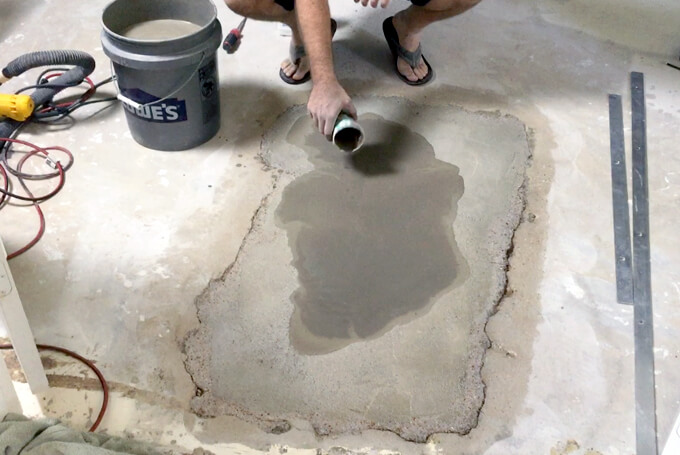
STEP 3: LEVEL THE CONCRETE

Nursery Flooring
After the concrete was level in the back, it was time to tackle the low spot in the front. To do this we first rolled down an indoor primer. We used MAPEI White Indoor Primer.

Nursery Flooring
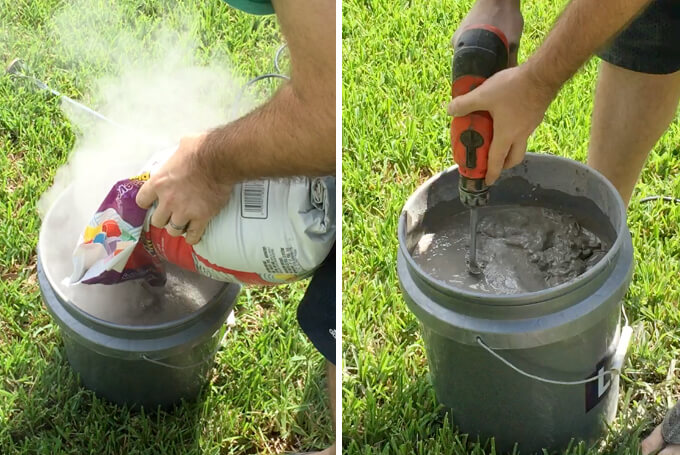
Next, we mixed up a bag of self-leveler. We choose to go with MAPEI Gray and Silver Indoor Leveler.

Nursery Flooring
We used a plastic cup to spread the leveler out over the low spots. But we both thought it looked REALLY thin and the consistency was watery.

Nursery Flooring
It was supposed to take 24 hours to level but it took about a day or two. And while it did even out pretty well considering how bad the concrete was in this area, it still needed a little more help.

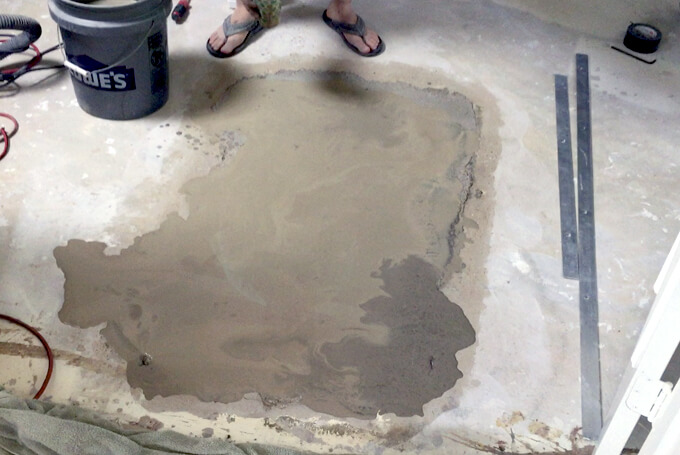
Brent mixed up another batch and that is when he realized that he got the ratio of water to mix incorrect the first time because he misread quart for gallon. Ha. Oops.

It wasn’t a big deal but it should not look as thin as it does in the photos above. The second batch was the correct consistency and worked like a charm to get our concrete level and ready for the new nursery flooring.

We still waited a few more days to make sure it was completely dry.

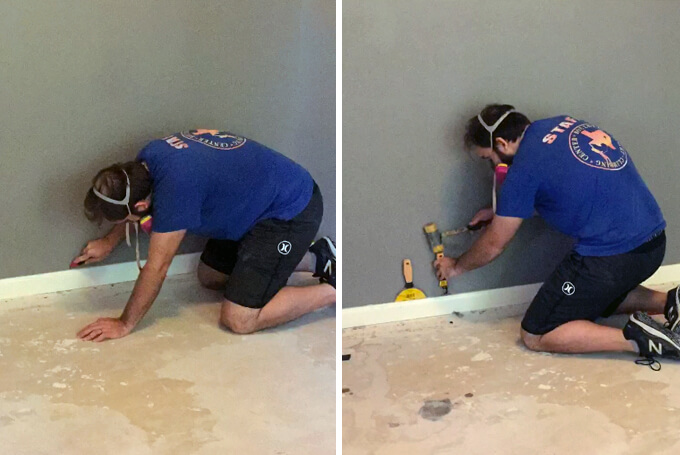
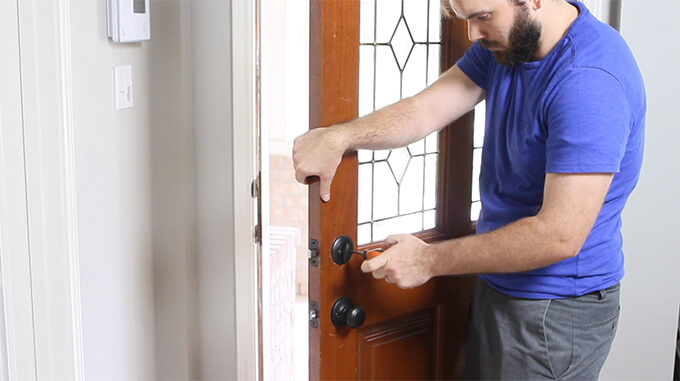
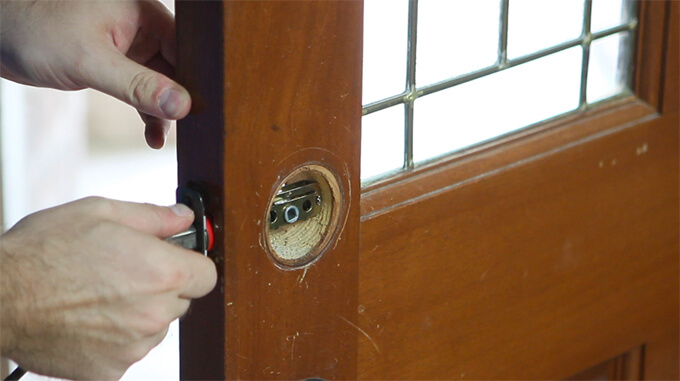
STEP 4: REMOVE THE BASEBOARDS

Nursery Flooring
Nursery Flooring

We went back and forth on what to do with the baseboards. After watching some reassuring tutorials on YouTube, we decided that it would be easy enough to remove them in a way that we could reuse them.

Brent was able to remove all of our baseboards in perfect condition which meant we would save money by using our same baseboards and not have to add quarter round.

Nursery Flooring

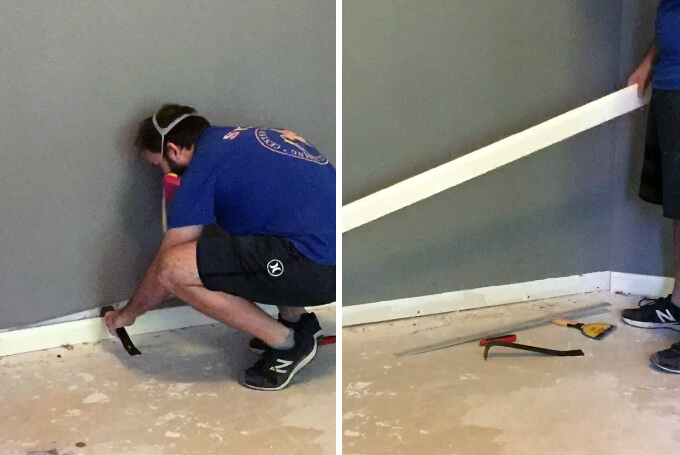
While they were off from the wall, thanks to my dad’s help, we were able to give the baseboards a complete refresh. Brent sanded them down and my dad put a fresh coat of white paint on them making them look brand new once they went back up on the wall.

STEP 5: INSTALL THE NEW FLOORING

When it came time to choose the nursery flooring we decided to give laminate flooring a try. We wanted the look of real hardwood floors but for the price of well, laminate.

We did a lot of comparing and contrasting of different types and brands of laminate flooring.

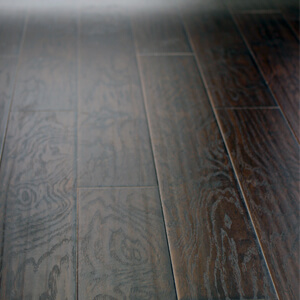
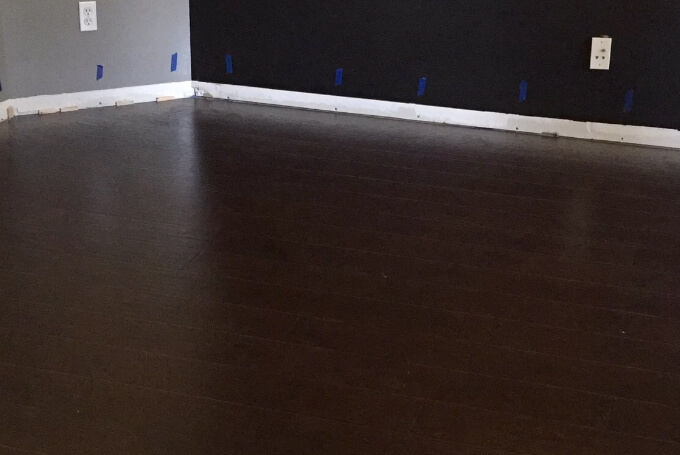
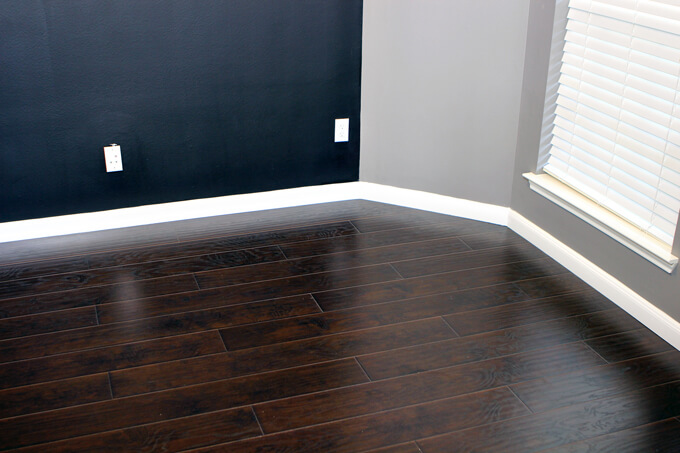
Ultimately, we chose Select Surfaces Laminate Flooring in Brazilian Coffee*. What we like about this particular flooring is the color, texture, that the pieces click together for an easy install, and the thick padding underneath that helps prevent it from feeling hollow. Plus, the cost fit our budget.

*This post contains an affiliate link. You can read our disclosure policy here.

Nursery Flooring
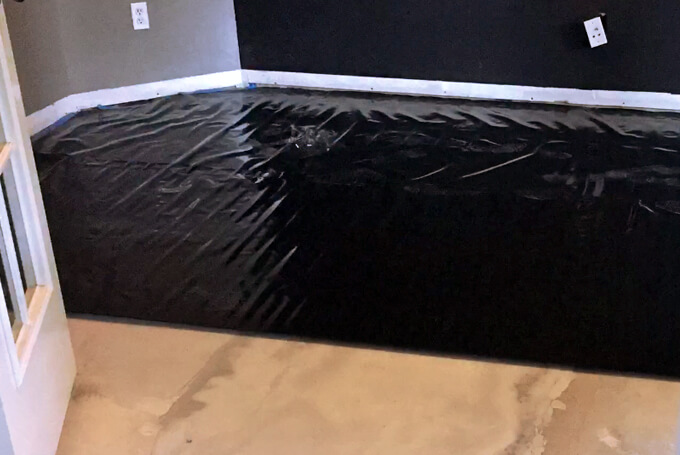
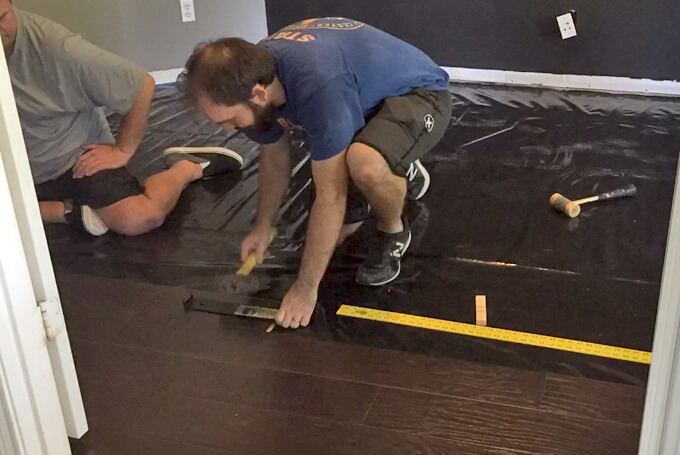
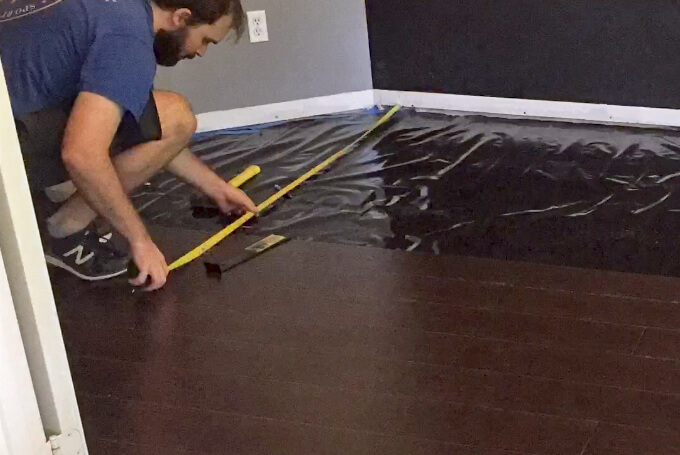
Finally, the day came to lay down our new flooring! First, we laid down a 6 mm flooring underlayment to act as a moisture barrier for the concrete subfloor. We overlapped each row by at least a foot.

Nursery Flooring
A huge thanks to my dad for coming to help with the nursery flooring. I feel bad when I can’t contribute to a project as much as I would like.

Being eight months pregnant and recently finding out I am anemic, my energy levels are pretty low these days so I am very grateful my dad stepped in and was able to assist Brent.

Nursery Flooring
The flooring when down really easily. The only thing they had to do was to cut the first and last piece of each row and then click it all together.

Nursery Flooring

They got in a rhythm and knocked out the whole room in one day, including having to run back across town and get one more package of flooring.

Another lesson we learned, always get one more package than suggested. This room was a little tricky because of the angles of the back wall.

STEP 6: PUT BACK BASEBOARDS

Nursery Flooring

After the baseboards were painted and dried, we used two inch finishing nails to secure the baseboards back to the wall studs.
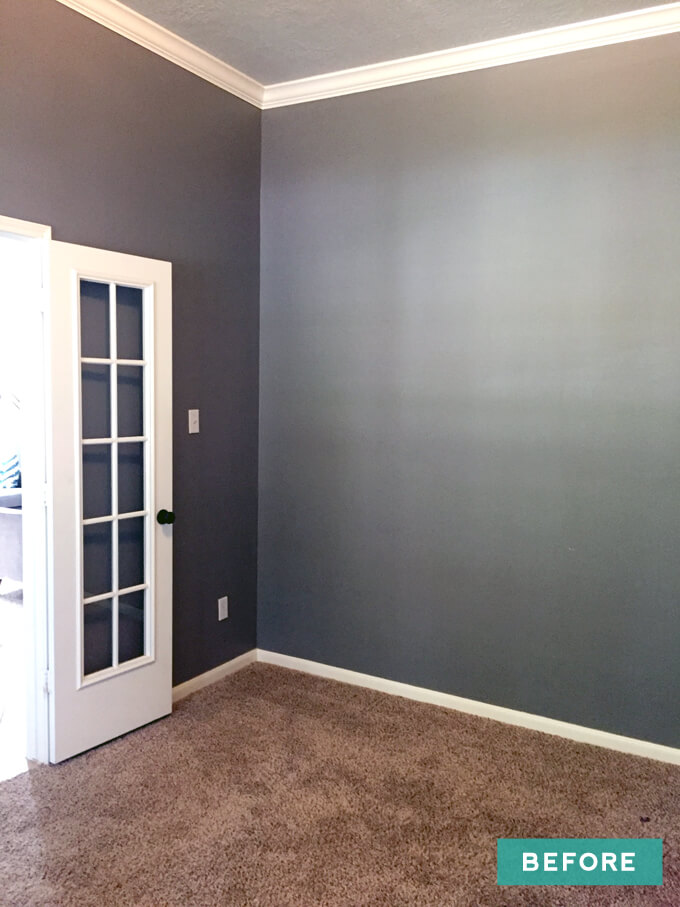
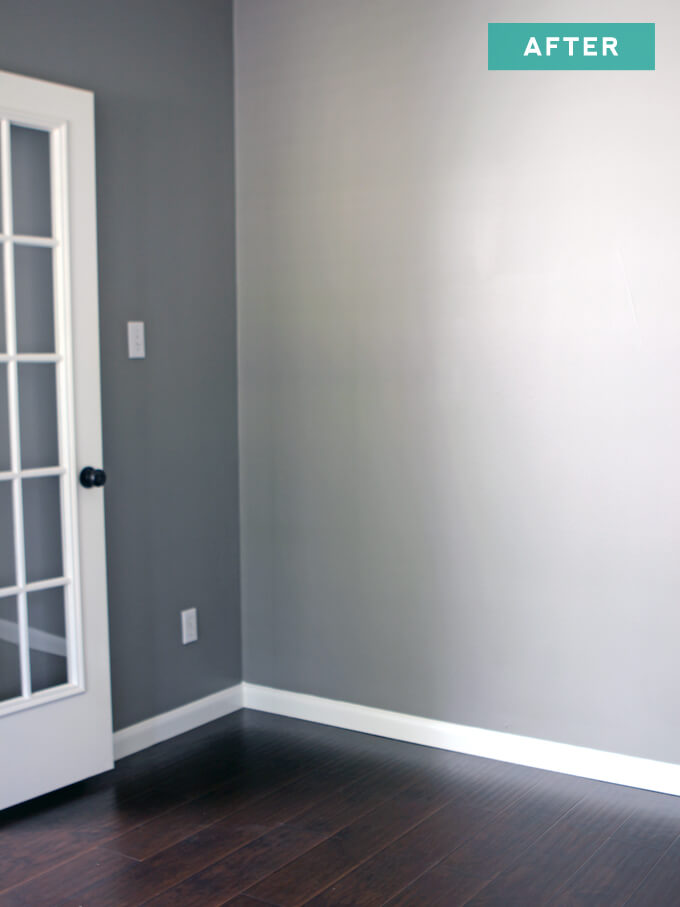
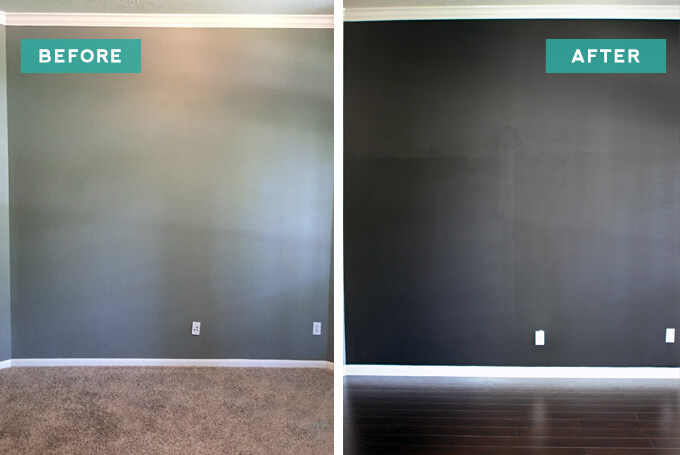
Before & After

Nursery Flooring

Above is our nursery flooring transformation. We said goodbye to tan carpet and hello to dark laminate flooring. You may also have noticed that the back wall color changed as well.

After we pulled the carpet up but before we installed the floors, we took the opportunity to paint the accent wall with chalkboard paint.

Brent is working on an AMAZING chalk art mural for this wall so we will share more about this project soon.

Nursery Flooring

We are extremely pleased with our flooring choice and how everything came together. It was a lot of labor intensive work and required trial and error and patience but having new nursery flooring is definitely worth it.

I have a big fluffy rug that I plan on laying down in the middle of the room and our gray crib really pops against the floors.

This project was the largest nursery project on our list and having it done is a big accomplishment and step towards finishing the nursery. Having this step done will get the ball rolling faster on all of our other projects as well.

The only downside is now we want this flooring throughout the whole house. But that is another project for a much later day.

INSTALL A SMART WIRELESS DOOR LOCK

Install a Smart Wireless Door Lock

A simple tutorial showing how to install a smart wireless door lock. Plus, we are sharing a few thoughts about getting our Security by Reliant smart home security system installed and an offer code for our readers. This post is sponsored by Reliant but as always all opinions and content are 100% our own.

Install a Smart Wireless Door Lock

A few posts back we shared what life was like without a smart home security system. Sure, most of our issues were first world problems but they drove us crazy nonetheless. That is why the day the Security by Reliant installation team showed up to our home it was like Christmas morning.

We were so excited to finally integrate several of their innovative products into our home to not only make life easier but to finally have the peace of mind that our home is now fully protected and monitored.

One perk of choosing Reliant to install all of your smart home products is that you don’t have to worry about setting up any of the equipment. The only piece of the puzzle we were in charge of was to install a smart wireless door lock.

To avoid having to pay a locksmith, we installed the wireless door lock ourselves. It is actually really easy. Follow along below as we show you how to install a smart wireless door lock yourself in just a few simple steps.

In this DIY tutorial we are using a Kwikset SmartCode touchpad electronic deadbolt lock (which comes in the advanced Security by Reliant package or can be added to the premium package). Before we installed the deadbolt lock, the security installer pre-paired it with our Security by Reliant system.

How to Install a Smart Wireless Door Lock

https://amzn.to/2XLdfLH

DIY Tutorial Video: Wireless Door Lock Install

To see new DIY videos on Thursdays, be sure to subscribe to our channel ⇾


Install a Smart Wireless Door Lock
Before we could install a smart wireless door lock, we needed to take off the old lock by removing the two screws next to the deadbolt and the two screws next to the thumbturn.

Install a Smart Wireless Door Lock
To rekey a Kwikset lock, first we inserted the key that came with the lock and turned it 90 degrees clockwise. Then we inserted the smart key tool into the hole above the key and removed the key.

Next, we inserted our new key and turned the key half a turn counterclockwise. We pulled the key out and tested the original key to double check it no longer works.

Install a Smart Wireless Door Lock
With the lock re-keyed the first thing we needed to install was the deadbolt. The cam slot should be in the center of the hole in the door.

Install a Smart Wireless Door Lock
If it isn’t, you can adjust the length of the deadbolt by twisting it to make it longer or shorter.

Install a Smart Wireless Door Lock
Then we attached the screws to either side of the deadbolt.

Install a Smart Wireless Door Lock
Once installed, we tested the deadbolt by twisting the cam slot with a screwdriver.

Install a Smart Wireless Door Lock
After inserting the cylinder into the keypad, we fed the wire through the housing ring. To do this we slid the wire under the deadbolt and passed the metal bar through the cam slot.

Install a Smart Wireless Door Lock
Next, we slid the cable through the hole in the mounting plate and pushed the cable down the small hole in the mounting plate.

Install a Smart Wireless Door Lock
Once the cable was in the small hole, we attached the plate with the two screws. Finally, we pluged the wire into the back of the thumbturn box and attached the mounting plate with two tiny screws.

Install a Smart Wireless Door Lock
Before we inserted the batteries, we held down the lock button and kept it pressed while we inserted the batteries until the lock finished calibrating.

Install a Smart Wireless Door Lock
The best part about this smart lock is it connects with our smart home security system and can be controlled by the Reliant Connect App.

Smart Home Security System Installation Day

Installation day was exciting and a breeze. Whether you love technology or are a little on the hesitant side, the installation team does a great job of making you feel comfortable implementing a smart home security system into your home.

They took as much time as we needed to walk us through the features of each product, explain how they all connect and demonstrate using the Reliant Connect App and security panel to properly control all the equipment.

Install a Smart Wireless Door Lock

We had the following products installed in our home:

  • Security system (window and door sensor, motion detector, control panel)
  • Garage door opener
  • Smart plug
  • Smart bulb
  • 2 Indoor cameras
  • 1 Outdoor camera
  • Wireless door locks with keypad
  • Doorbell with camera

We are DIYers by nature and will do as much as we can ourselves around the house but sometimes it is nice to sit back and let the experts do their thing, especially when it comes to security. The friendly, hardworking and knowledgeable team that came to our home made getting our security system set up extremely easy on us.

Install a Smart Wireless Door Lock

We have been using our smart home security system for about a month now and LOVE it. Being able to turn on lights, open your front door, shut your garage door all from one app on your phone is as amazing as it sounds. Brent and I now compete to see who can log into the Reliant Connect App first and turn on the light or check the door bell camera.

Stay tuned because in the next few weeks we will share how we have integrated the system into our daily routine and what life is like now with a smart home security system. Spoiler Alert: life is much easier and our home is safer.

GOOD NEWS FOR YOU!
If you are interested in signing up for your own Security by Reliant package, use the offer code “STUDIO” and get your first month of service FREE!

Industrial Home Office Organization

Industrial Home Office Organization

We’re sharing our favorite industrial home office organization pieces that not only help control clutter but look cool too!

Industrial Home Office Organization

I don’t know about you but our home office was the room in our home that seemed to collect the most clutter. Whether you spend long days working in a home office like I do or it just gets occasional use during the nights and weekends, controlling all the paper and supplies that stack up in and around the office can be an overwhelming task. I mean, where does all that stuff come from? Am I right?

A few months ago we had to move our office from a room with doors to the front room in our home without doors and I went into a bit of a panic mode. How in the world was I going to keep all my office supplies (and boy do I LOVE office supplies), paperwork and incoming and outgoing mail neat and organized so I wouldn’t be completely embarrassed if someone stopped by unexpectedly to visit?

When I first started planning our home office I knew I needed to incorporate a few essential home office organization pieces to help get the job done. My favorite pieces came from World Market because not only were they practical and functional but also looked like cool vintage industrial decor pieces as well which fit the style of the room perfectly.

Industrial Home Office Organization

Now that our home office makeover is complete I am thrilled with how nicely everything is organized. It is always so much easier to keep things straightened when things have a specific spot to go back to and when everyone in the house knows exactly where things need to go. Plus, since all the organization pieces we picked out pretty much double as decor pieces we killed two birds with one stone and didn’t have to spend a lot extra to decorate the room. Win!

HOME OFFICE VIDEO TOUR

[yotuwp type=”videos” id=”doQ4ZK4LKuE&t=46s” title=”off” description=”off” player=”width=590&modestbranding=0&showinfo=0″]

Subscribe to our YouTube Channel

Like our video? Subscribe and help us reach our goal of 100k subscribers.

7 Industrial Home Office Organization Ideas

Industrial Home Office Organization
#1 Two-Level Tray

You can get a lot of milage out of a tray that sits on your countertop by using it to sort important papers that need attention such as being mailed back out or signed and returned.

A multi level tray works well to distinguish between the different types of paperwork so that paper so paperwork that requires one person’s attention can be in one tray and paperwork that another family member need to return and sign can be in another one.

I use it to keep client folders grouped into projects that need to be started and projects that are currently in progress.

I personally love the industrial style of this tray; not only is it functional, but it looks like a piece of decor sitting out on the counter.

Unfortunately, this exact product is no longer available but this tired tray is cool too.

Industrial Home Office Organization Rolling Printer Stand
#2 Rolling Printer Stand

The printer is a necessary in a home office but it doesn’t look cute when it is out in the open and they are usually too big and oddly shaped to hide.

A fun solution we came up with is to set your printed on an end table with two shelves that can roll out from under your desk.

The printer can be placed on the bottom shelf and extra paper on the top of the rolling table.

The end table could also roll out to provide extra work space. This is a nice solution that allows the printer to be easily accessible while also keeping it out of plain sight when it is not being used.

Unfortunately, this exact product is no longer available but you could add casters to this end table.

Industrial Home Office Organization Industrial Lazy Susan
#3 Industrial Lazy Susan

In keeping with the industrial vibe, a hardware bin lazy susan makes for a really fun, easy, and clean solution to store your most used and best-looking office supplies. From twine to washi tape, everything will have a designated spot and supplies are always organized and easy to grab.

Shop the Hardware Bin Lazy Susan

Industrial Home Office Organization Mail Holder
#4 Industrial Mail Holder

A stylish mail holder placed in a location in your home where you walk by often is a great place to store time-sensitive mail, bills that need to be paid or outgoing mail.

We have one sitting on the front of the desk in our home office so that we never lose a bill in the mound of mail we get and can easily grab the mail that needs to go out as we walk out the door.

Shop the St. Laurent Mail Holder

Industrial Home Office Organization Pencil Cup
#5 Industrial Pencil Cup

Why is it that pens are always laying around the house, but when the time comes that you actually need to use one, you can’t find one anywhere?

A pencil holder on our desk easily solves this problem. Note: not all pencil holders are created equal. I love the size and vintage-industrial appearance of this pencil cup; as you can see, it’s large enough to hold my extensive colored marker and Sharpie collection.

Shop the St. Laurent Pencil Cup

Industrial Home Office Organization Wire Baskets
#6 Wire Baskets for Sorting Mail

Mail clutter was a huge problem in the past in my home. Even when we request to go paperless, we still mail thanking us for going paperless!

With busy daily schedules it is hard to stay on top of sorting the mail, but fortunately, wire baskets make for an easy organization system.

Labeling each wire basket (“file”, “shred” and “recycle”) allows you to easily and quickly assign the paper to its appropriate basket.

Tip: Using smaller baskets forces you to clear them out on a regular basis and keeps clutter at bay.

Charlotte Lined Wire Baskets

Industrial Home Office Organization Metal Trash Can
#7 Metal Trash Can

A trash can in a home office is a must but it doesn’t have to be plain and boring.

This oversized metal trash can looks more like an industrial decor piece rather than a can for storing garbage.

Also, if you are think outside the trash can, it could make for a cool base to hold a large faux plant.

Shop the Embossed Metal St. Laurent Trash Can

Industrial Home Office Organization

There you have it! These are my favorite industrial home office organization pieces!

Having a home office be the first room guests see when they walk in the door seemed a little intimidating to us at first, but we are happy with how easy it has been to keep our office organized just by incorporating these industrial-style storage pieces.

No matter where your work space is, you can have the organized office of your dreams and easily control the clutter with just a few must-have storage pieces.

SHOP THIS POST

FYI: This post contains a few affiliate links to products we used to make this project. Gray House Studio does receive commissions for sales from these links but at no extra cost to you. We appreciate you supporting this site. Read our privacy and disclosure policy. You can also easily shop our recommended products here.

PIN FOR LATER

We've collected seven products that will help control the clutter in your industrial styled home office. Not only are these home office organization pieces helpful, they look really interesting and unique as well. These tips will help you kick start organizing a home office.

Two-Level Desk DIY

Two-Level Desk DIY

Check out to build a wood two-level desk for your home office. This is s great solution if you need a large workspace for multiple monitors. There are woodworking plans available project.

Two-Level Desk DIY

We are finally finished with our home office and are wrapping up our home office posts by sharing one more DIY furniture project and the focal point of the room, our two-level desk. This desk design is great if you need a desk with a lot of workspace and one that floats in the middle of the room because it includes a front panel for cord management.

I liked that the top level would hide most of what I had on my desk on the lower level. So we snapped a picture for inspiration and Brent drew up some plans of a modified version to use to build our desk.

How To Build a Two-Level Wood Desk

PROJECT PLANS

DIY Wood Desk Woodworking Plans

Get our Wood Two-Level Desk Plans

When you purchase our DIY wood two-level desk plans you get a 10 page PDF with a detailed materials list, a cut list, exact dimensions for each piece, building instructions – we appreciate you supporting Gray House Studio!

TUTORIAL VIDEO

[yotuwp type=”videos” id=”pFH56Oiq3RY” title=”off” description=”off” player=”width=590&modestbranding=0&showinfo=0″]

Subscribe to our YouTube Channel

Like our video? Subscribe and help us reach our goal of 100k subscribers.

STEP BY STEP GUIDE

Two-Level Desk DIY

1. To make the four 2″x12″s easier to work with and transport, we had the boards cut down at the home improvement store first.

We had them cut so there was a little extra room on each side from our desk measurements since more than likely the panel saw they use wouldn’t cut the boards exactly square.

We had to make the precise cuts on our miter saw back at home but because the boards are 2”x12”s and our miter saw only cuts about eight inches, we had to cut one half of the board and then flip the board over and cut the other half.

We used a framing square to mark the cut so we could make sure the cut on the miter saw was straight and square.

Two-Level Desk DIY

2. Each side of the desk is made up of three boards that we connected together with pocket hole screws. We used our Kreg Pocket Hole Jig and https://amzn.to/2Hg0SNh”>drill to drill pocket hole screws in the top of the legs to attach the top boards to the sides in a later step.

Two-Level Desk DIY

3. Before screwing the boards together, we used clamps to hold the boards to our workspace to make sure they stayed flush and didn’t move around. We connected the boards using pocket hole screws and wood glue.

Two-Level Desk DIY

4. After both sides (legs) were assembled, we stood them up and attached clamps to the base to prevent them from falling over.

Then we started attaching the top of the desk with pocket hole screws using the pocket hole jig and wood glue.

The top of the lower part of the desk is made up of multiple 2”x12”s so before we attached them to the side of the desk we needed to attach the boards together with pocket hole screws and wood glue like we did with the sides of the desk.

Two-Level Desk DIY

5. We used pocket holes screws to attach the top level of the desk to the sides.

Two-Level Desk DIY

6. Next, we needed to add a back panel on the top of the desk for the plywood panel front to attach to that sits between the two taller side pieces.

We had to cut the 2”x12” down using the table saw to fit in that slot.

To make the board easier to screw in, we attached a small block of wood on the inside of each of the sides of the desk at the same level as the lower leg brace.

We used a framing square and a straight edge to make the mark to make sure the block was perfectly aligned.

Then we glued and nailed the blocks in place so we could set the 2″x12” on them to attach it to the desk.

Two-Level Desk DIY

7. We attached our back panel board using wood glue and pocket hole screwed it into the existing top of the desk and the side braces.

Two-Level Desk DIY

8. To give us something to attach the front panel piece to at the bottom of the desk we added a 2”x4” to the bottom of the desk that we pocket hole screwed into both sides of the legs.

Two-Level Desk DIY

9. To give the front panel something to attach to in the middle we added a 2″x4″ even with the 2″x12″ installed previously and under the top level of the desk.

These boards allowed us to nail our large sheet of plywood into the top, middle and bottom of the desk, making sure it was nice and secure.

Two-Level Desk DIY

10. Next, we cut our plywood piece down to the size we needed (40-1/2” x 61“) on the table saw.

Two-Level Desk DIY

11. We didn’t install the front panel just yet, but did do a test fit to make sure it fit perfectly in the inset of the desk before taking the desk inside the house.

Two-Level Desk DIY

12. Because the lower level of the desk is made of multiple boards, we needed to create a smooth surface.

To do this we filled in all the joints between the boards with wood filler and then after it dried went over the entire top of the desk with an orbital sander to give it a consistent and even surface.

Before bringing it in the house, I stained the entire surface of the desk with our favorite stain while Brent painted the front panel of the desk gray (SW Dovetail) to match our home office cabinets we built.

Two-Level Desk DIY

13. Next, we brought the desk in the house to do the final few steps.

Thankfully, Brent’s dad was in town visiting during this part because the desk is pretty heavy duty and there was no way I was going to be able to even lift it let alone carry it from the garage to the front of the house.

The final step before we permanently attached the front plywood panel was to cut a hole in the the back of the top of the lower level of the desk for our computer cords to run through.

We did this by drilling two holes in the desk and cutting sections of the wood away using a jigsaw.

The two holes allowed the jigsaw to rotate at the corners of the cut. We also attached a thin piece of wood by use clamps to attach it to the top and bottom of the lower level of the desk to prevent the wood from splintering during the cut.

Since the jigsaw can make a bit of a mess, while Brent was making the cut, I followed close behind with a shop vacuum to minimize the mess.

Two-Level Desk DIY

14. To hide the cords running from the desk to the outlet, we cut a small hole in the rug under the desk and ran the cords under the rug making them completely invisible and out of the way when looking at the desk.

Two-Level Desk DIY

15. Finally, once all the cables and cords were run out from under the desk, we attached the front panel to the desk using a nail gun and finishing nails to hold it in place.

Two-Level Desk DIY

After the desk was complete, I added a few decor and organization pieces to finish off the industrial/rustic look we are going for in our home office.

Check out the post below on all the organization pieces I used in our home office.

We are really happy with the design of the desk and how well it works in this space. Jake the cat loves to lay on the top level of the desk while I work which I love because it keeps him off my keyboard.

Two-Level Desk DIY

We have plenty of surface space for both our computers and lots of room for me to spread out with all of my planners, binders and notebooks that I use on a daily basis. My two favorite aspects of this desk is obviously the cord management solution as well as it is tall enough to store a printer stand on casters underneath keeping the less attractive aspects of a home office out of sight.

Two-Level Desk DIY

Be sure to check out our home office makeover to see all of our home office projects and take a video tour!

PIN IT FOR LATER

A woodworking tutorial showing how to build an all wood desk. This two-level desk design provides a large work space for those working with two monitors and includes cord management solutions so it can float in the middle of the room. Woodworking plans are available for this project as well a how to build a wood desk tutorial video.

Life Without A Smart Home Security System

Life Without a Smart Home Security System

As we are anxiously awaiting to have our new Security by Reliant smart home security system installed, we took some time to reflect on how life without a smart home security system made us act a bit ridiculous. This post is sponsored by Reliant but as always all opinions and content are 100% our own.

4 Ridiculous Things You Do When You Don’t Have a Smart Home Security System

These days we are pulled in a million different directions which means we are often scatter brained when it comes to making sure our home is locked up and protected. Sometimes just the simplest of tasks can be stressful due to not feeling safe or being inconvenient. Here is what life has looked like in the past for Brent and I without a smart home security system. At times it can make us act a bit ridiculous.

What We Do Now…

1. When a Pesky Solicitor Rings the Doorbell

Life Without a Smart Home Security System
“Maybe he can’t see me … or maybe I look crazy enough to make him leave.”

2. When We Try to Close the Garage Door Without a Remote

Life Without a Smart Home Security System
Before every bike ride Brent works in a garage door sprint workout.

3. When We Hear a Noise in the Backyard at Night

Life Without a Smart Home Security System
Be afraid, be very afraid of Brent and his Nerf gun.

4. When We Can’t Remember if We Shut the Garage Door

Life Without a Smart Home Security System
“I’m like 80%, maybe 40% sure we shut the…Brent, do you remember if we shut the garage door?”

Watch what our life was like without a smart security system:

The scenarios in this video are reenactments based on real life events.

To see new DIY videos on Thursdays, be sure to subscribe to our channel ⇾


Out With the Old Security System

When we bought our home it had a “this house is protected by…” sign in our front flower bed and some really intimidating stickers plastered on all the windows around the house warning intruders to beware because we have a security system. But the truth is the security system in our home was the one that was originally installed when the house was built making it around 15 years old.

Let’s face it, it was a dinosaur by today’s technology standards. It could technically do it’s job by putting off an ear piercing alarm and contacting the police in an emergency but I believe it is the equivalent of still using a Motorola Razr cell phone over a smartphone today. Sure, it works but you are seriously missing out on all the awesome and convenient technology that some genius worked hard to develop. And once you get a taste of all the cool features you wonder how you ever lived without it.

Life Without a Smart Home Security System

The Death of Our Old Security System

Oh, but when I say that our alarm could technically still do its job, I lied. We never used the alarm because the previous owner never gave us the code to disarm it and we didn’t feel like investing in getting it re-programed because it was so ancient. So we just ignored it.

That is until one night (I’m not pointing fingers, but…) Brent was messing around with the keypad and somehow pushed the instant button which meant that if any door opened, the alarm would immediately go off. A few hours later, Brent opened the back door and suddenly we both dropped to the ground at the deafening and unexpected sound of the panic alarm.

We tried everything to turn it off. Even just pounding on the keypad hoping aggression would scare it off. The cat was freaking out running around in circles. I was pretty much ready to just run out the door and let the security system win. It was not hooked up to call the police but it was so loud that we knew potentially the neighbors might call the cops if we left it going long enough. Finally, in a moment of desperation Brent cut the wire to the speaker. Then, unplugged it in the closet and the attic putting the final nail in the coffin of our antiquated security system.

In With a New Smart Home Security System

In all seriousness, as DIYers we invest not only our money but also time and energy into our home. It is our haven and our canvas so we knew we didn’t want to go too long without having a way to protect and monitor it. Plus, with a baby coming in September I really wanted the comfort of knowing our house is safe along with the convenience of controlling areas of our home with the push of a button so I can focus on the important things.

What We Are Looking for in a Home Security System Solution

When looking for a smart home security system solution we are looking for one that provides protection, peace of mind and convenience. We hope to also integrate a doorbell camera, smart bulbs, and additional cameras. To be really picky and take it a step further, we are looking for an easy solution to control everything with just one app rather than having a lot of different devices running independently.

When the Security by Reliant team reached out to us about partnering together to implement a unique smart home security solution in our home we were ecstatic and jumped at the chance when we learned that they offer a variety of options such as a smart home security system, a doorbell with a camera, wireless door locks, smart plugs, indoor and outdoor cameras and garage door openers. Plus, you can access all your connected devices from anywhere with the Reliant Connect app. Just one app, now that is what we are talking about!

Security by Reliant offered everything on our detailed wish list and then a few extra features that we didn’t even know existed but are excited to implement in our home like geofencing. The best part is they offer different packages based on your budget and needs.

Because this is 2016, we are looking for more than just protection when it comes to monitoring our home. Being able to set up our home to run according to our unique schedule is a dream come true for us tech nerds. And no more scratching our heads over if we locked the door or not sounds AMAZING! We are pumped to get our Security by Reliant products installed and bring our house into the 21st century. We will be back to share more details about installation day soon and what life is like with a smart home security system, so stay tuned!

Tell Us: What is the most ridiculous thing you have done or has happened to you when it comes to your home?

If you like this video and can relate to any of our crazy antics, we would love for you to pin and share!
↓ ↓ ↓ ↓ ↓ ↓

Life Without a Smart Home Security System